
SAML configuration
The SAML 2.0 configuration page section by section, for the Admin Portal and the Self-Service Portal configuration.
The Admin Portal and the Self-Service Portal each have a SAML 2.0 configuration page with the same five numbered sections. The table shows how the two differ; choose the configuration you are setting up below to see its instructions.
Admin Portal and Self-Service Portal configurations compared
Section titled “Admin Portal and Self-Service Portal configurations compared”| Admin Portal configuration | Self-Service Portal configuration | |
|---|---|---|
| Sections 1 to 4 | Yes | Yes, with its own values |
| Admin Portal roles | Yes, between sections 2 and 3 | No: access is decided per Service Context |
| Section 5 | Admin Portal Login | Self Service Portal Login |
| Enable switch | Enable SAML 2.0 Admin Dashboard Authentication | Enable SAML 2.0 Self Service Authentication |
| Saving | Needs at least one default role | Can’t be switched off while Email Magic Link is off. See Self-Service Portal authentication. |
Which configuration are you setting up?
Choose a configuration to show the instructions.
Admin Portal: open Admin Access Control → Authentication in the Organization left navigation and click Enable (or Edit) on the SAML 2.0 row.
Self-Service Portal, also used by Captive Portal SAML: open Selfservice Access Control → Authentication in the Organization left navigation and click Enable (or Edit) on the SAML 2.0 row.
Work through the sections top to bottom. Section 1 holds the values your IdP needs; sections 3 and 4 hold the values your IdP gives back. Keep the IdP’s console open next to the page. For Entra, see Microsoft Entra ID.
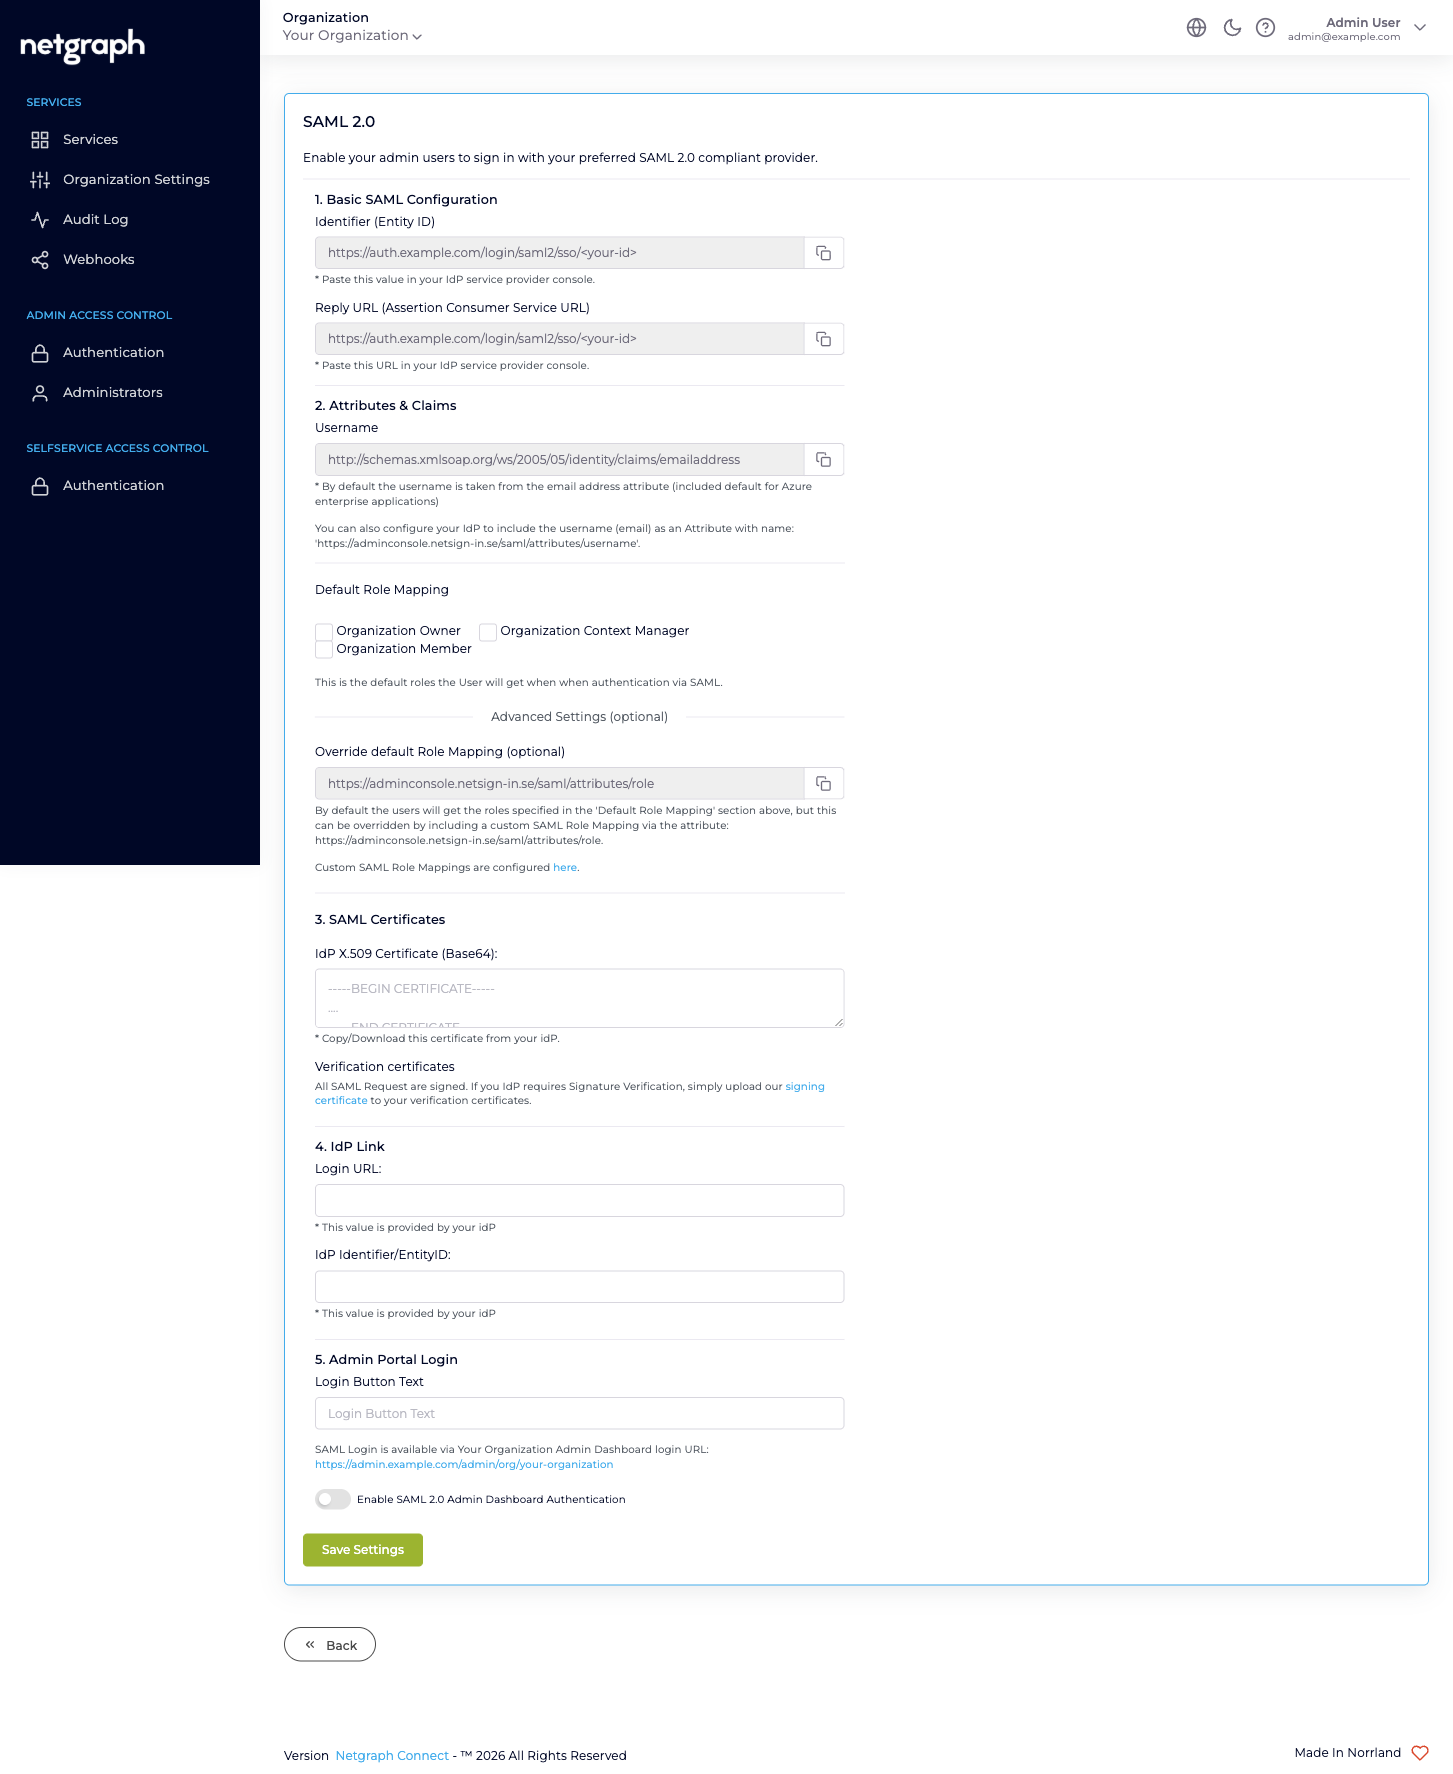
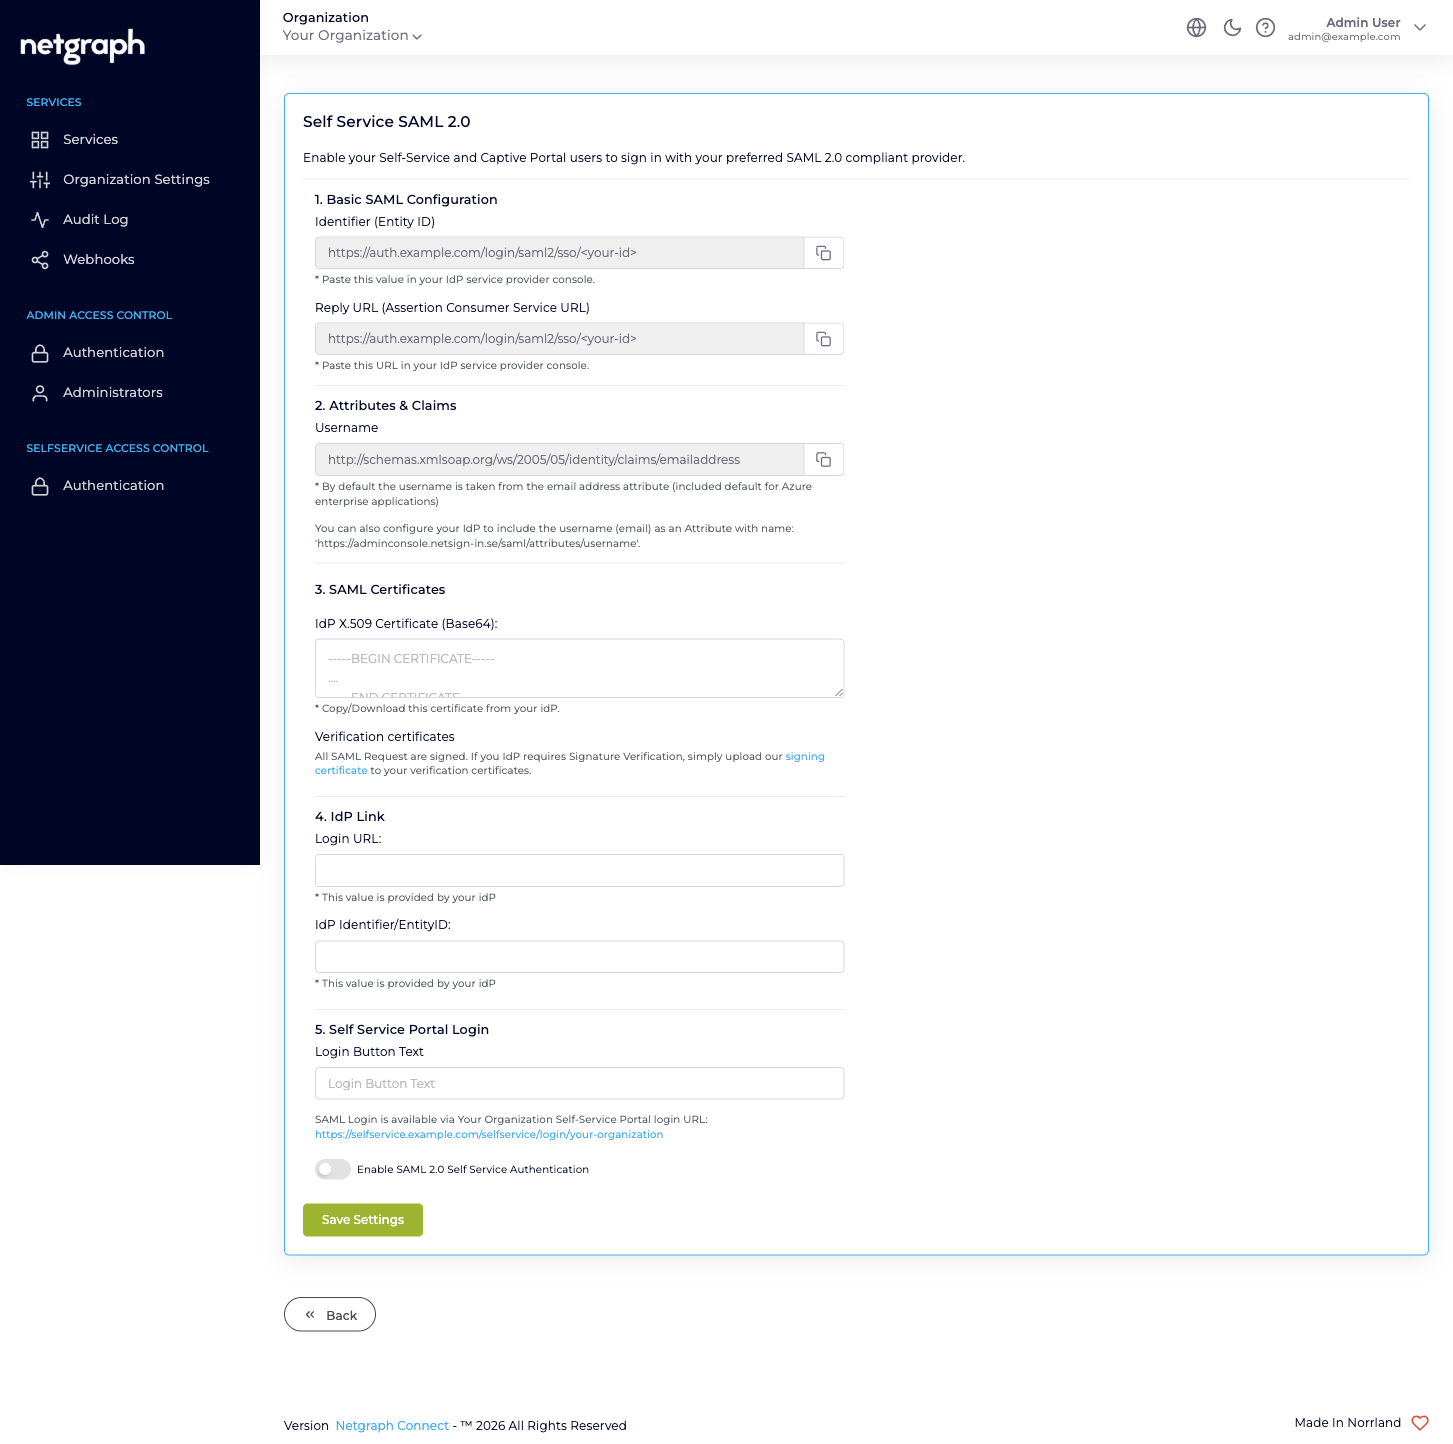
1. Basic SAML Configuration
Section titled “1. Basic SAML Configuration”Two read-only values, each with a copy button. Paste them into the IdP application for this configuration.
- Identifier (Entity ID): the platform’s identifier for this configuration. It ends in a short id that is unique to your Organization and to the configuration.
- Reply URL (Assertion Consumer Service URL): where your IdP sends its response. It is the same URL as the Entity ID.
The Admin Portal and Self-Service Portal configurations have different values, which is why each needs its own application in your IdP.
2. Attributes & Claims
Section titled “2. Attributes & Claims”Username shows the claim the platform reads the username from by
default: http://schemas.xmlsoap.org/ws/2005/05/identity/claims/emailaddress,
which Entra sends by default. The text below it names an alternative
attribute, https://adminconsole.netsign-in.se/saml/attributes/username,
for when your IdP can’t send the right value in the email claim.
Nothing here needs filling in.
How the username is chosen
Section titled “How the username is chosen”The platform takes the username from the first of these that the IdP’s response contains:
- The attribute
https://adminconsole.netsign-in.se/saml/attributes/username. - The email-address claim
http://schemas.xmlsoap.org/ws/2005/05/identity/claims/emailaddress. - The Name ID of the response.
Use the username attribute when the email claim doesn’t carry the address the user is known by on the platform, for example when users sign in to the IdP with one address but are invited to the platform under another. The username is not case-sensitive.
If an administrator with that username already exists, the user is signed in to that account. Otherwise the user is added to Administrators with the source SAML on the first sign-in. See Managing administrators.
The username must be the email address the user was given access under in the Service Contexts. On the Captive Portal, it is matched against the email patterns of the Sign-In Context’s Access Policies.
Admin Portal roles
Section titled “Admin Portal roles”Every administrator who signs in through SAML gets the roles of the Default Role Mapping, unless the IdP sends a role that selects a Custom SAML Role Mapping.
Default Role Mapping
Section titled “Default Role Mapping”Tick at least one of Organization Owner, Organization Context Manager and Organization Member; the configuration can’t be saved without one.
With Organization Member as the default, users the IdP lets through can view but not change anything. Higher roles are then granted under Administrators, through Teams with SCIM provisioning, or with a Custom SAML Role Mapping (below).
The Default Role Mapping is added at every SAML sign-in, also for users provisioned over SCIM. Keep it at Organization Member when roles come from Teams.
A configuration created before the current role model can show a Legacy Default Role Mapping instead, with Default Role Mapping turned off. Click Remove Legacy Default Role Mapping to use Default Role Mapping.
Advanced: Custom SAML Role Mappings
Use a Custom SAML Role Mapping to give members of a specific IdP group other roles than the default, for example Organization Owner.
A Custom SAML Role Mapping is a name you choose, for example
nac-team-lead, linked to one or more of the three roles. When the
IdP sends that name as the user’s role, the user gets the mapping’s
roles instead of the Default Role Mapping.
-
Create the mapping
Click the here link under Override default Role Mapping (optional). Click Add SAML Role, enter the name and add the roles on the details page. Give every mapping at least one role.
-
Have the IdP send the name as the role
The platform reads the role from either of these, in this order:
- The attribute
https://adminconsole.netsign-in.se/saml/attributes/role, shown under Override default Role Mapping (optional). - The IdP’s standard role claim:
http://schemas.microsoft.com/ws/2008/06/identity/claims/role(Microsoft Entra ID and ADFS) orhttp://schemas.xmlsoap.org/ws/2005/05/identity/claims/role.
In Entra, use an app role whose value is the mapping name: see Microsoft Entra ID.
- The attribute
The value has to match the mapping name exactly, including upper and lower case. If the IdP sends a value that matches no mapping, or no role at all, the user gets the Default Role Mapping.
Self-Service Portal access
Section titled “Self-Service Portal access”The Self-Service Portal configuration has no roles. After sign-in, what the user can do is decided in each Service Context:
- In a Sign-In Context, by the Access Policy whose email pattern matches the user, and its Self-Service permissions.
- In an EasyPSK Context, by the Wireless Personal Networks the user has been invited to and the user’s role on each.
- In an Endpoint Manager Context, by the Endpoint Identity Groups the user has been added to, or that enrol the user automatically on the first sign-in.
Invite users, or set up enrolment, in each Service Context. SAML only changes how they sign in.
Captive Portal access
Section titled “Captive Portal access”Captive Portal sign-in uses this configuration. Guests are let in by the Sign-In Context’s Access Policies: the policy whose email pattern matches the username must have Enable SAML Login turned on. See SAML SSO.
3. SAML Certificates
Section titled “3. SAML Certificates”Each configuration has its own IdP certificate and its own signing certificate selection.
- IdP X.509 Certificate (Base64): paste your IdP’s signing
certificate, including the
-----BEGIN CERTIFICATE-----and-----END CERTIFICATE-----lines. The platform uses it to verify that responses come from your IdP. - Signing certificate: the certificate the platform signs its requests with, its expiry date and a Download link. Your IdP needs it only if the IdP verifies request signatures. When the platform publishes a new one, see SAML signing certificate.
Warning
The platform trusts one IdP certificate at a time. When your IdP starts signing with a new certificate, paste it here at the same time: responses signed with the other certificate are rejected. Users who are already signed in are not affected.
4. IdP Link
Section titled “4. IdP Link”Use the values from the IdP application that belongs to the configuration.
- Login URL: the IdP’s single sign-on URL, where the platform redirects users to sign in.
- IdP Identifier/EntityID: the IdP’s own identifier, which it puts in the Issuer of every response.
5. Portal Login
Section titled “5. Portal Login”In the Admin Portal configuration the section is called Admin Portal Login, and the switch is Enable SAML 2.0 Admin Dashboard Authentication.
In the Self-Service Portal configuration the section is called Self Service Portal Login, and the switch is Enable SAML 2.0 Self Service Authentication.
- Login Button Text: the label on the SAML button on that portal’s sign-in page, for example Sign in with Entra ID. Fill it in, so the button has a label.
- The sign-in URL: a read-only link to your Organization’s sign-in page for that portal. Share it with the users who sign in this way.
- The enable switch: SAML is offered on the sign-in page only when the switch is on. With the switch off, the configuration can be saved and prepared without being used.
While Email Magic Link is disabled, a hint under the switch says that SAML 2.0 is the only sign-in method and must stay on.
Click Save Settings. The IdP values in sections 3 and 4 have to be filled in before you can save, even with the switch off.
The Admin Portal configuration also needs at least one default role.
Administrators who sign in through SAML are not asked for the platform’s Mandatory Email MFA; multi-factor authentication is handled by the IdP. Email MFA still applies to Form Login, which suits the break-glass account described in Admin Portal authentication.
After saving
Section titled “After saving”Sign in through SAML once from a private browser window, while you stay signed in to the Admin Portal in your normal window, so that you can correct the configuration if sign-in fails. Common problems are covered in Organization diagnostics.