
Managing devices — bulk and single
Add devices to an iPSK Group one MAC at a time or in bulk via CSV. Update descriptions, retire devices at end-of-life, and keep the MAB and iPSK workflows in sync across admin and Self-Service.
A device is on the iPSK network when its MAC address is in the right Group. Adding, updating, and removing devices is the most common day-to-day operation in an iPSK deployment. This page covers both admin-side and Self-Service-side flows for the whole lifecycle.
Where devices show up
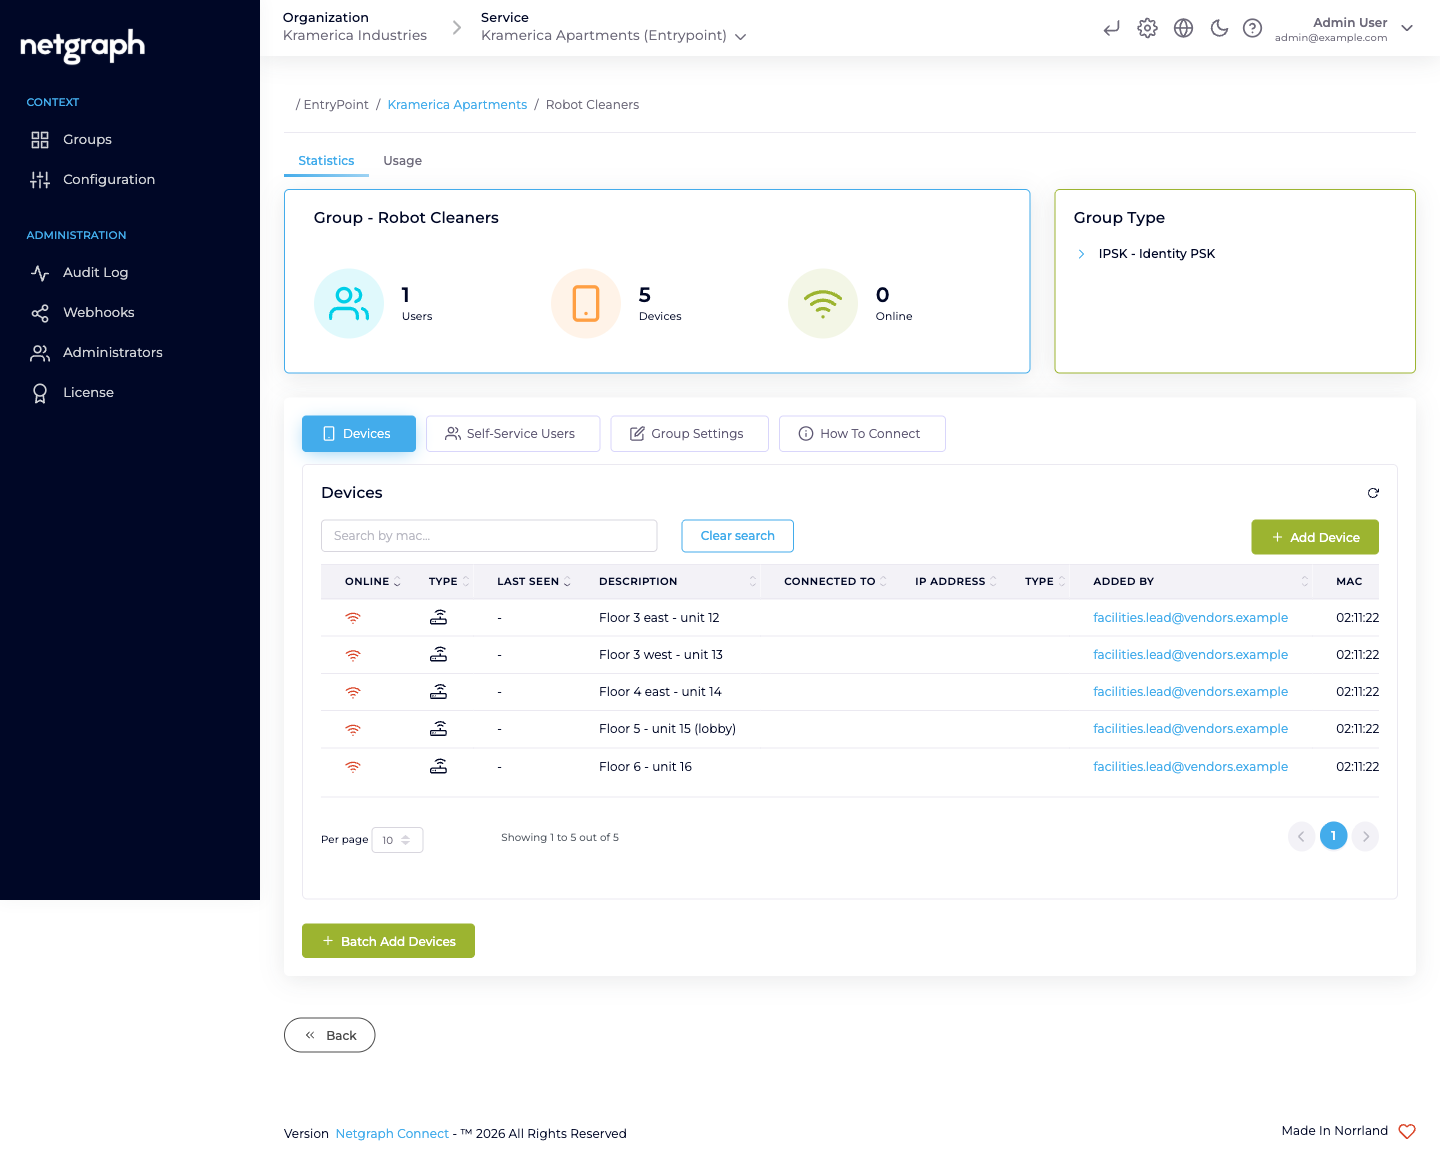
Section titled “Where devices show up”Each Group’s detail page has a Devices tab. The same data lives in two places:
- Admin side. Rich table view with filter and sort — used by Organization admins to audit the full fleet.
- Self-Service portal. Accordion-style per-device view scoped to the Group the user has access to. Most day-to-day device CRUD happens here, performed by the Group’s delegates.
Columns / accordion fields include:
- Description — free-text, set when the device is added; shown in both views.
- MAC — lowercase, colon-separated. Immutable once set.
- Status — Online / Offline based on the most recent RADIUS accounting record.
- Added by / Added date — who onboarded the device.
- Updated by / Updated date — last edit.
- Last seen online — timestamp of the last Interim-Update.
- Connection info — NAS, port, VLAN where the Cisco controller reports them.
Adding a single device
Section titled “Adding a single device”Use when a one-off device arrives — a replacement robot, a new test signage display, a single smart-lock replacement.
From the admin dashboard
Section titled “From the admin dashboard”-
Open the Group's Devices tab
From the Group detail.
-
Click Add Device
The single-add dialog opens.
-
Enter the MAC
12 hexadecimal characters, any common format (colons, dashes, no separator). Stored lowercase with colons.
-
Enter a Description
Short free text — Robot-cleaner #12 (floor 4), Signage display — reception east, Smart lock — server room.
-
Save
The device appears in the list. Next association fetches the Group’s PSK and authenticates against it.
From the Self-Service portal
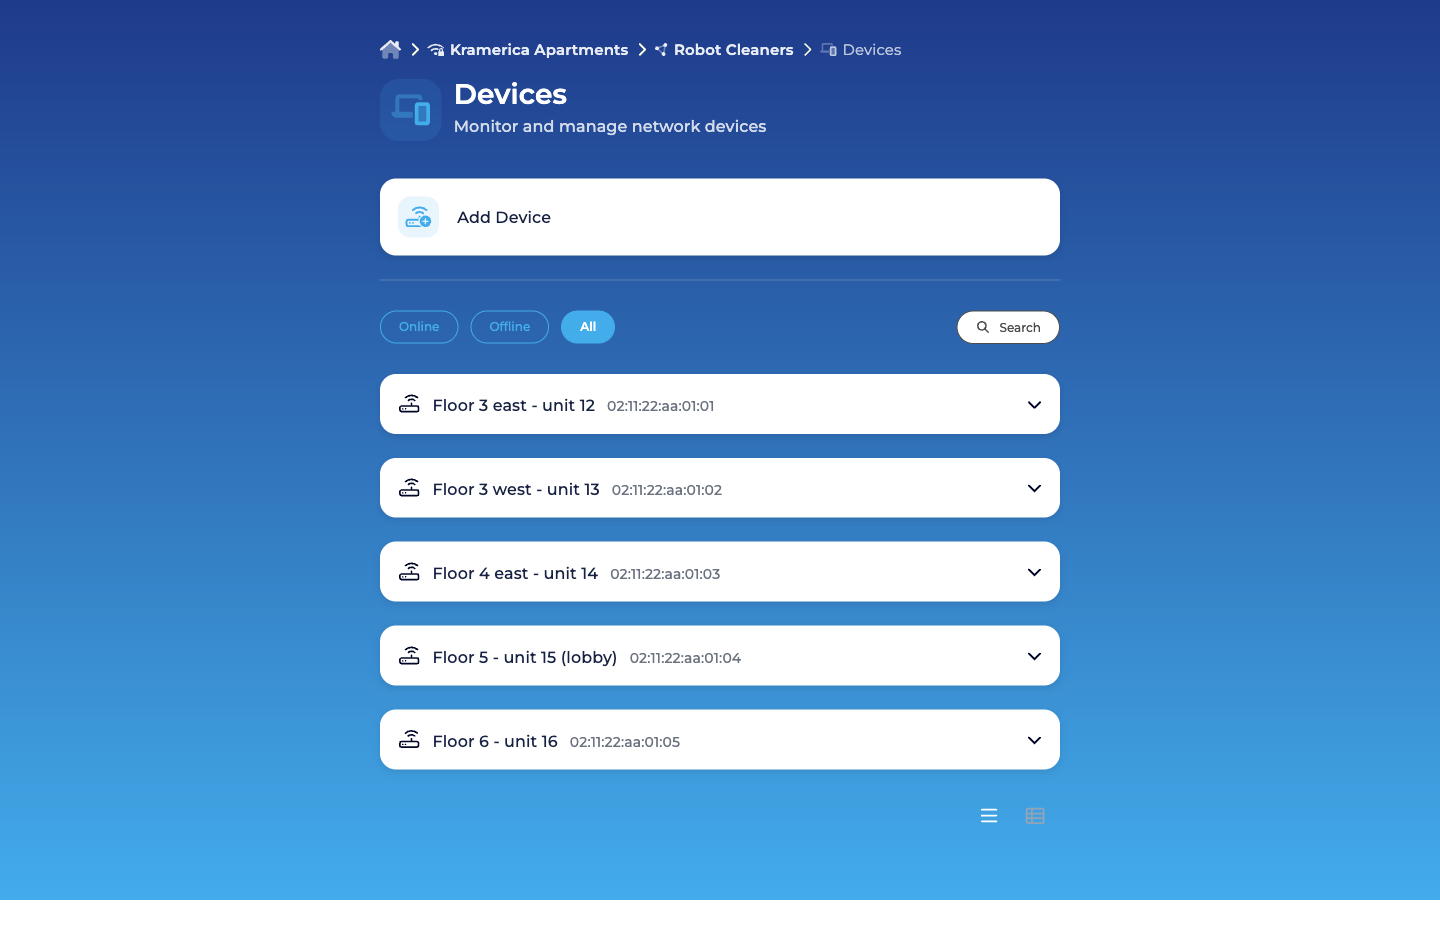
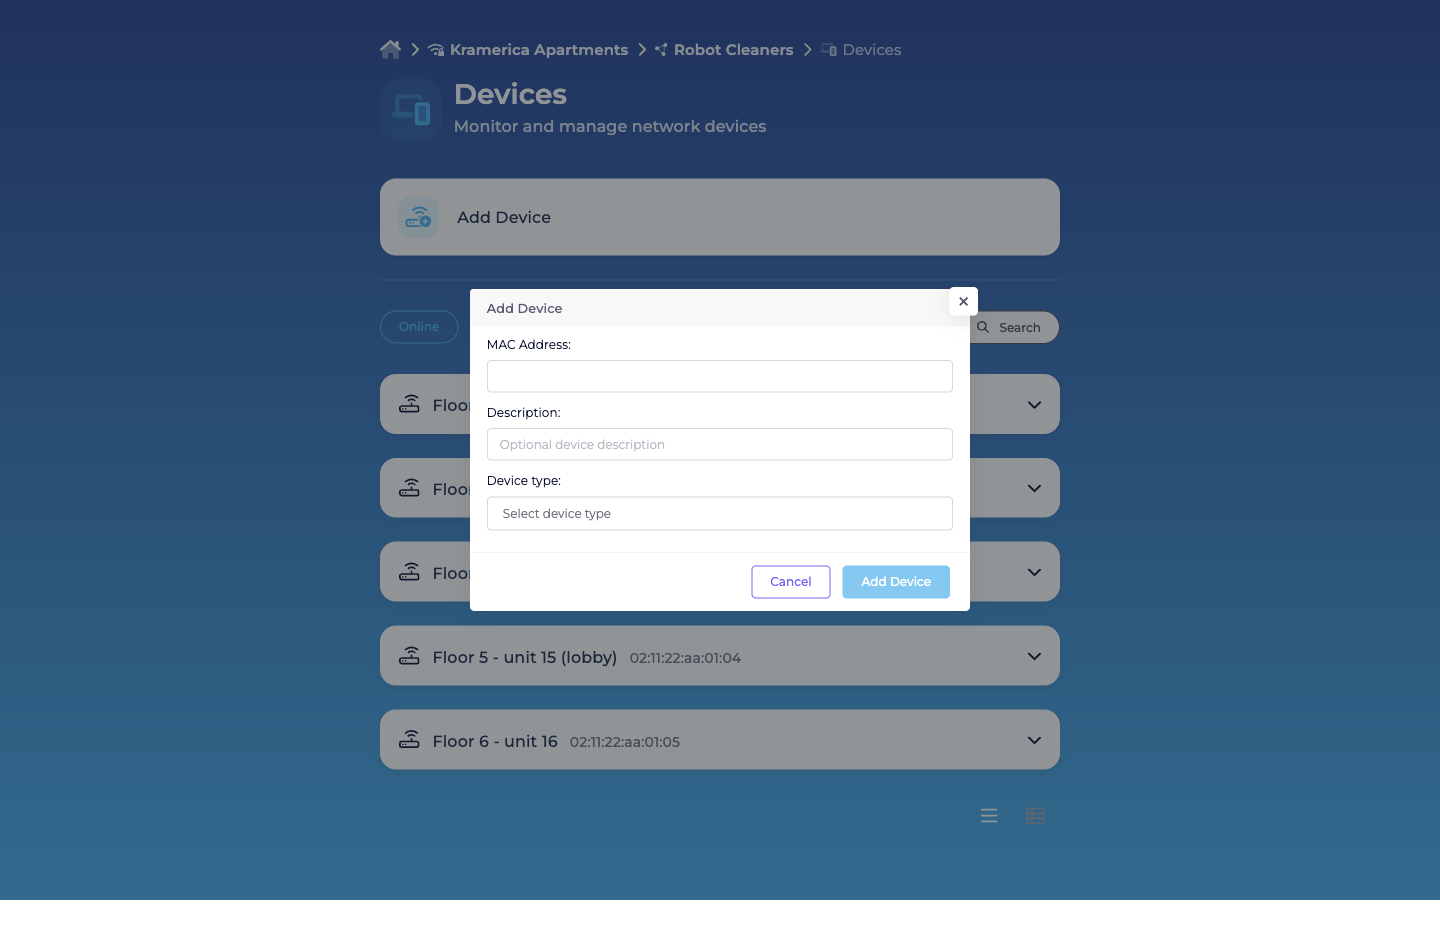
Section titled “From the Self-Service portal”A Self-Service User with the User (default) role in the Group (the always-on permission) can add devices directly from the portal’s Devices card. The Self-Service Add Device dialog takes MAC Address, an optional Description, and a Device type. Delegates do this themselves as new units arrive — no admin ticket.
Bulk-importing via CSV
Section titled “Bulk-importing via CSV”For onboarding a fleet — the building’s first hundred cleaning robots, a full rollout of digital signage — the CSV bulk upload is the right path.
-
Prepare the CSV
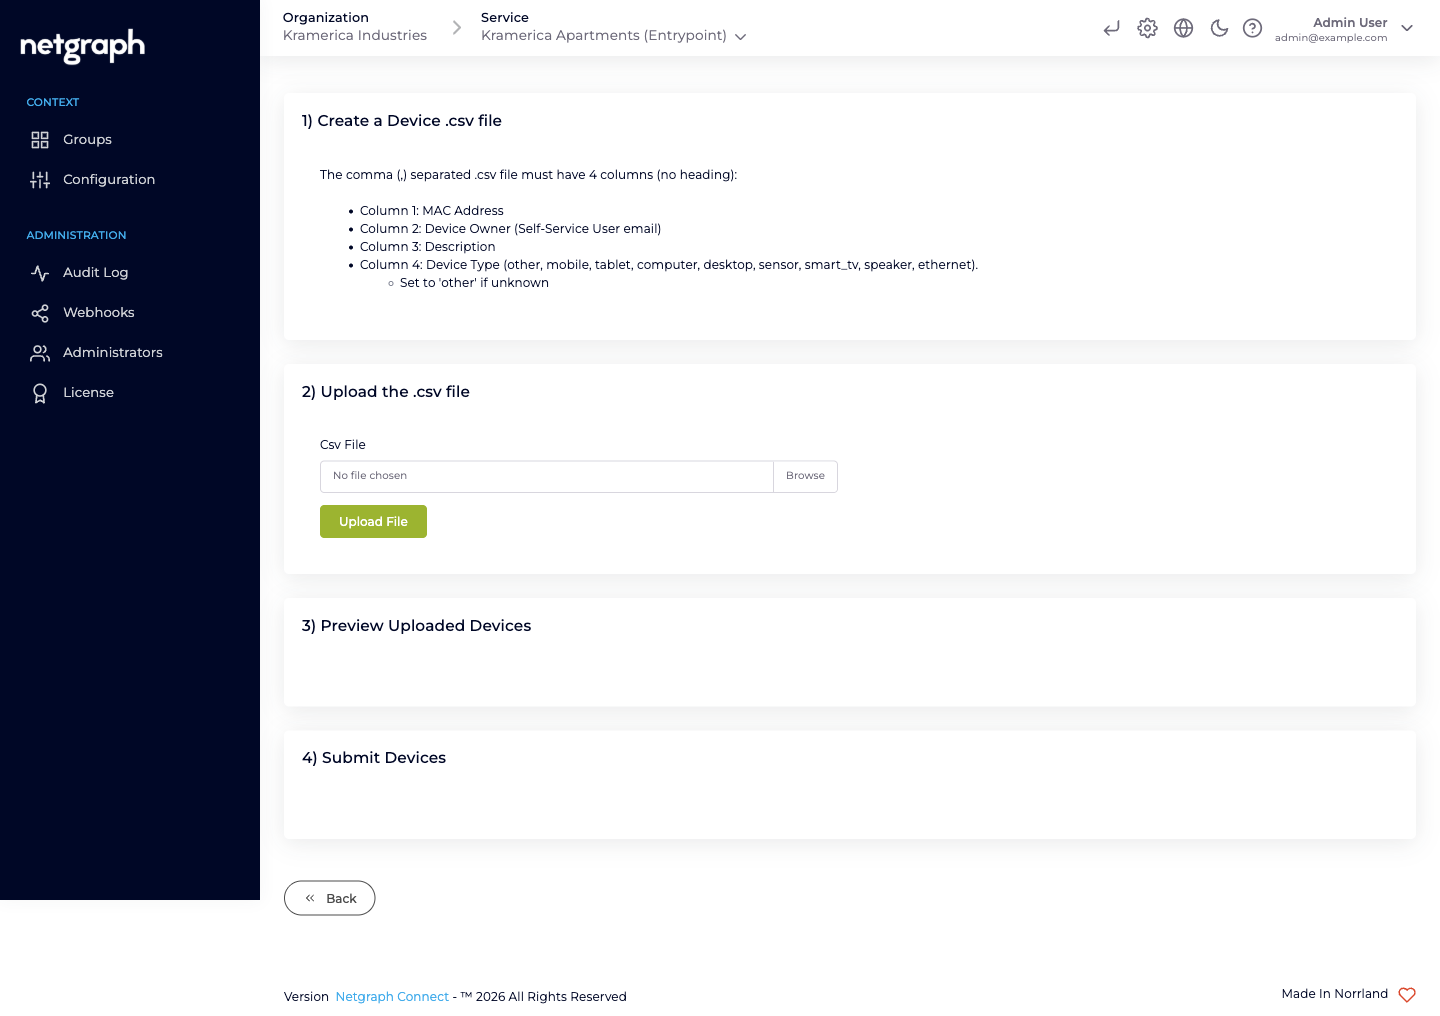
The upload form spells out the exact format: a comma-separated
.csvwith no heading row and four columns:- MAC Address — any common format; stored lowercase with colons.
- Device Owner — the email of a Self-Service User on this Group. If the email isn’t a member yet, the batch submission auto-adds them as a User (default).
- Description — free text.
- Device Type — one of
other,mobile,tablet,computer,desktop,sensor,smart_tv,speaker,ethernet. Useotherif unknown.
Example row:
02:11:22:aa:01:01,facilities.lead@vendors.example,Floor 3 east - unit 12,other -
Open the Group's Devices tab
On the Group detail page, click Batch Add Devices.
-
Upload and preview
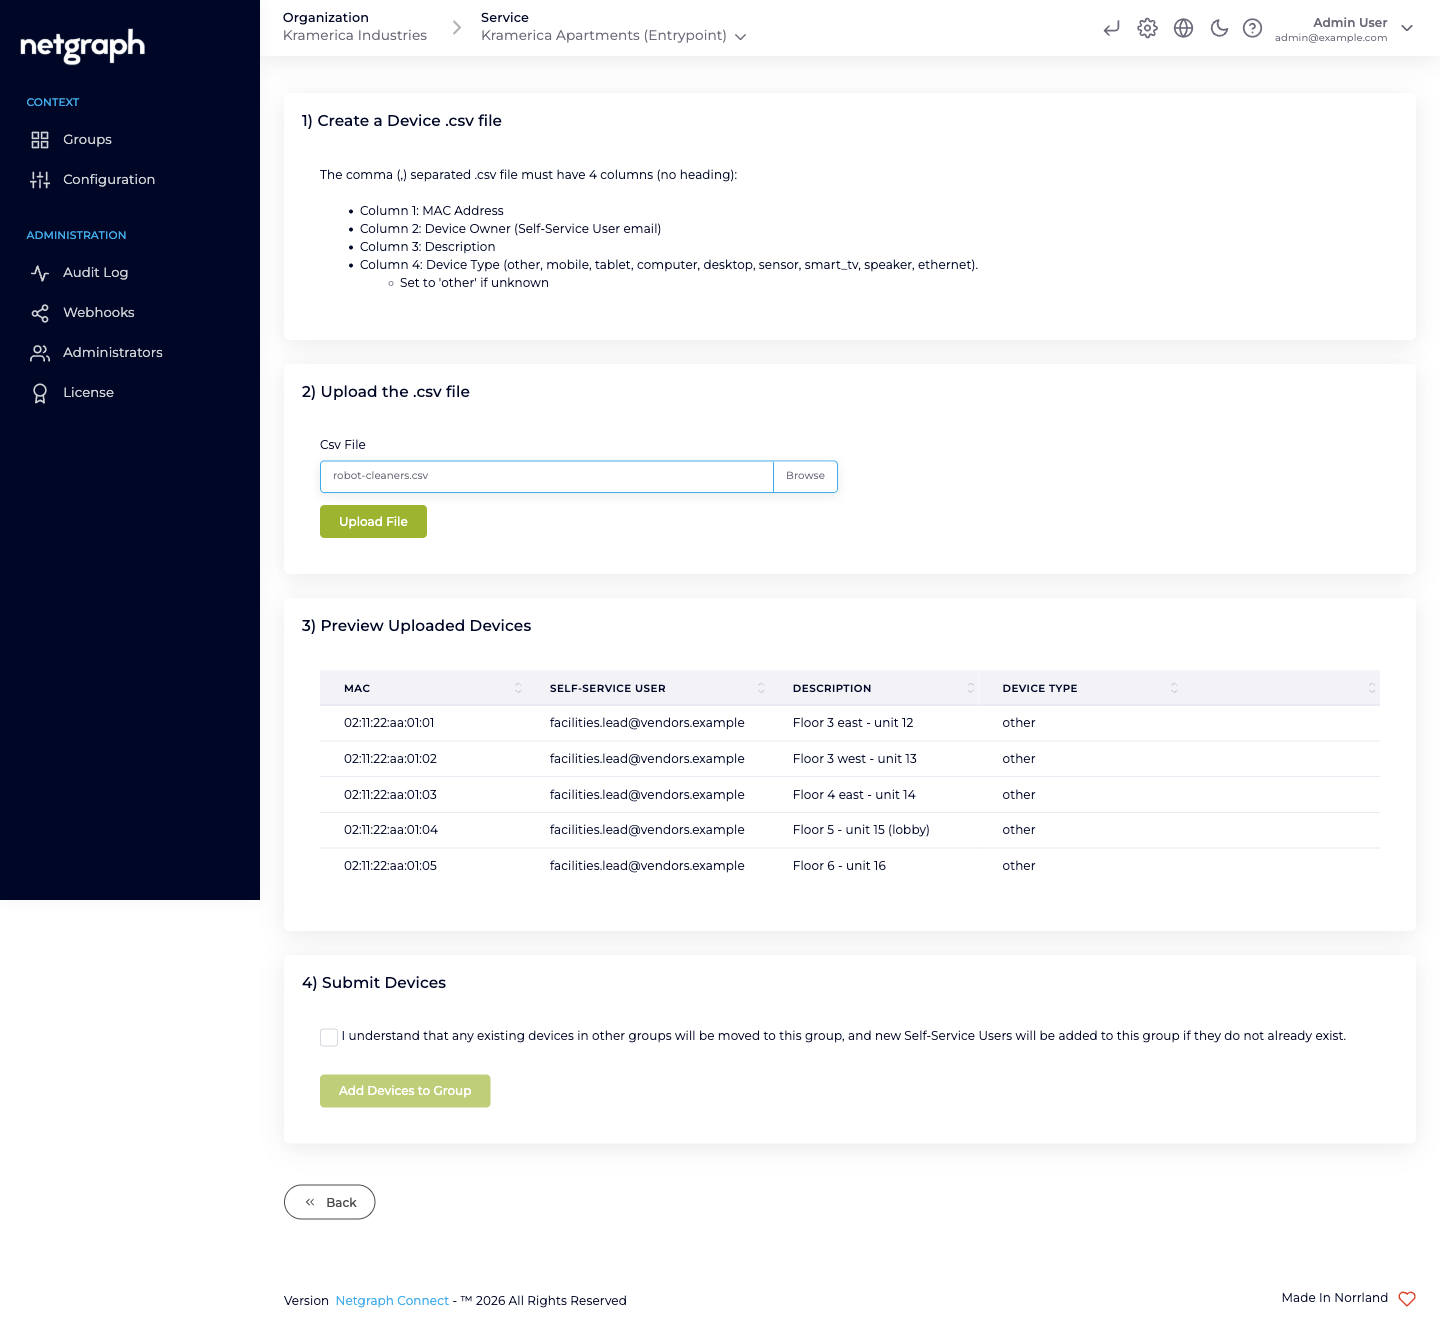
The platform parses the CSV and shows every row in a preview table — MAC, Self-Service User, Description, Device Type, plus a Warning Text column that flags rows the platform can’t accept. Fix in the CSV and re-upload if needed.
-
Confirm the side-effects
Tick I understand that any existing devices in other groups will be moved to this group, and new Self-Service Users will be added to this group if they do not already exist. Then click Add Devices to Group. The Group populates in one shot.
The two side-effects in the consent line are worth repeating:
- Devices already in another Group get moved into the Group you’re batch-adding to. That’s often what you want (merging a vendor’s existing inventory into the new delegation), but it can surprise if two Groups have been managing the same physical fleet.
- Self-Service Users in the CSV’s Device Owner column that don’t exist on this Group yet get auto-added as User (default). For fleets owned by a single lead, list their email on every row; for mixed-ownership fleets, put the right email per device.
Large imports sometimes need several minutes to process depending on the device count; the UI shows progress as the batch completes.
Moving a device between Groups
Section titled “Moving a device between Groups”Sometimes a device class gets split — the Robot Cleaners Group is growing and you want to split out Lab-floor Robots as a separate Group with its own PSK and VLAN.
-
Remove the MAC from the current Group
On the original Group’s Devices tab, delete the row.
-
Add the MAC to the new Group
Either individually via Add Device or in bulk via CSV if moving many.
-
Update the device itself
The device is now authenticating against a different Group’s PSK. Re-configure it with the new Group’s PSK (typically by swapping the Wi-Fi configuration on the device).
There’s no single “Move Device” action in the iPSK admin today — delete-and-recreate is the shape. The platform doesn’t prevent duplicate MACs across Groups, but the first-matching-Group rule applies at authentication time; keeping each MAC in exactly one Group avoids surprises.
Updating a device
Section titled “Updating a device”Click a device row (admin) or expand its accordion entry (Self- Service) to edit its Description. MAC address is immutable — a different MAC means deleting and re-adding.
Changes appear immediately in both admin and Self-Service views. The device’s live RADIUS session is unaffected — nothing re-authenticates on a description edit.
Removing a device
Section titled “Removing a device”When a device is retired:
- Admin side. Devices tab → row menu → Delete. Confirmation dialog. On confirm, the MAC is removed from the Group.
- Self-Service side. Devices card → expand the entry → Revoke. Same underlying action.
After removal:
- The device’s next authentication attempt fails. Its current session, if any, stays up until the next re-association or Interim-Update lapse; if the Context has CoA listeners configured, the Group’s session can be torn down actively.
- The device’s history stays in audit. Who added it, who updated it, who removed it — all preserved.
- The device’s row disappears from the Devices list.
Retirement is idempotent — re-adding a MAC that’s been removed starts a fresh record.
MAC-format quirks
Section titled “MAC-format quirks”- Colons vs dashes. Both accepted on input; stored as lowercase with colons.
- Inventory-spreadsheet drift. Some spreadsheets use
aabbccddeeff, some useAA-BB-CC-DD-EE-FF. Normalize the CSV before upload or accept EntryPoint’s normalisation on parse. - Copy-paste errors. A missing character, a stray space, an
l-for-1substitution — watch for these when a device rejects that was supposed to be in a Group.
Operational tips
Section titled “Operational tips”- Pair additions with device-side PSK configuration. Adding a MAC is half the job; the device also needs the Group’s current PSK typed into its Wi-Fi setup.
- Batch rollouts by Group. Onboarding 100 devices for one Group is fine; staggering across Groups on the same SSID is ambiguous-looking in audit trails.
- Use a naming convention in Descriptions. Robot-cleaner #12, Signage display — reception east — the Description is the only hint future admins (and delegates) get about what a MAC belongs to.
- Don’t reuse a MAC across Groups. The platform allows it, but the first-matching-Group authentication rule makes behaviour unpredictable.