
Meraki connection
Connect a Meraki WPN Context to your Cisco Meraki dashboard — API key, organization, network or template, SSID, Group Policy Strategy, and PSK defaults.
Every Meraki WPN Context holds one connection to a Cisco Meraki dashboard. Open Configuration → Basic Configuration in the Context admin to configure it.
Warning
External DHCP required. The wireless network the Context targets must use an external DHCP service. EasyPSK does not work with Meraki access-point-assigned DHCP (NAT mode). Wireless clients on the WPN SSID can reach their default gateway but can’t reach wired clients on the same VLAN — that’s the L2 isolation EasyPSK relies on.
Prerequisites on the Meraki side
Section titled “Prerequisites on the Meraki side”- A Meraki dashboard organization you administer.
- A Meraki network with MR-series access points.
- A Meraki Dashboard API key. Full organization access is required for the Template based configuration type — the option is greyed out without it. The network-based types work with network-scoped keys, but full access is still recommended; restricted keys can miss objects the integration needs (group policies, clients, identity PSKs).
- An SSID configured for Identity PSK without RADIUS with Wi-Fi Personal Network turned on. The SSID can be freshly created or an existing one repurposed. The next section walks through it.
Configure the SSID in Meraki
Section titled “Configure the SSID in Meraki”Before the Context can manage keys, the target SSID has to exist in the Meraki dashboard and be set up the way EasyPSK expects. In the dashboard, open Wireless → Configure → Access control, pick (or create) the SSID, then:
-
Name and enable the SSID
Under Basic info, give the SSID a name (for example
Kramerica WPN) and set SSID status to Enabled. Note the name exactly: the Context’s SSID field points at it later.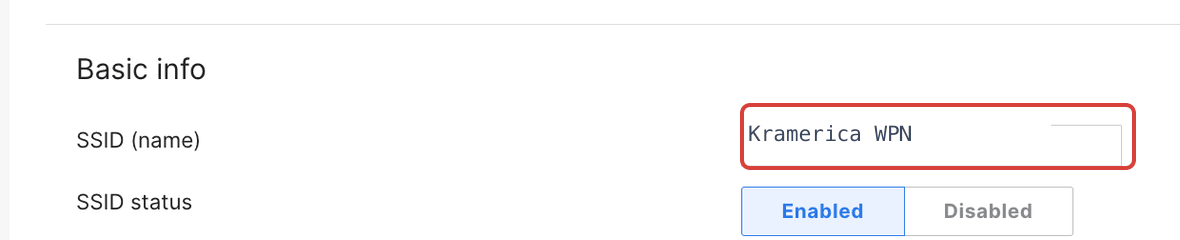
Name the SSID and enable it. -
Set Security to Identity PSK without RADIUS
Under Security, select Identity PSK without RADIUS. Each device is admitted by the passphrase it presents, and each passphrase carries its own group policy. The platform owns this list: it writes one Identity PSK, and the matching group policy, for every private network you create, so you do not add keys here by hand. The example below already holds one key per apartment.
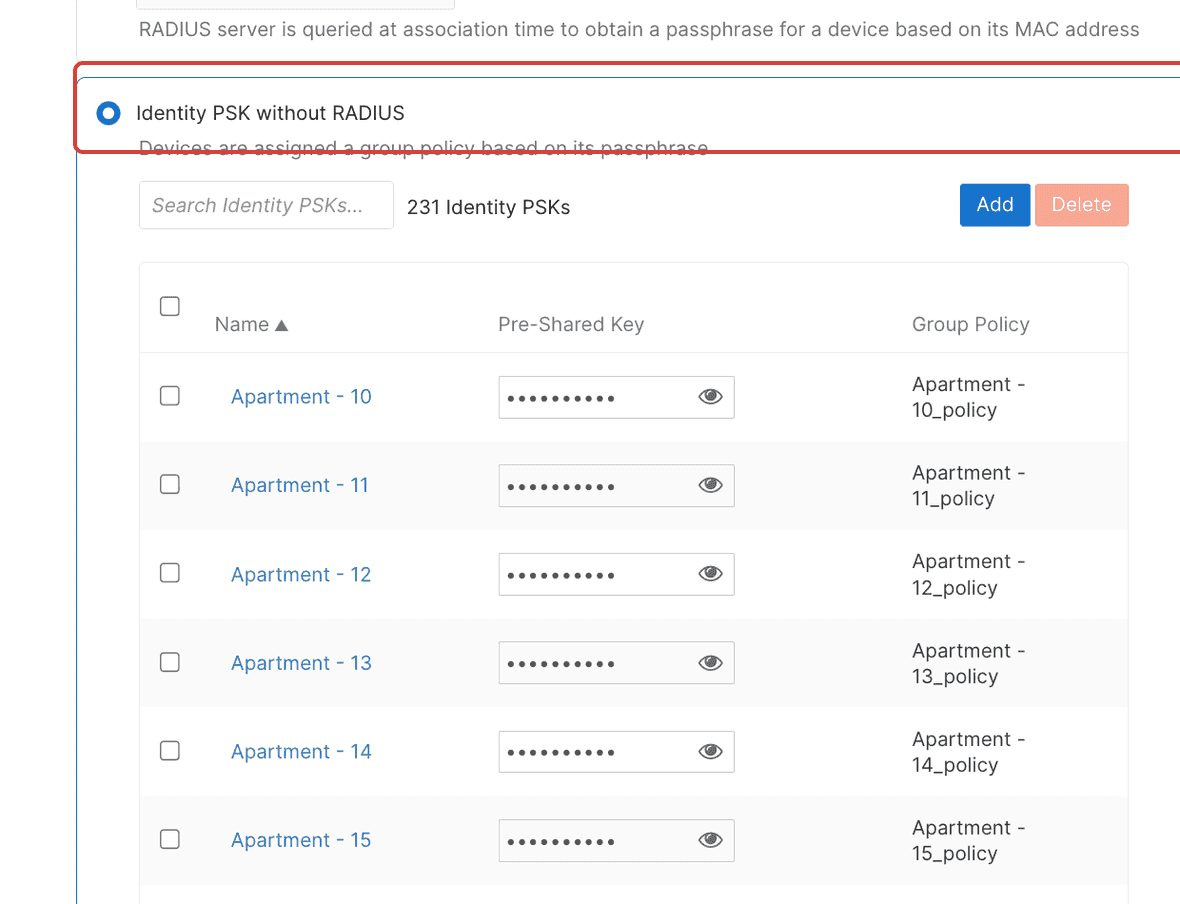
Set Security to Identity PSK without RADIUS. The platform fills the key list, one per private network. -
Turn on Wi-Fi Personal Network (WPN)
Set Wi-Fi Personal Network (WPN) to Enabled. This is the control that segments the SSID into one private network per key (see below). Leave WPA encryption at WPA2 only unless the customer’s devices require otherwise.
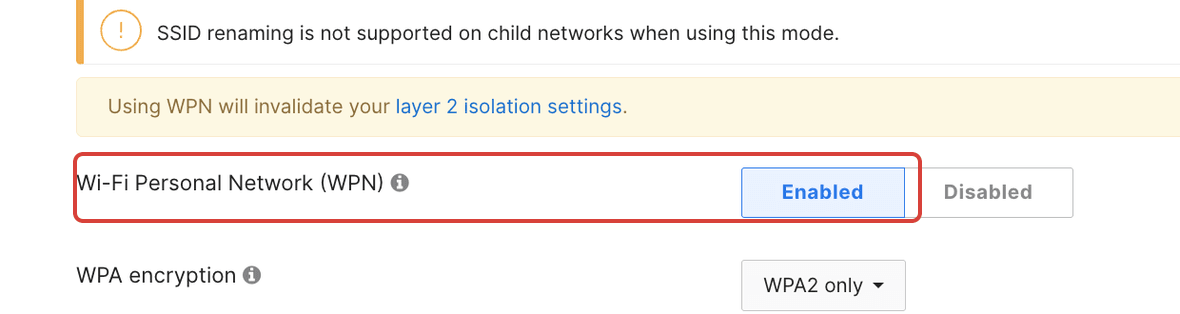
Enable Wi-Fi Personal Network (WPN): the per-key micro-segmentation control.
What WPN does, and the UDN tag
Section titled “What WPN does, and the UDN tag”Wi-Fi Personal Network is what turns one shared SSID into hundreds of private ones. With it enabled, Meraki gives every Identity PSK its own User Defined Network (UDN): a private layer-2 segment that lives inside the single SSID. Meraki stamps each connecting client with the UDN tag that belongs to the key it joined with, and only clients carrying the same tag can discover and reach each other.
So one passphrase maps to one UDN, which maps to one resident’s personal network. Their phone, laptop, TV, and console share a key, land in the same UDN, and behave like a normal home network: casting, printing, and Bonjour/mDNS discovery all work between them. A neighbour on the very same SSID, VLAN, and IP range holds a different key, lands in a different UDN, and stays invisible. That is the micro-segmentation EasyPSK delivers: many households on one wireless network and one address space, each fenced into its own UDN by the key it holds.
Note
WPN replaces blanket layer-2 isolation rather than adding to it. The dashboard flags this on the same page: turning WPN on “invalidates your layer 2 isolation settings”, because per-UDN segmentation now does that job per key, instead of isolating every client from every other.
The fields, in order
Section titled “The fields, in order”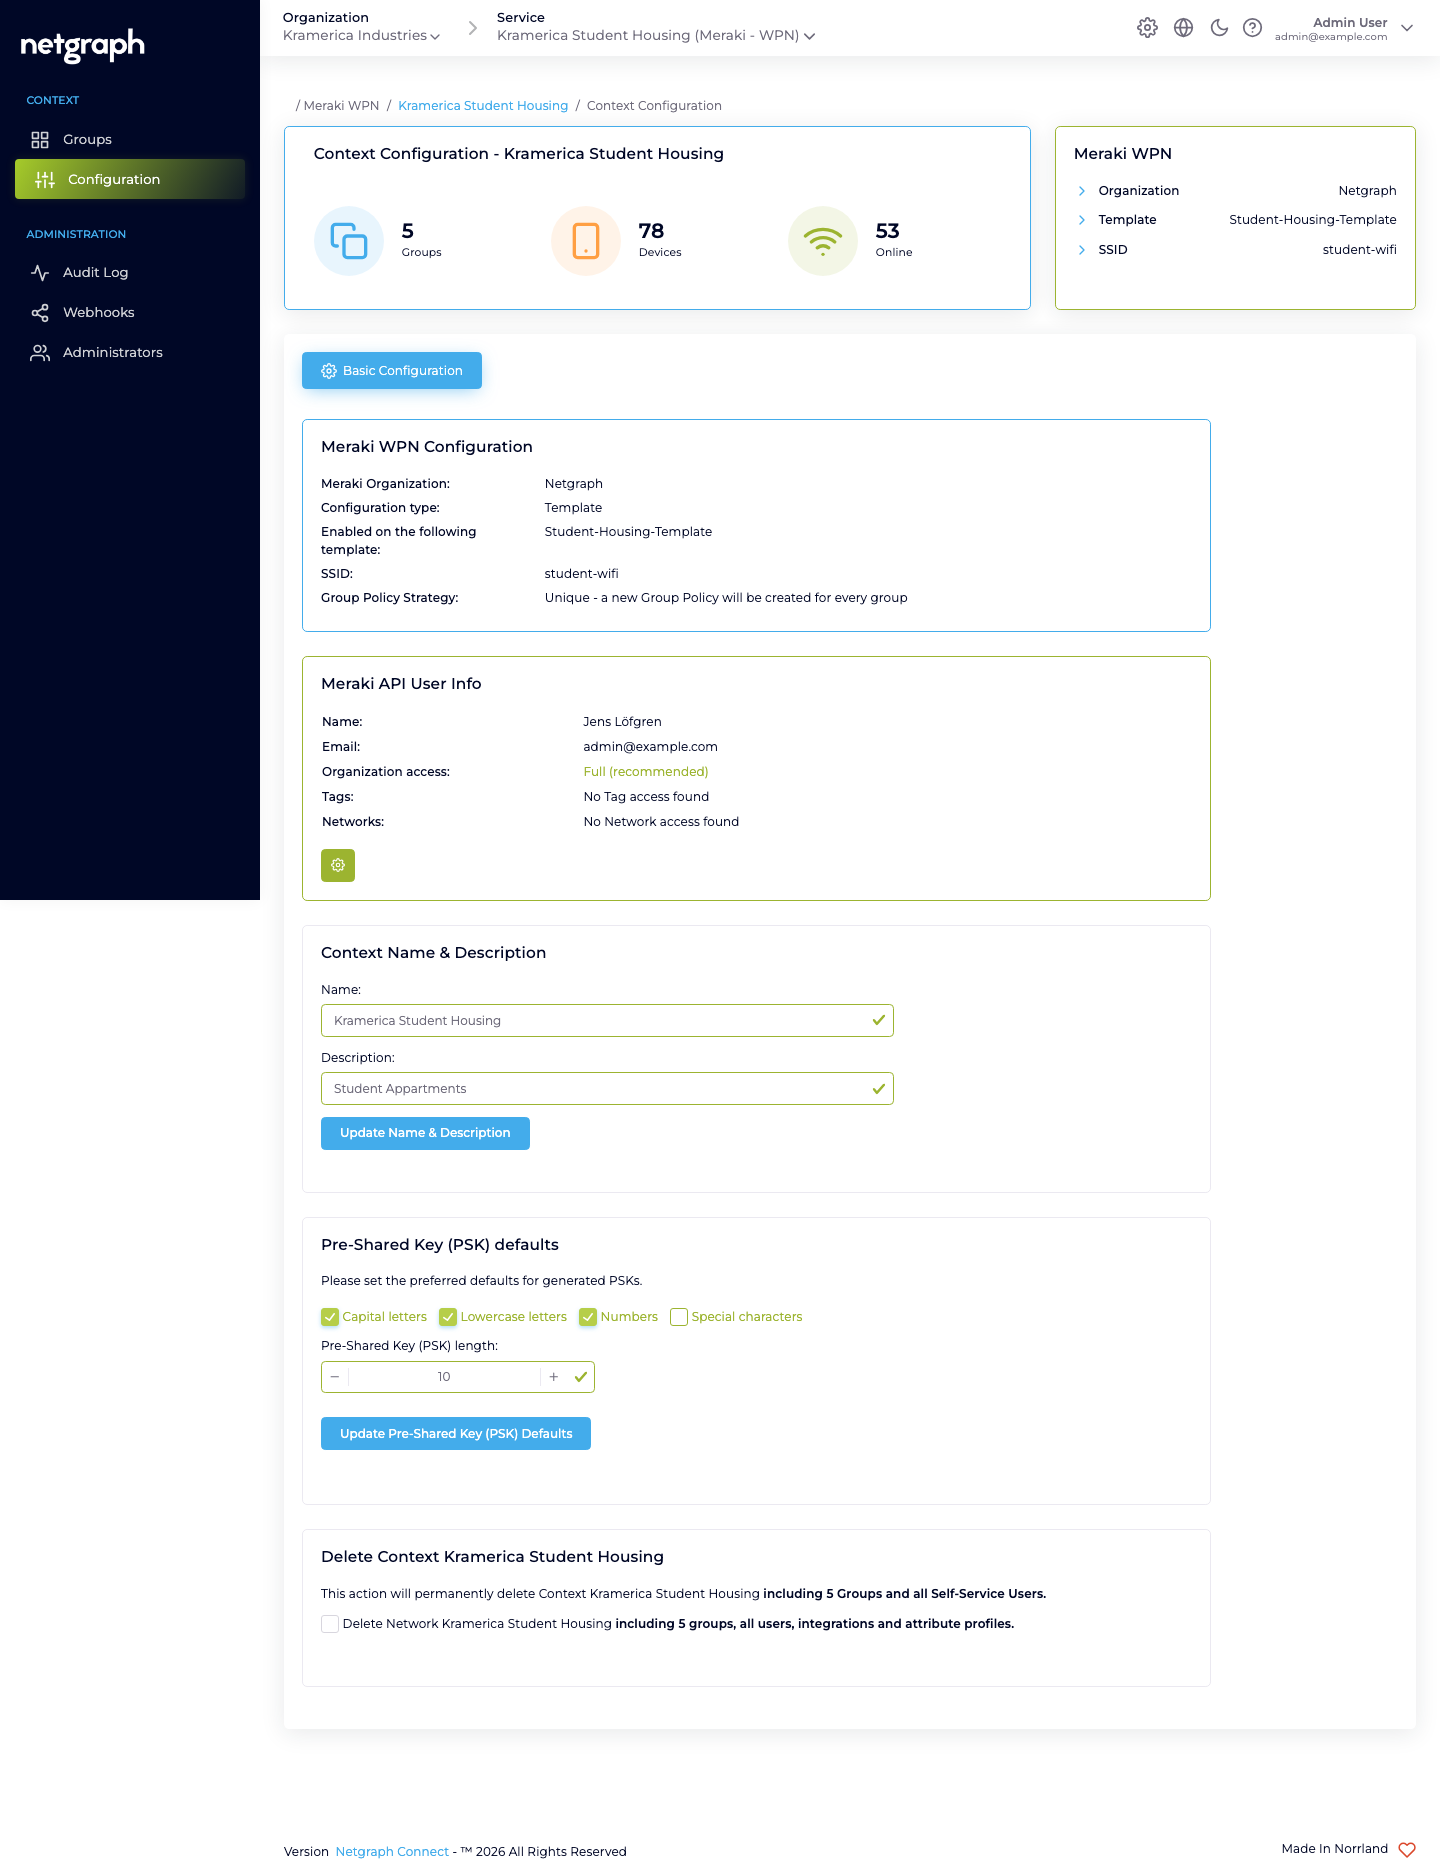
Meraki API Key
Section titled “Meraki API Key”40 characters. Pasted once. When you save, the platform re-fetches the organizations and networks the key can reach. Rotating the key later is the same two-field flow: paste the new key, confirm the organization.
The API key is marked secret in the audit log — it’s never readable after save, including by you.
Meraki Organization
Section titled “Meraki Organization”Populated from the Meraki Dashboard API after the key is validated. Pick the organization that owns the network you’re onboarding.
After saving, a Meraki API User Info card appears below, showing the name + email of the account that minted the key and the organization-access level (Full, Read-only, or None). When the key has organization read access, the card also lists the specific tags and networks it can reach, each with its own access level, so you can confirm the key covers everything the integration touches. Use it to sanity-check you didn’t paste the wrong key.
Configuration type
Section titled “Configuration type”Three options. They differ in how the Context finds your SSID, what API access they need, which Group Policy Strategies they offer, and whether you can grow the integration later:
| Template based | Networks based (single network) | Networks based (multiple networks) | |
|---|---|---|---|
| Points at | One Meraki configuration template | One Meraki network | Several independent networks broadcasting the same SSID name |
| API access needed | Full organization access (option disabled otherwise) | Network-scoped is enough | Network-scoped is enough |
| SSID selection | Dropdown of template SSIDs | Dropdown of the network’s SSIDs | You type the exact SSID name and fetch matching networks |
| Group Policy Strategy | One policy per group or Shared Policy | One policy per group or Shared Policy | Always One policy per group |
| Add networks later | Automatic — template-bound networks inherit | No | Yes — see Adding networks later |
Template based
Section titled “Template based”Point the Context at a Meraki configuration template. The dropdown — Network templates (with wireless product type) — lists the organization’s templates, and Template SSIDs (configured for WPN) lists the SSIDs in the chosen template. Every Meraki network bound to that template inherits the configuration, so one Context covers a whole template-managed estate. Best for campuses with many Meraki networks that all broadcast the same SSID.
This is the only configuration type where the Shared Policy can be updated after setup.
Networks based (single network)
Section titled “Networks based (single network)”Point the Context at exactly one Meraki network. The dropdown — Networks (with wireless product type) — lists networks that are not bound to a configuration template, and Network SSIDs (configured for WPN) lists the SSIDs in the chosen network. The simplest option, and the right one when one building equals one Meraki network.
Networks based (multiple networks)
Section titled “Networks based (multiple networks)”Point the Context at the same SSID name across several independent Meraki networks. Type the exact SSID name into Meraki Network SSID name and click Fetch matching networks. The platform searches the organization and lists every network that matches all of:
- the network is not bound to a configuration template,
- the SSID is enabled on the network,
- the SSID is configured for Identity PSK without RADIUS,
- the SSID name matches exactly what you typed.
Check the networks to include. More networks can be added the same way after setup — see Adding networks later. This type always uses the One policy per group strategy; no strategy dropdown is shown.
Whichever configuration type you pick, only SSIDs that are enabled and configured for Identity PSK without RADIUS in the Meraki dashboard qualify: Template based and single-network setups show them in a dropdown, the multiple-networks setup matches them by exact name.
Tip
One Context governs one SSID. If a building runs two distinct
SSIDs for two distinct populations — for example student-wifi
for residents and staff-wifi for maintenance — create two
Meraki WPN Contexts, one per SSID.
Meraki Group Policy Strategy
Section titled “Meraki Group Policy Strategy”How the platform maps Wireless Personal Networks to Meraki Group Policies. The dropdown appears for Template based and Networks based (single network) once an SSID is selected; the multiple-networks type always uses One policy per group and shows no dropdown.
- One policy per group (the default) — the platform creates a new Meraki Group Policy per Wireless Personal Network, named after the WPN. The policy is owned by the platform: it is created when the WPN is created and removed when the WPN is removed. Gives fine-grained per-unit network shaping (bandwidth cap per apartment, VLAN per apartment, layer-7 rules per apartment), at the cost of more group policies to look at on the Meraki side.
- Shared Policy — every Wireless Personal Network in the Context references the same pre-existing Meraki Group Policy. You pick which one from a dropdown. One policy defines the shaping for every apartment. Simpler to reason about at scale. The policy is yours: the platform never deletes it.
Both options keep the L2 isolation between units intact — that’s a Meraki Identity PSK feature, not a Group Policy feature.
| Configuration type | One policy per group | Shared Policy |
|---|---|---|
| Template based | Yes (default) | Yes — and updatable after setup |
| Networks based (single network) | Yes (default) | Yes — fixed after setup |
| Networks based (multiple networks) | Always | Not offered |
Shared Group Policy (conditional)
Section titled “Shared Group Policy (conditional)”Only shown when the strategy is Shared Policy. Dropdown of the Meraki Group Policies defined on the selected network or template. The policy must already exist on the Meraki side — create it in the Meraki dashboard first if needed.
Pre-Shared Key (PSK) defaults
Section titled “Pre-Shared Key (PSK) defaults”A second card on the Basic Configuration tab, separate from the Meraki integration. Controls the auto-generator that runs every time a new Wireless Personal Network is created without an explicit PSK:
- Character classes — checkboxes for Capital letters, Lowercase letters, Numbers, Special characters. At least one must be enabled.
- Pre-Shared Key (PSK) length — between 8 and 63, inclusive. Meraki enforces the same range.
Changing the defaults does not rotate existing PSKs. It applies only to newly-generated keys. Existing WPNs keep their current passphrases until explicitly rotated.
Context Name & Description
Section titled “Context Name & Description”Cosmetic — the name shows in breadcrumbs, the Services overview, and the Self-Service portal picker if a user has access to more than one Context. Description is optional and not shown to residents.
What you can change after setup
Section titled “What you can change after setup”The configuration type, the SSID, and the Group Policy Strategy are fixed once the Meraki integration is connected. To run a different SSID or a different strategy, create a new Meraki WPN Context and move the Wireless Personal Networks over during a change window. What the integration does let you change afterwards:
- The API key and API user — see Rotating the API key.
- The Shared Group Policy selection — Template based Contexts with the Shared Policy strategy only; see below.
- The set of networks — multiple-networks Contexts can add and remove networks; see Adding networks later.
Updating the Shared Group Policy
Section titled “Updating the Shared Group Policy”For a Template based Context running the Shared Policy strategy, an Update Shared Group Policy card on the configuration page lets you point every Wireless Personal Network at a different pre-existing Meraki Group Policy.
The confirmation dialog spells out the consequence: the group policy changes for all Identity PSKs the Context manages, and the update can take a while on Contexts with many units. Single-network Contexts don’t have this card — their shared policy is fixed at setup.
Adding networks later
Section titled “Adding networks later”For a Networks based (multiple networks) Context, the Add additional network integrations card lets the integration grow with your estate. It works exactly like the initial search: the platform looks for networks that are not template-bound and broadcast the Context’s SSID name, enabled and configured for Identity PSK without RADIUS. Check the ones to add and click Add additional network(s).
When a network is added, the platform provisions the existing Wireless Personal Networks onto it. If provisioning fails on one of the networks, the card reports which network failed so you can fix the Meraki side and retry. Networks can also be removed from the integration the same way.
Rotating the API key
Section titled “Rotating the API key”- Generate a new API key in the Meraki dashboard.
- Paste it into Meraki API Key and save.
- Verify Meraki API User Info reflects the new account and access scope.
- Revoke the old key in the Meraki dashboard.