
Groups and shared PSK
Each iPSK Group carries one shared Pre-Shared Key and the MAC addresses of every device that authenticates with it. This page covers the lifecycle: create, configure, delegate, rotate, retire.
An iPSK Group is the unit of day-to-day operation on the iPSK variant. One shared PSK, one device class, one delegated admin. This page covers the admin-side lifecycle: create a Group, configure it, delegate it to the right team, rotate the PSK over time, and retire it when the device class is decommissioned.
The shared-PSK model
Section titled “The shared-PSK model”Every device in a Group authenticates with the same Pre-Shared Key. The PSK is:
- Per-Group. Robot Cleaners uses one PSK; Digital Signage uses a different one; Smart Locks a third. Four Groups → four keys.
- Scoped to the Group’s audience. Every device added to the Group uses the Group’s current PSK. Rotating it means every device in the Group needs the new key.
- Visible to users with the right role. End-users with the User (default) role in the Self-Service portal see the PSK (they need it to configure devices). The Pre-Shared Key (PSK) Administrator role additionally rotates it.
- Returned on the RADIUS Access-Accept. The AP fetches the PSK via RADIUS on every device association and uses it to complete the WPA2 4-way handshake.
This contrasts both with EAP-PEAP (per-user password) and EAP-TLS (per-user or per-device certificate). iPSK is the right shape when the device class is the unit of trust — all robot cleaners should get onto VLAN 410, regardless of which individual robot.
Creating an iPSK Group
Section titled “Creating an iPSK Group”-
Open the Context's Groups tab
From the iPSK Context overview, click Add Group.
-
Name the Group by device class
Robot Cleaners, Digital Signage, Smart Locks, Lab Sensors. The name shows up in breadcrumbs, the Groups list on the Context, and the Self-Service portal for everyone invited to the Group.
-
Add a Description
A one-liner that names the owner and scope — Facility-services- owned cleaning-robot fleet; 12 units across floors 3–6. Helps future admins distinguish Groups quickly.
-
Click Create Group
You land on the Group detail page. The Group gets an auto-generated PSK; you’ll hand it off to the delegated admin shortly.
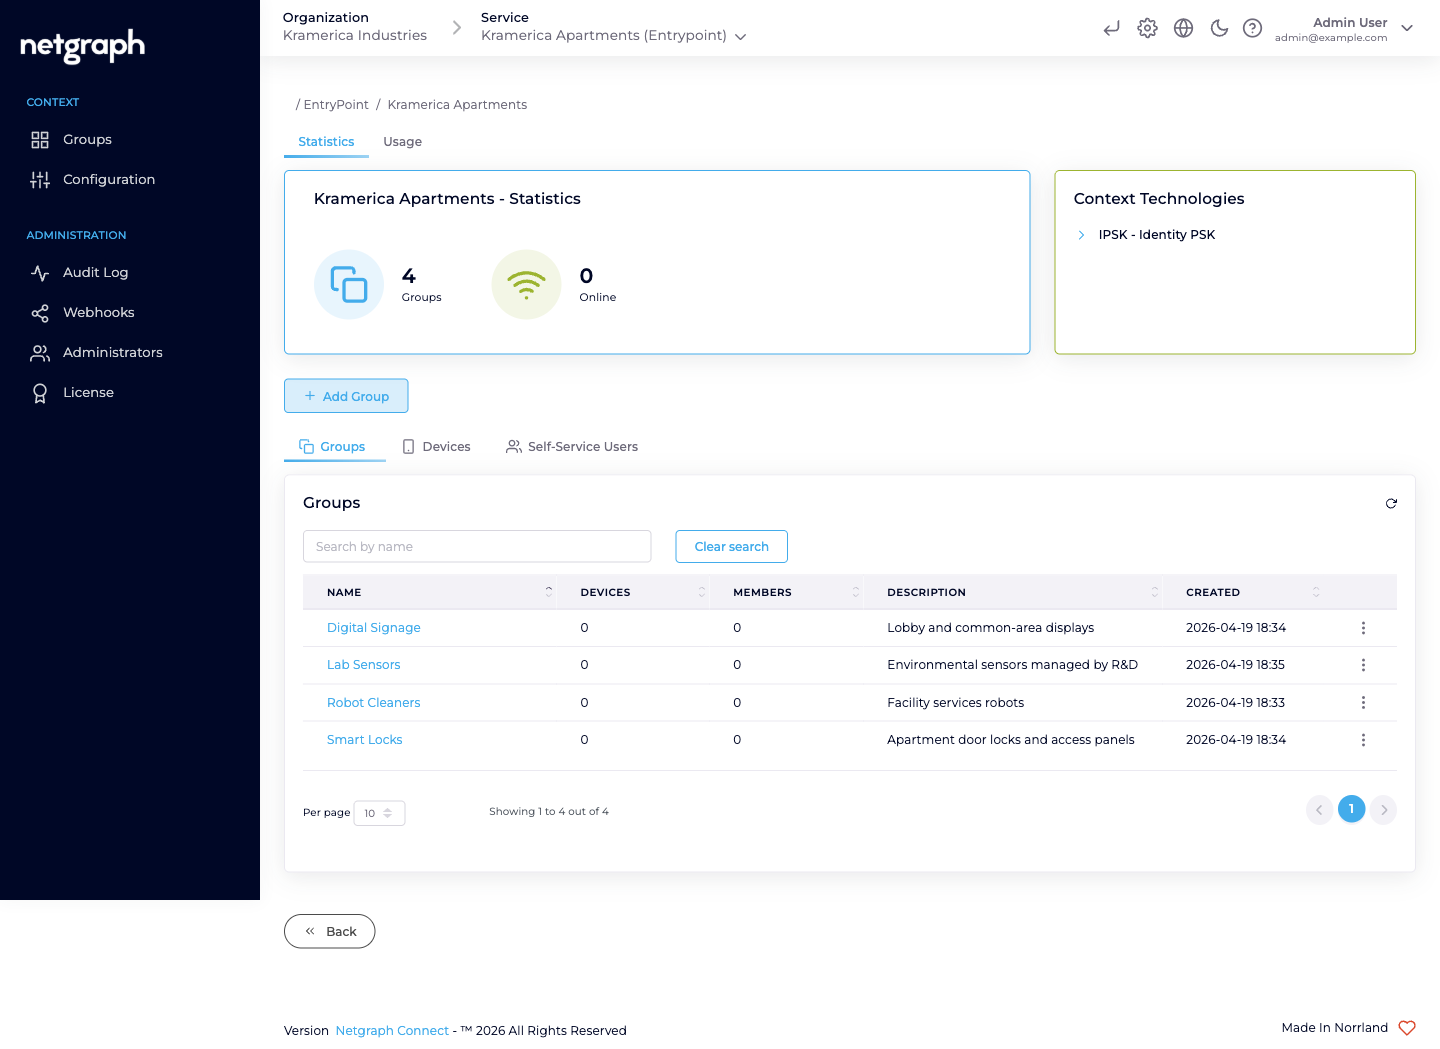
The Context’s Groups list shows columns for Name, Devices, Members (Self-Service Users), Description, and Created.
What’s on the Group detail page
Section titled “What’s on the Group detail page”An iPSK Group detail carries:
- Statistics card — Devices / Members / Online counters.
- Usage — time-series chart of Registered vs Online devices specifically for this Group.
- Devices tab — the MAC addresses in the Group, each with live session data when the device is online (NAS, VLAN, session duration, data usage where your Cisco controller reports it).
- Users (Self-Service Users) tab — the people invited to this Group and their roles.
- Group Settings tab — rename, attach Attribute Profile(s), rotate the PSK from the admin side, delete.
Attaching an Attribute Profile
Section titled “Attaching an Attribute Profile”Per-Group VLAN / SGT assignment is the whole point of “one Group per device class”. Robot Cleaners lands on the cleaning-floor VLAN; Digital Signage on the signage VLAN; Smart Locks on the access-control VLAN.
-
Create the Profile if it doesn't exist
On the Context, Configuration → Attribute Profiles → Add attribute profile. Name it for the audience (VLAN 410 — Cleaning), add the three tunnel attributes that assign the VLAN. See Attribute Profiles.
-
Open the Group's Settings tab
Scroll to the Attribute Profiles card.
-
Attach the Profile
Pick it from the selector and save. Every iPSK Access-Accept for a device in this Group now carries the VLAN assignment on the RADIUS response.
A Group can reference more than one Profile — useful for stacking a Cisco AV-pair (SGT, URL redirect) alongside the VLAN assignment. Context-level Default attribute profiles on the Context’s Basic Configuration tab set the fallback Profile for every new Group.
Inviting the first delegated admin
Section titled “Inviting the first delegated admin”Self-Service is what turns “one Group per device class” from a naming convention into real delegation. Each Group gets at least one Self-Service User with elevated roles.
-
Open the Group's Users tab
From the Group detail.
-
Click Add Self-Service User
Enter the delegate’s email.
-
Pick roles
A full delegate typically gets User (default) (always on), Self-Service User Administrator (invite their own colleagues), and Pre-Shared Key (PSK) Administrator (rotate the PSK). For the facility-services lead on Robot Cleaners, all three make sense.
-
Send the invite
Leave Send email invite? on. The delegate receives a portal login email; on first sign-in they land in the Group detail view with the right cards rendered for their roles.
See Self-Service portal & roles for the role matrix in detail.
Rotating the shared PSK
Section titled “Rotating the shared PSK”The PSK is rotated when:
- It leaks (screenshotted, pasted into chat, shared widely).
- A delegate leaves and their knowledge of the key needs to stop working on the next re-association.
- On a hygiene schedule — some Organizations rotate per quarter.
Two paths:
- Delegated (usual). The Group’s Pre-Shared Key (PSK) Administrator opens the Self-Service portal and hits Manage Key → Regenerate. You don’t need to be in the loop.
- Admin-side. On the Group’s Group Settings tab, use the Manage PSK card. Useful if the delegate has lost access and you need to cover for them urgently.
Either way, every device in the Group is kicked off the network at the next re-association until updated to the new PSK. If your Context has Change of Authorization (CoA) listeners configured (under Configuration → Basic Configuration), EntryPoint triggers CoA re-auth on the connected devices immediately rather than waiting for them to idle-disconnect.
Plan a rotation around your fleet’s update window. For visible device classes (digital signage), a rotation is usually a scheduled event with technicians on-site to re-pair units; for less-visible classes (sensors) the rotation can ride the device-side roll-in schedule.
Retiring a Group
Section titled “Retiring a Group”When the device class is decommissioned and the fleet is leaving the network:
-
Let the delegate clean up first (optional)
The PSK Administrator removes their devices from the Self- Service portal’s Devices card. The Group’s Removed by audit trail reflects who retired what.
-
Delete the Group
On the Group’s Group Settings tab, confirm deletion. The PSK and every remaining MAC entry are removed; Self-Service Users lose portal access to the Group immediately.
-
Detach unused Attribute Profiles
If the Profile attached to the Group is no longer used by any other Group, clean it up from the Context’s Attribute Profiles tab.
Attribute Profiles are Context-scoped, not Group-scoped — deleting a Group does not delete its Profile. Retire them separately when genuinely unused.
Operational tips
Section titled “Operational tips”- One Group per device class, not per device. Putting every printer in its own Group defeats the entire PSK-reuse model.
- Name Groups by device class, not by owner. Robot Cleaners reads better than Acme Corp Cleaning — owners change more often than device classes.
- Use the Description to name the owner. Facility services (primary: X); marketing agency (secondary: Y) — who’s responsible lives in the Description.
- Two PSK Administrators per Group is a resilient default — if the primary is unreachable at PSK-rotation time, the secondary can still cover.
- Set Default attribute profiles on the Context. Auto-fills the Profile selector on new Groups; saves you a step per Group creation.
Related
Section titled “Related”Managing devices — bulk and single
Adding, updating, and removing MACs — admin and Self-Service sides.
Self-Service portal & roles
The delegated-admin surface and the three roles.
Attribute Profiles
Reusable RADIUS-response bundles attached per Group.
RADIUS clients
Hostname, ports, shared secret, CIDR allow-list.