
Batch Group Sync
Reconcile a whole Meraki WPN Context from one CSV file: create, update, reset, and delete Wireless Personal Networks and their Self-Service Users in a single reviewed run.
Batch Group Sync brings a Meraki WPN Context into line with a single CSV file. The file describes the end state you want: every Wireless Personal Network that should exist, and the Self-Service Users in each. The platform compares that file with what exists today, shows you a per-group plan, and applies it only after you confirm. It is the fastest way to onboard, update, or turn over a whole building at once.
Batch Group Sync is part of the Meraki WPN delivery of EasyPSK for Cisco Networks. When you run EasyPSK via RADIUS, groups are managed individually rather than reconciled from a file.
Batch Create vs Batch Group Sync
These are two different tools. Batch Create Wireless Personal Networks (on the Create multiple tab, covered in Managing Wireless Personal Networks) only adds new, empty WPNs in a numbered run. Batch Group Sync reconciles the whole picture from a file: it can add, update, reset, and remove WPNs and their Self-Service Users in one reviewed run.
The file
Section titled “The file”The CSV needs a header row. Recognised columns (case and extra spaces do not matter):
- group (required): the WPN name, matched by name to the group lists in the Admin and Self-Service portals. A row with a group name and no email defines a WPN with no Self-Service Users.
- email (optional): a Self-Service User’s email. Use one row per user, repeating the group name on each of that group’s rows.
- phone (optional): the user’s mobile number, in international
format with a country code (for example
+46 70 123 45 67). Leave it blank to keep the user’s current number.
group,email,phoneApartment 101,anna.andersson@example.com,+46 70 123 45 67Apartment 101,erik.berg@example.com,Apartment 102,sara.lind@example.com,+46 70 234 56 78The upload step has a Download an example CSV link if you want a template to copy.
Start from the current state
Section titled “Start from the current state”The quickest way to build a correct file is to start from what you already have. On the Context overview, click Export Groups to download the current WPNs and their Self-Service Users as a CSV with these same three columns. Edit that file (add a building’s worth of apartments, change who lives where, fill in phone numbers) and upload it back. Because Export and upload share one format, a sync round-trips cleanly.
Running a sync
Section titled “Running a sync”Open Batch Group Sync from the Context overview. The wizard has four steps: Upload & settings, Review changes, Confirm, and Progress.
1. Upload & settings
Section titled “1. Upload & settings”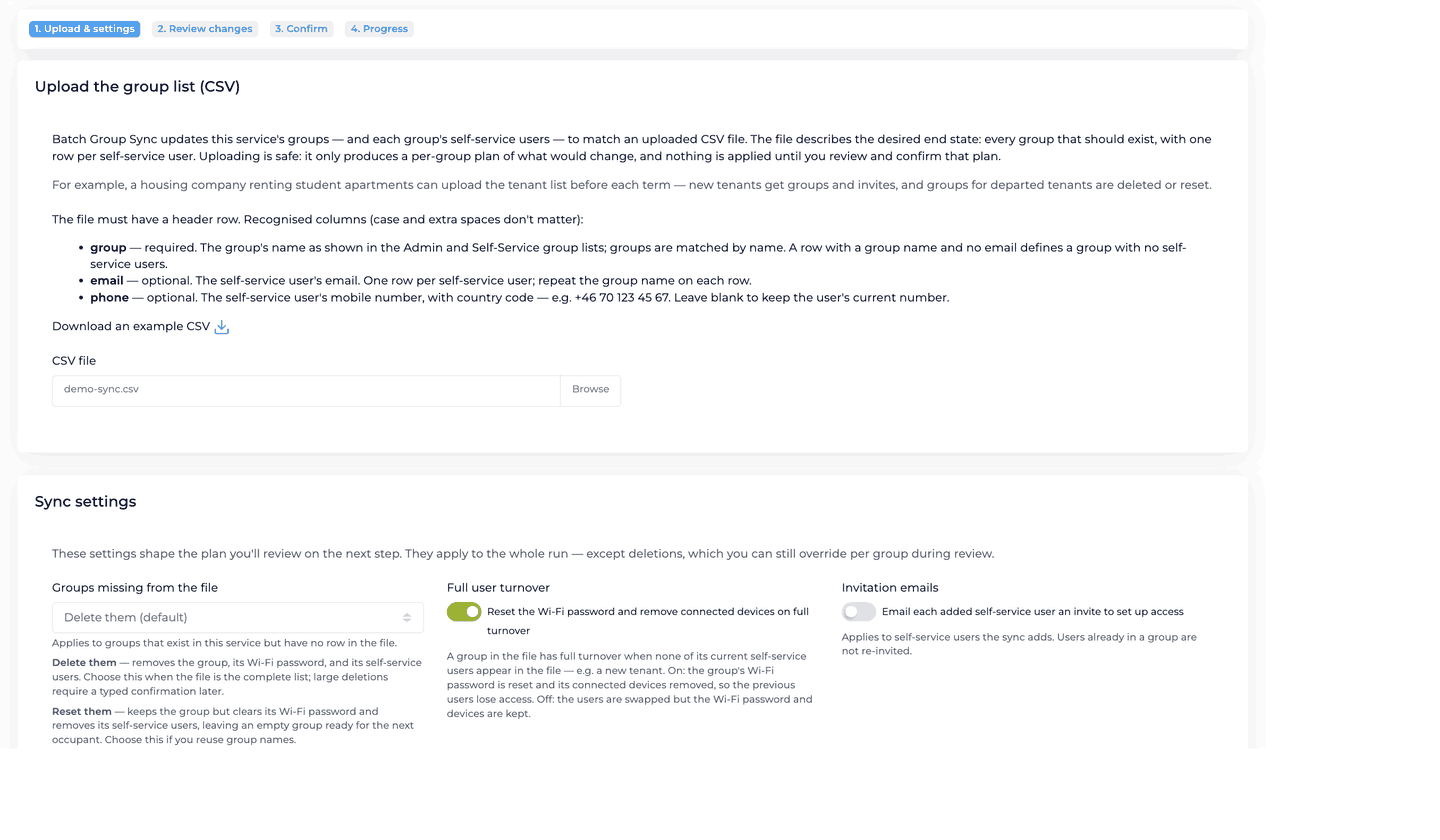
-
Choose the CSV file
Browse to your edited file. The upload happens in your browser only; nothing is sent or changed yet.
-
Set the sync behaviour
The three Sync settings shape the plan (see below). They apply to the whole run, except deletions, which you can still override per group during review.
-
Click See what will change
This runs a dry run: the platform builds a per-group plan and nothing is applied to Meraki. You always see the plan before anything happens.
The Sync settings:
- Groups missing from the file sets what to do with a WPN that exists in the Context but has no row in the file. Delete them (the default) removes the WPN, its Wi-Fi password, and its Self-Service Users. Reset them keeps the WPN but clears its Wi-Fi password and removes its Self-Service Users, leaving an empty unit ready for the next occupant. Leave them untouched makes no change. Choose Delete when the file is the complete list; choose Reset if you reuse the same unit names between occupants.
- Full user turnover applies when none of a WPN’s current Self-Service Users appear in the file, for example a new tenant replacing the last one. Turn this on to reset that WPN’s Wi-Fi password and remove its connected devices, so the previous residents lose access. Leave it off to swap the users but keep the password and devices.
- Invitation emails emails each added Self-Service User an invite to set up portal access. Users already in a group are not re-invited.
2. Review changes
Section titled “2. Review changes”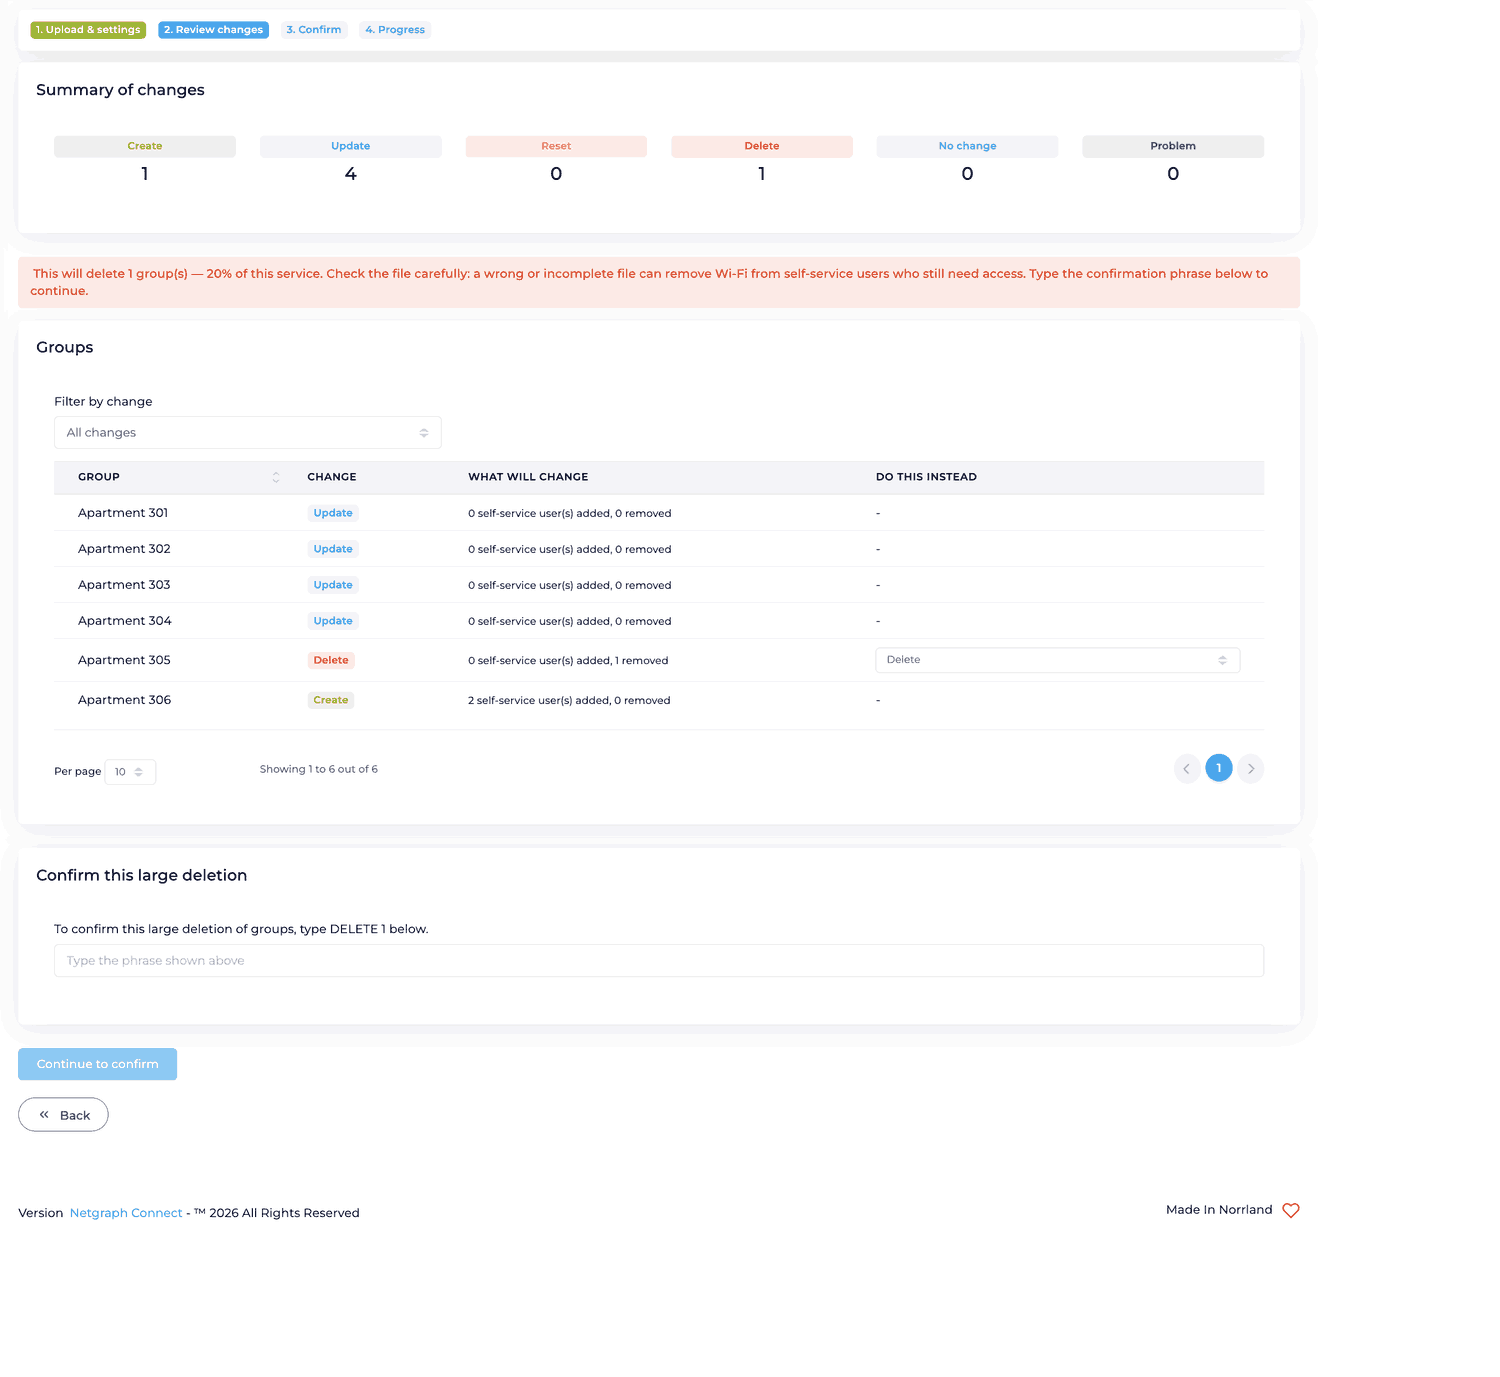
The plan sorts every WPN into one of six outcomes: Create, Update, Reset, Delete, No change, or Problem. The Summary of changes counts each, and every WPN gets a row showing what will change: how many Self-Service Users are added and removed, and whether the Wi-Fi password is reset or devices removed. Use Filter by change to focus on, say, only the deletions.
For any WPN the plan would delete, the Do this instead column lets you override that single group: reset its Wi-Fi password instead, or leave it untouched. This is the escape hatch when the file is missing a group by accident.
A Problem row is a row the file got wrong: a missing group name, an invalid email, or an invalid phone number. Problem rows are skipped and never applied, so the rest of the sync still runs.
Large-deletion confirmation
When a sync would delete a large share of the Context’s WPNs, the
review step asks you to type a confirmation phrase (for example
DELETE 1) before you can continue. It is a deliberate guard against
uploading a wrong or incomplete file that would remove Wi-Fi from
residents who still need it. Check the plan carefully before you
confirm.
3. Confirm
Section titled “3. Confirm”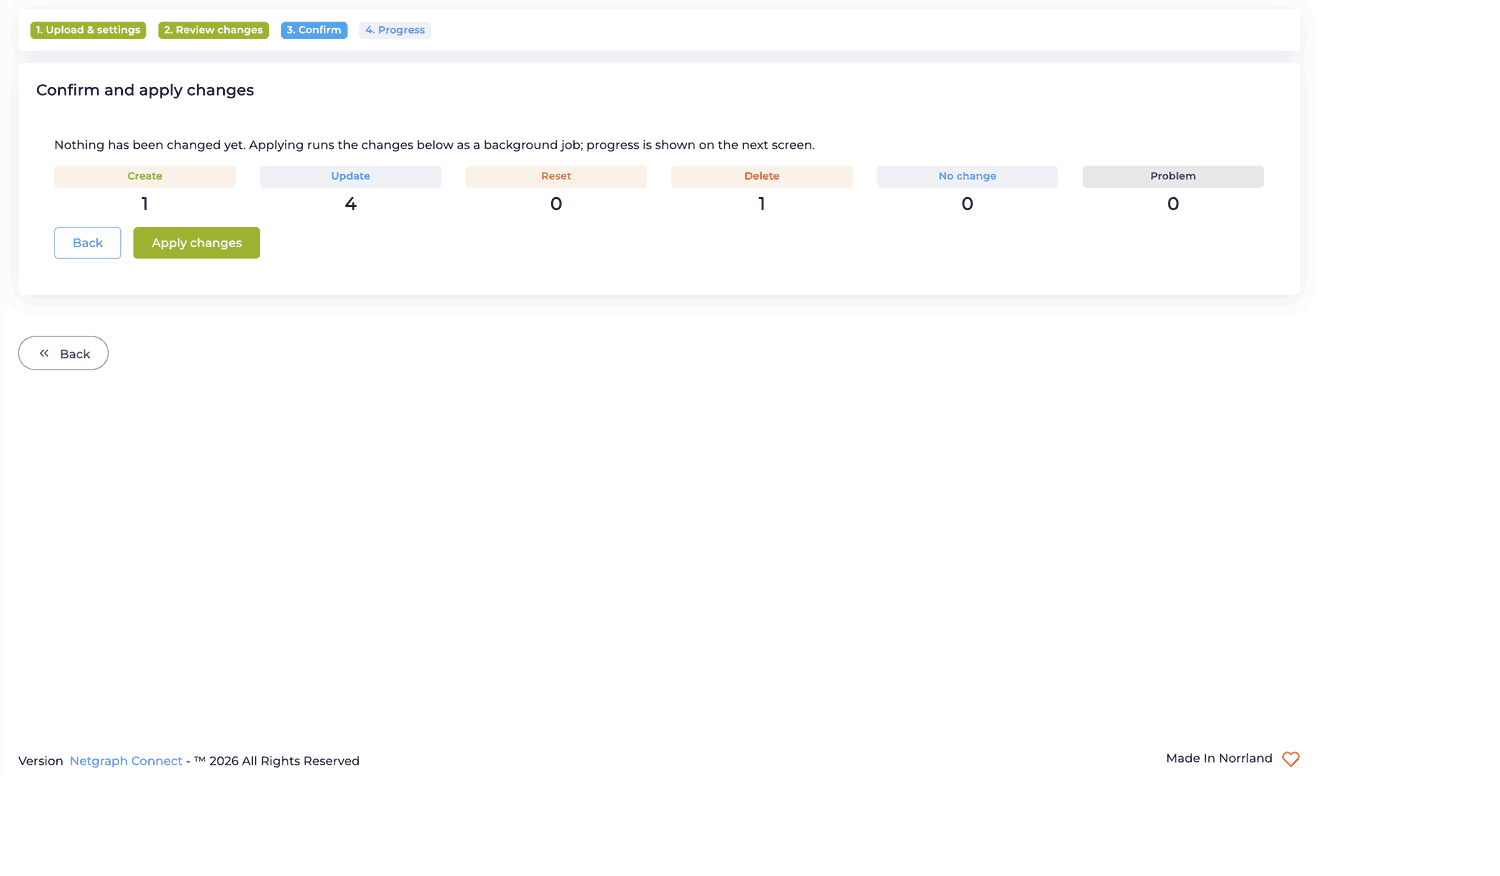
A final summary of the counts. Nothing has been changed at this point. Click Apply changes to start the run.
4. Progress
Section titled “4. Progress”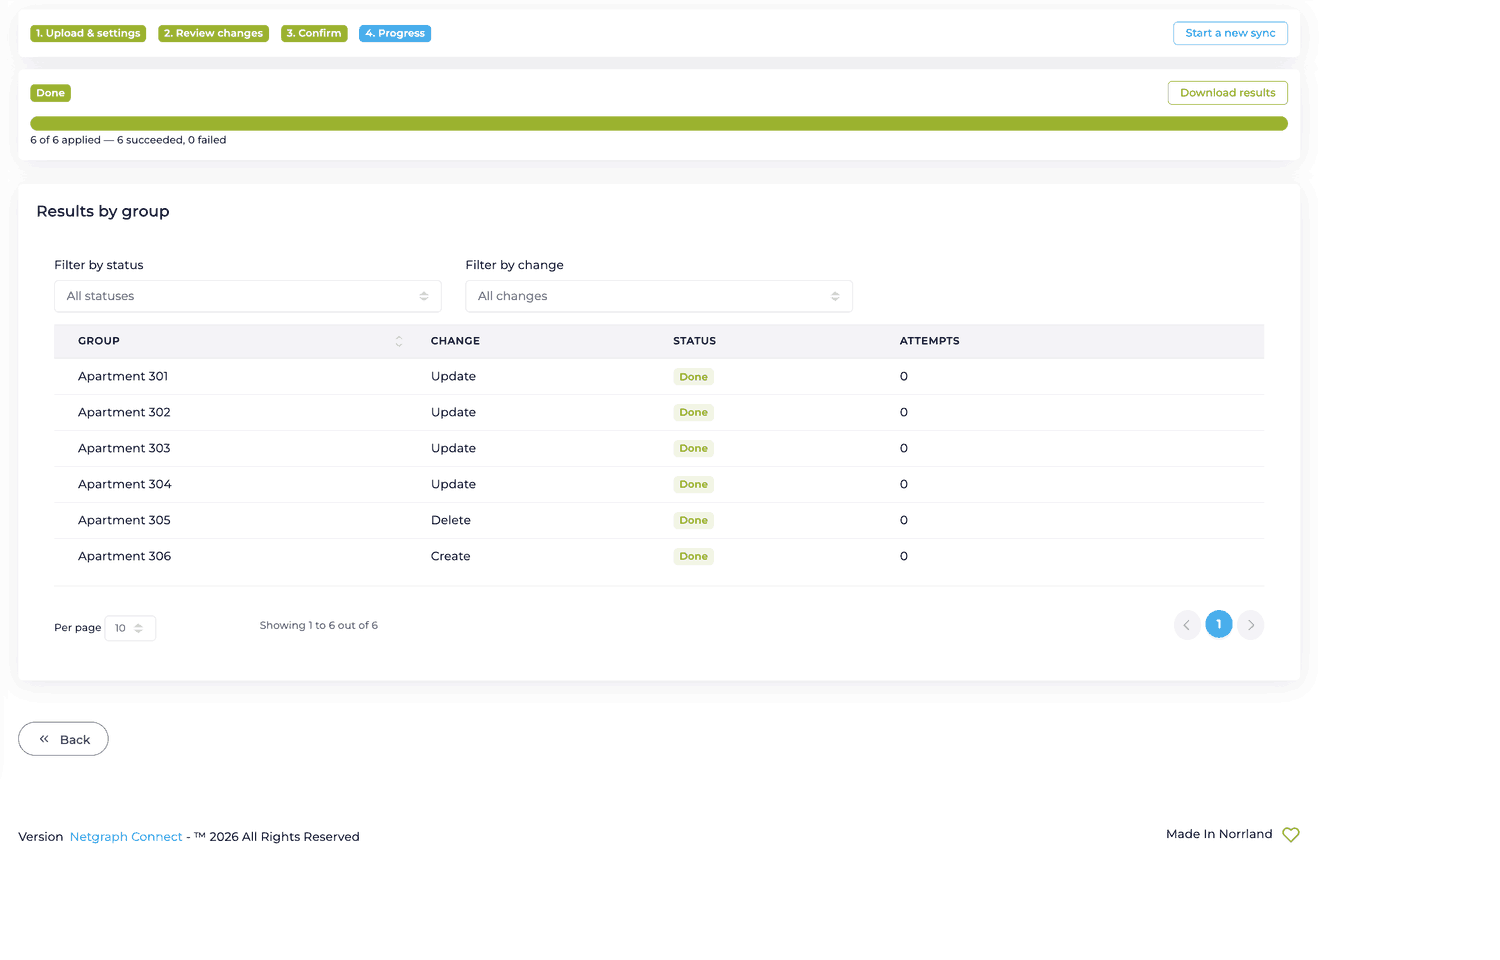
The sync applies as a background job, so you can leave the page and come back. The Progress step shows a running count (applied, succeeded, failed, skipped) and a Results by group table with each WPN’s change, status, and number of attempts. Expand a row for the detail on any WPN that did not apply cleanly. Each WPN is applied independently, so one problem group never stops the rest.
A run finishes as Done, or Done with some problems if any group failed. Download results exports the outcome per group. You can Stop a running sync: groups already being updated finish, but nothing new starts.
Tip
If a WPN’s chosen Wi-Fi password happens to collide with one already in use on the Meraki SSID, the platform picks a fresh one and retries, so a duplicate password does not fail the group. If you set the password yourself and it still clashes, that group is reported with a clear message on its details row, and you can rerun it with a different value.
Recent syncs
Section titled “Recent syncs”Past runs are listed under Recent syncs on the Batch Group Sync page, with when each started, its status, how many groups it touched, and how many it deleted. Open any run to review its full per-group results again.