
Managing Self-Service Users
Invite residents to a Wireless Personal Network, grant or revoke the Group Administrator permission, and use Self-Service enrollment to let a resident provision themselves on first login.
Self-Service Users are the residents of a Wireless Personal Network. Every resident has User (default) — always on, can’t be removed. On top of that, any resident can additionally hold Group Administrator, which turns them into the apartment’s “home-router admin”.
There are three ways a resident becomes a Self-Service User of a WPN:
- Invited by an admin — from the admin dashboard, shown below.
- Invited by the WPN’s Group Administrator — from the Self-Service portal. Same flow, same permissions, scoped to their own WPN.
- Self-enrolled — if you’ve turned on Self-Service Enrollment on the WPN, each resident whose email domain matches the WPN’s enrollment filter gets auto-attached the first time they sign into the portal, with the default roles you’ve chosen.
Inviting a resident from the admin dashboard
Section titled “Inviting a resident from the admin dashboard”-
Open the Wireless Personal Network
From the Context overview, click the WPN name.
-
Open the Self-Service Users tab
On the WPN detail page.
-
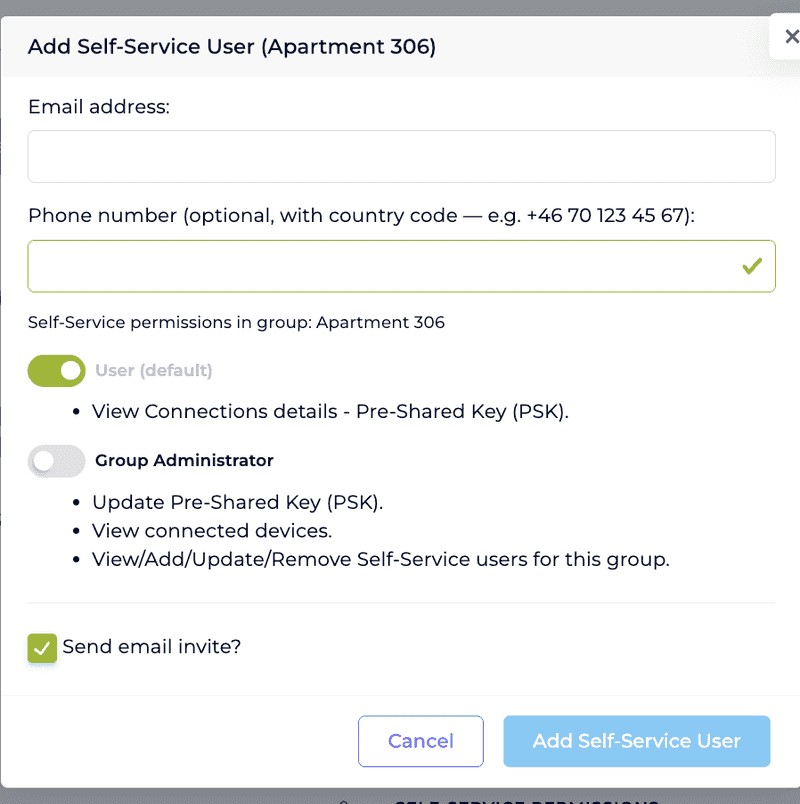
Click Add Self-Service User
A modal opens.
-
Enter the resident's email
This is the address they’ll sign into the Self-Service portal with.
-
Add a phone number (optional)
Enter the resident’s mobile number in international format, with a country code, for example
+46 70 123 45 67. It is an optional contact detail stored on the resident’s record for your reference; leaving it blank is fine. You can add or change it later from Modify User. -
Set permissions
User (default) is always checked and can’t be unchecked. Check Group Administrator additionally if this resident should manage the PSK and roommates for this unit.
-
Choose whether to send the email invite
Keep Send email invite? checked to have the platform send the Self-Service portal login email immediately. Uncheck it to create the pending invitation without sending; you can then Resend Invitation later from the row’s action menu.
-
Click Add Self-Service User
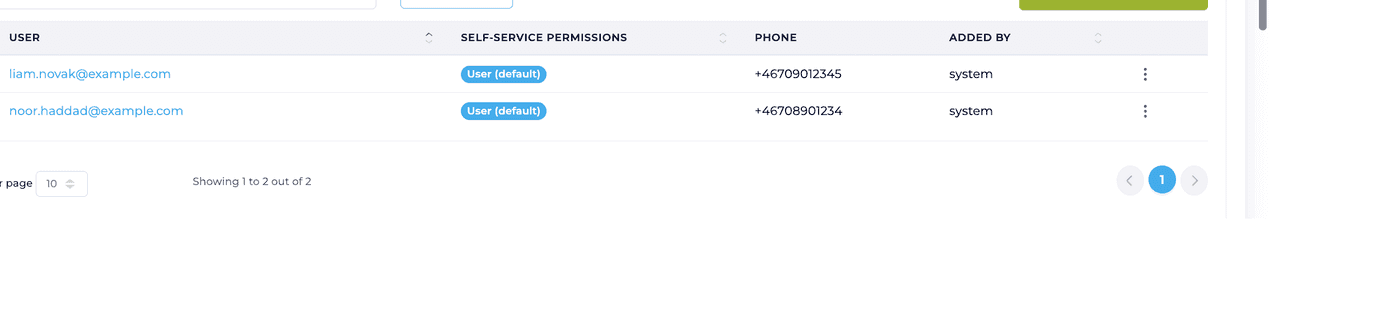
The resident appears in the list right away. Their row shows their roles as pills, who invited them, and an action menu (Resend Invitation, Modify User, Remove).
Self-Service Enrollment
Section titled “Self-Service Enrollment”Above the user list, the Self-Service Enrollment section controls automatic attachment. Tick Enable Self-Service enrollment and two settings appear:
- Email domain filter (required) — the email domain that
qualifies a resident for this WPN, entered with a leading @, for
example
@residents.example. It must start with @ and is unique per WPN: the same domain can’t be the filter for two WPNs at once. - Default roles for users enrolling via Self-Service — switches that set the roles auto-enrolled residents receive. Leave them off to enroll residents as User (default); turn on the management role to have qualifying residents arrive as a Group Administrator.
With this on, the first resident whose email domain matches the filter is auto-attached to this WPN the first time they sign into the Self-Service portal, with the default roles you selected.
Useful when:
- Residents sign into the Self-Service portal (via magic link or your Organization’s SAML IdP) with their work or building email, and the matching email domain routes each resident to the right Wireless Personal Network automatically.
- You’re onboarding a building one floor at a time and the manual Add Self-Service User flow would double your work.
Tip
Auto-enrolled residents get whatever default roles you selected in the enrollment settings. You can still adjust an individual later by opening their row, clicking Modify User, and changing their permissions.
Promoting a resident to Group Administrator
Section titled “Promoting a resident to Group Administrator”From the Self-Service Users tab:
-
Find the resident's row
Search by email if the list is long.
-
Click the action menu and pick Modify User
Or click directly on the resident’s username.
-
Check Group Administrator
Leave User (default) alone — it’s always on.
-
Save
The change is immediate. Next time the resident opens the portal they see the Change Passphrase and Manage Users cards.
Tip
Keeping two Group Administrators per unit is a useful pattern. If one moves out or loses portal access, the other can still rotate the PSK and invite replacements without you having to step in.
Demoting a Group Administrator
Section titled “Demoting a Group Administrator”Open Modify User and uncheck Group Administrator. The resident remains in the WPN as a User (default) and keeps their Self-Service portal access — they just lose the management cards.
Revoking a Self-Service User
Section titled “Revoking a Self-Service User”When a resident moves out:
-
Open the Self-Service Users tab
On the WPN detail page.
-
Find the resident's row
-
Click Remove
From the action menu. The resident loses portal access to this WPN immediately.
Revoking a Self-Service User does not rotate the Pre-Shared Key — the ex-resident’s existing devices will still join the WPN if they know the PSK. Typical practice is to revoke the user and rotate the PSK (or let the Group Administrator do the rotation from their side), so the ex-resident’s devices lose access at the same time they lose portal visibility.
Where residents come from
Section titled “Where residents come from”- Email-only invitation — the platform sends a magic-link-style invitation to the email you entered. The resident clicks the link and signs in; no password to manage.
- SAML — if the Organization has a SAML relying party configured with the target set to the self-service portal, residents authenticate against your IdP instead of receiving magic-link emails. See Organization SAML authentication.