
Setup with Microsoft Entra ID
End-to-end setup guide for EntryPoint with Microsoft Entra ID — Graph API credentials and permissions, Microsoft Cloud PKI, Intune SCEP and trusted certificate profiles, the EntryPoint Context, RADIUS network integration, and Entra group mapping.
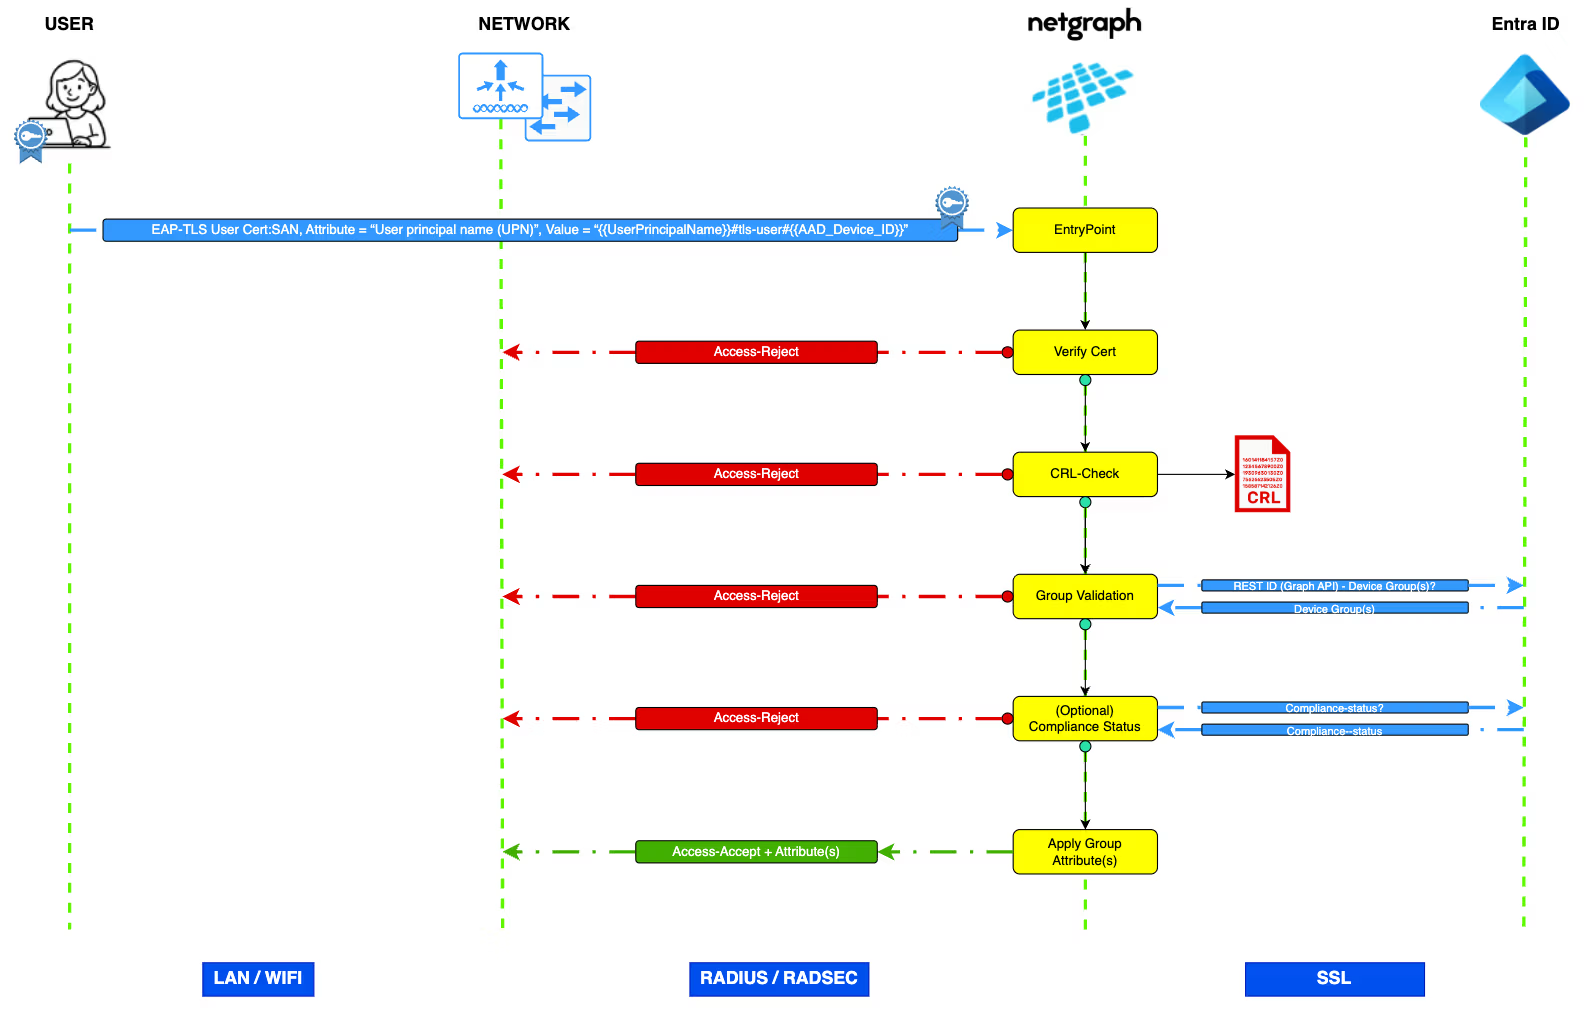
The EntryPoint RADIUS service for 802.1X (EAP-TLS) with Microsoft Entra ID ensures that only authorised devices can access your network by validating client certificates and tying authorisation to Microsoft Entra group membership. Microsoft Entra ID handles identity verification (User Principal Name) and device compliance (Entra Device ID).
This guide walks the entire setup, end to end: Graph API credentials, Microsoft Cloud PKI, Intune certificate profiles, the Wi-Fi profile, the EntryPoint Context, RADIUS network integration and the Entra group mapping.
Note
Modifications to the Microsoft environment should be performed by personnel with appropriate technical expertise to ensure a correct configuration and to mitigate the risk of unintended operational impacts.
1. Create Microsoft Graph API credentials and permissions
Section titled “1. Create Microsoft Graph API credentials and permissions”This step establishes the credentials and permissions for the Microsoft Graph API in the Microsoft Entra admin center. The generated Directory (Tenant) ID, Application (Client) ID and client secret are needed later when configuring EntryPoint.
-
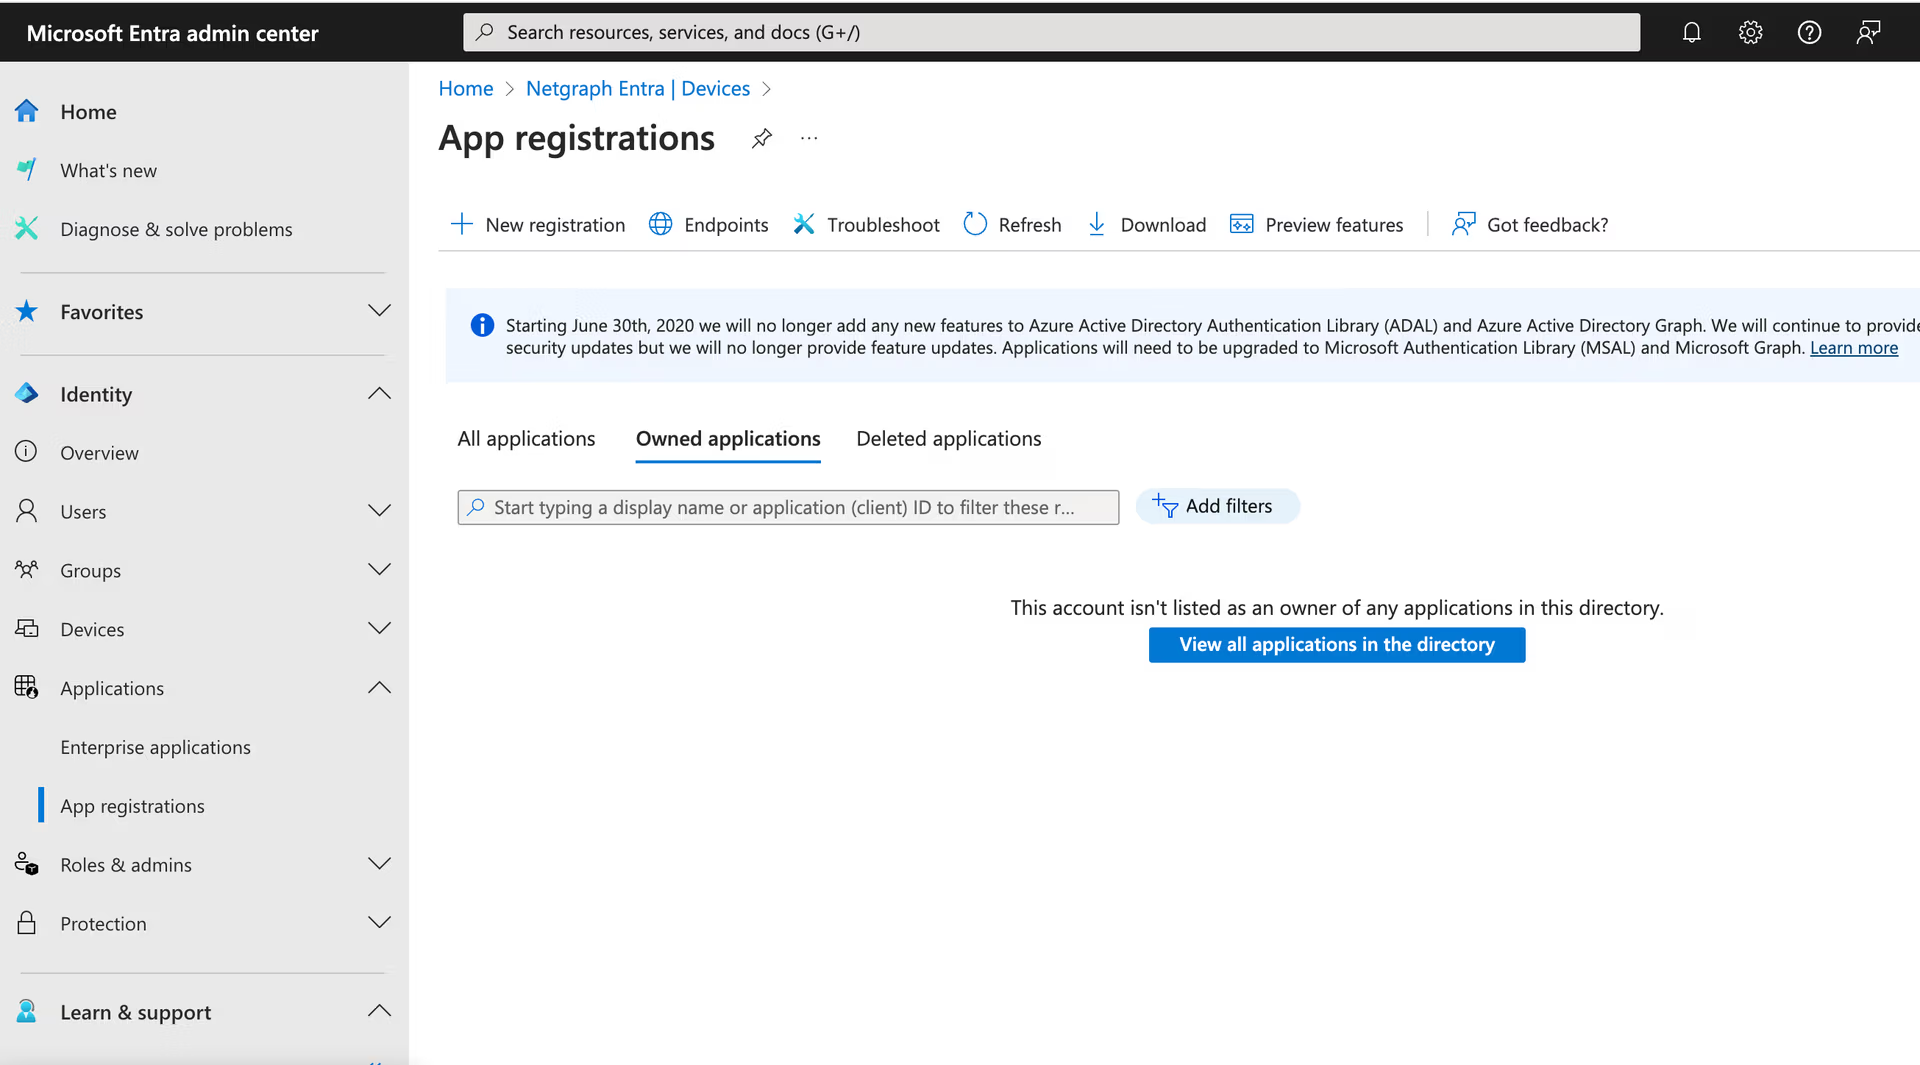
Access App Registrations
In the Microsoft Entra admin center, navigate to the App registrations section.
-
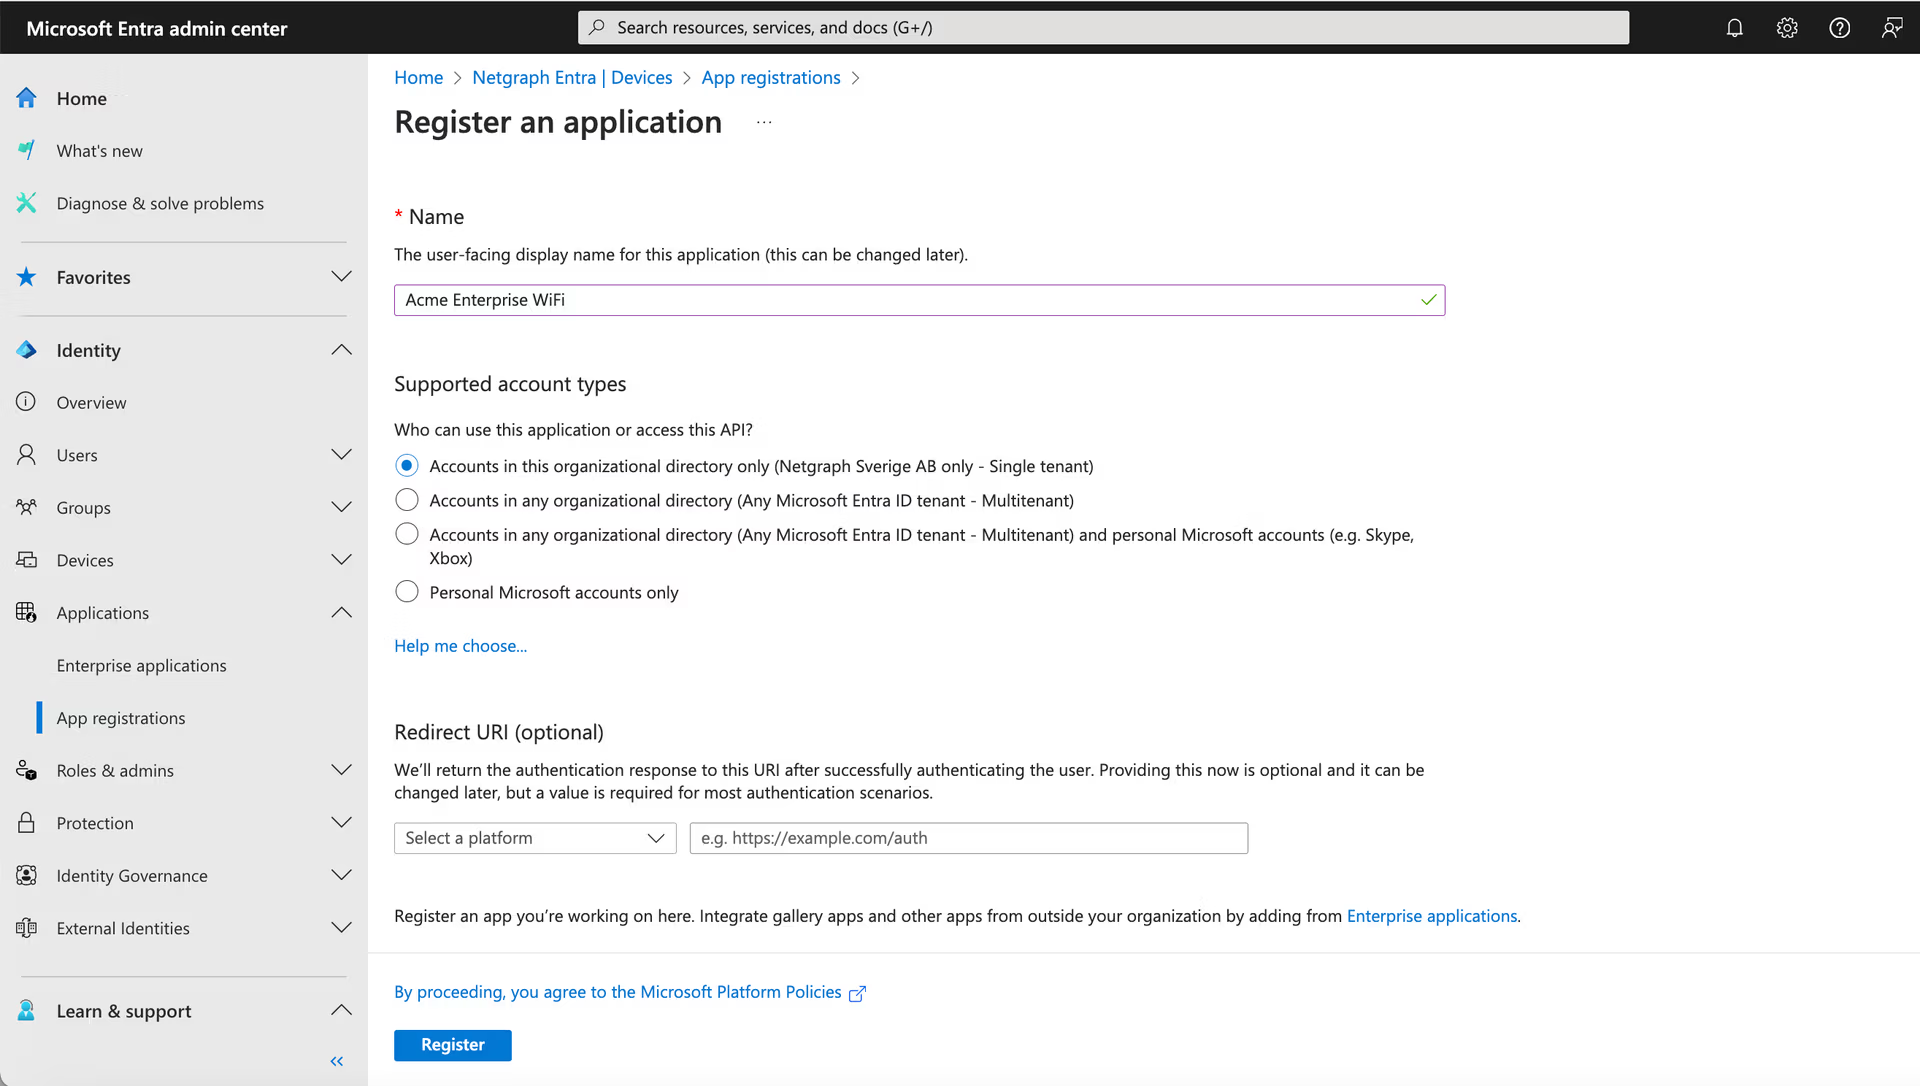
Register a new application
Click New registration, give the application a name and complete the registration.
-
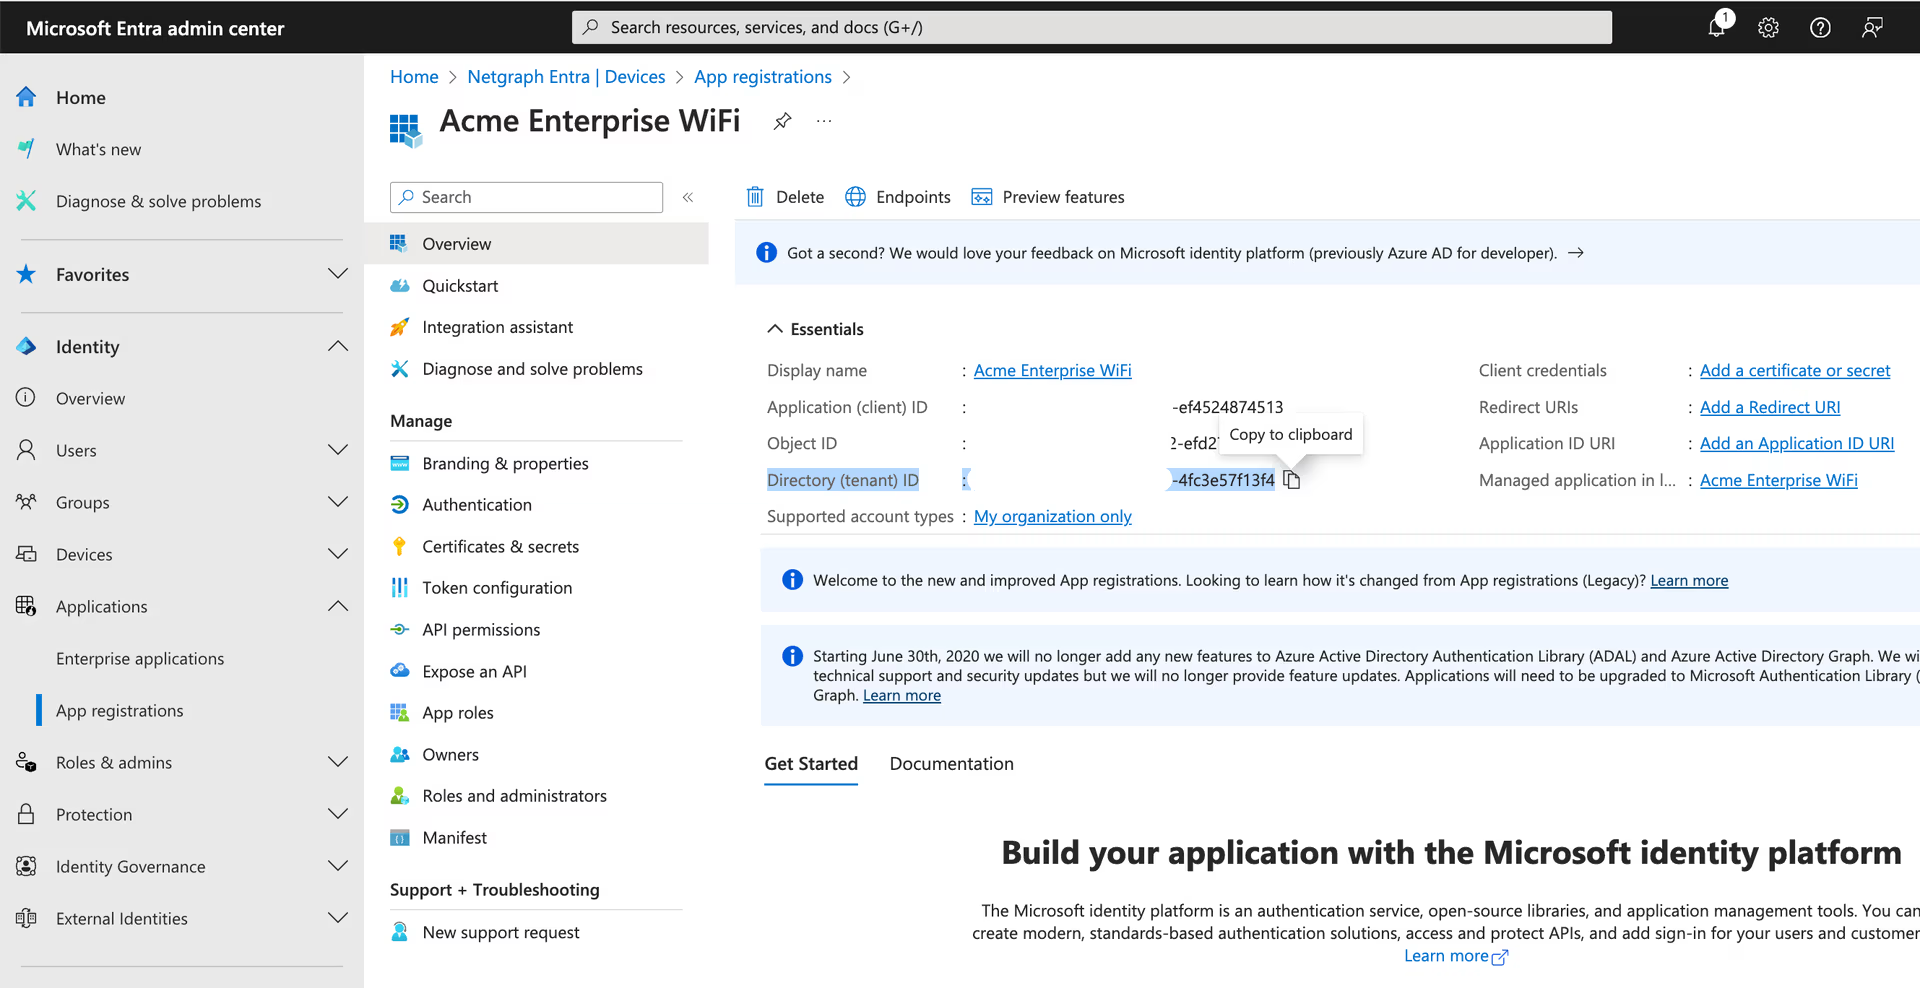
Record the Directory (Tenant) ID
Copy the Directory (Tenant) ID value shown on the registered application — you’ll paste it into EntryPoint later.
-
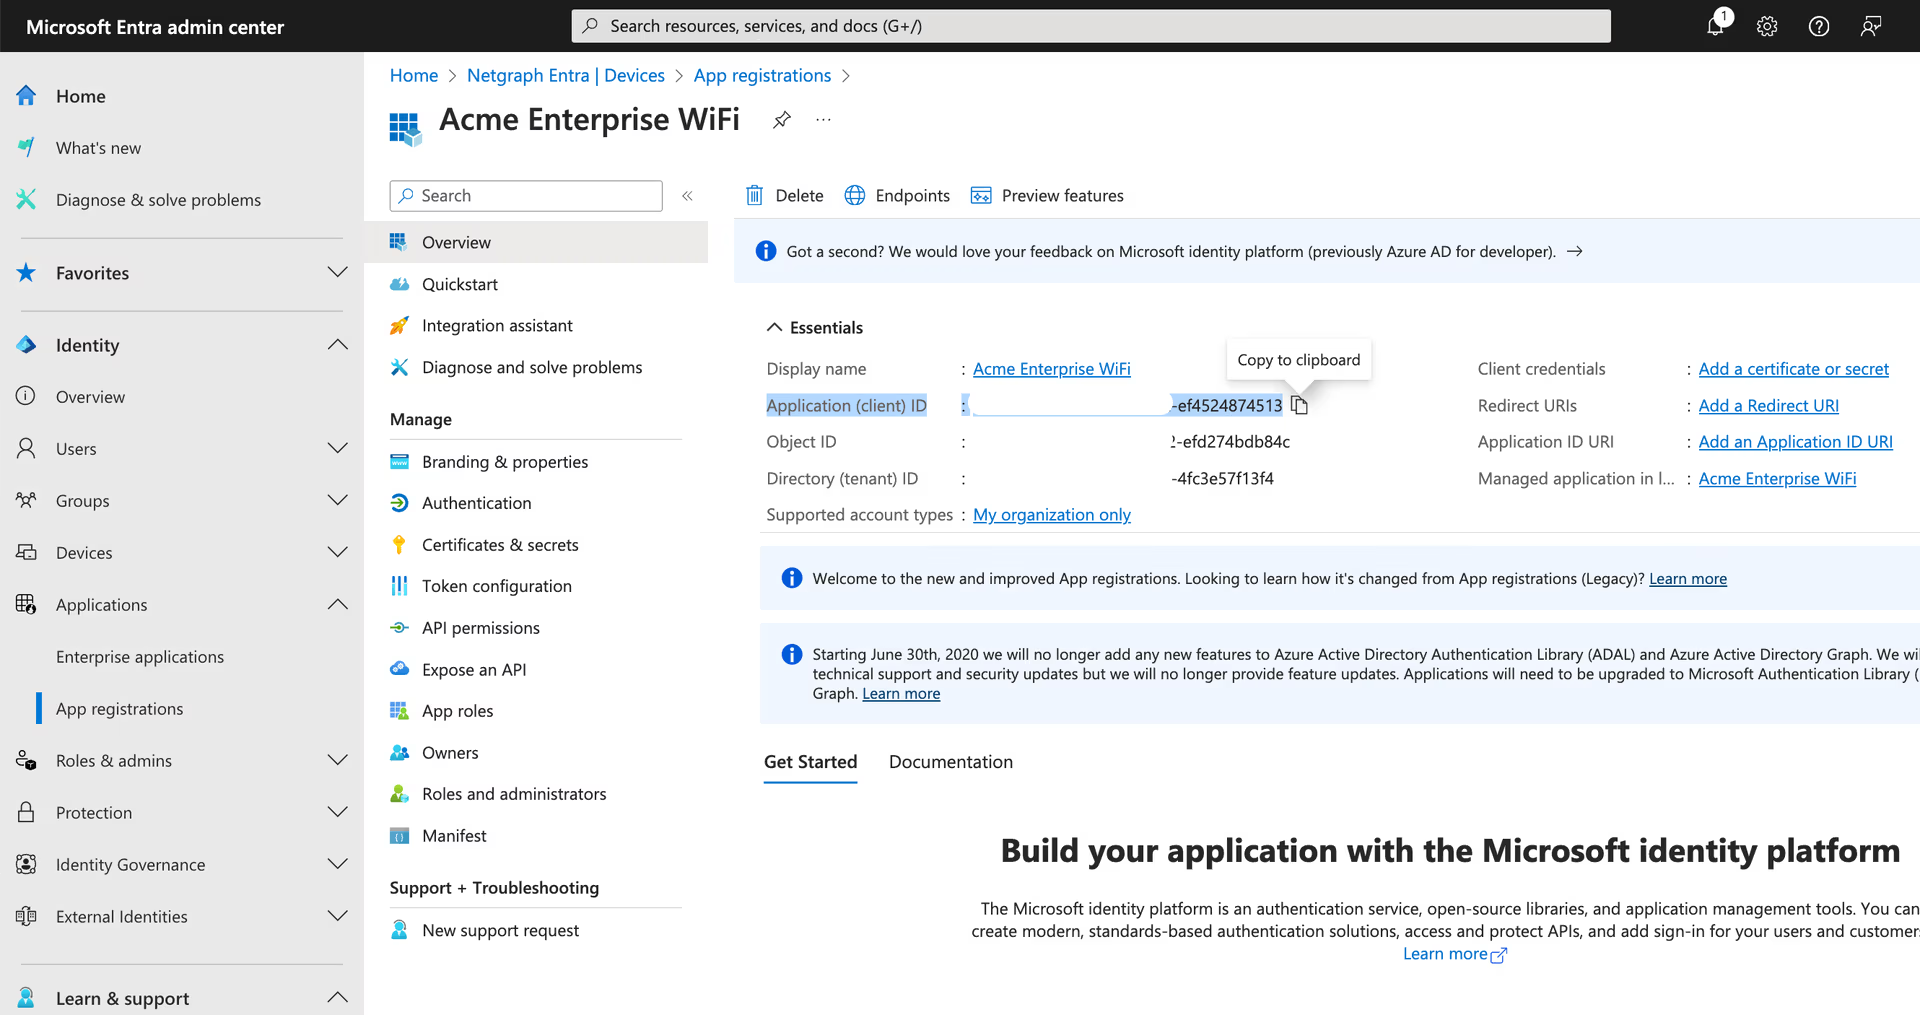
Record the Application (Client) ID
Copy the Application (Client) ID value as well.
-
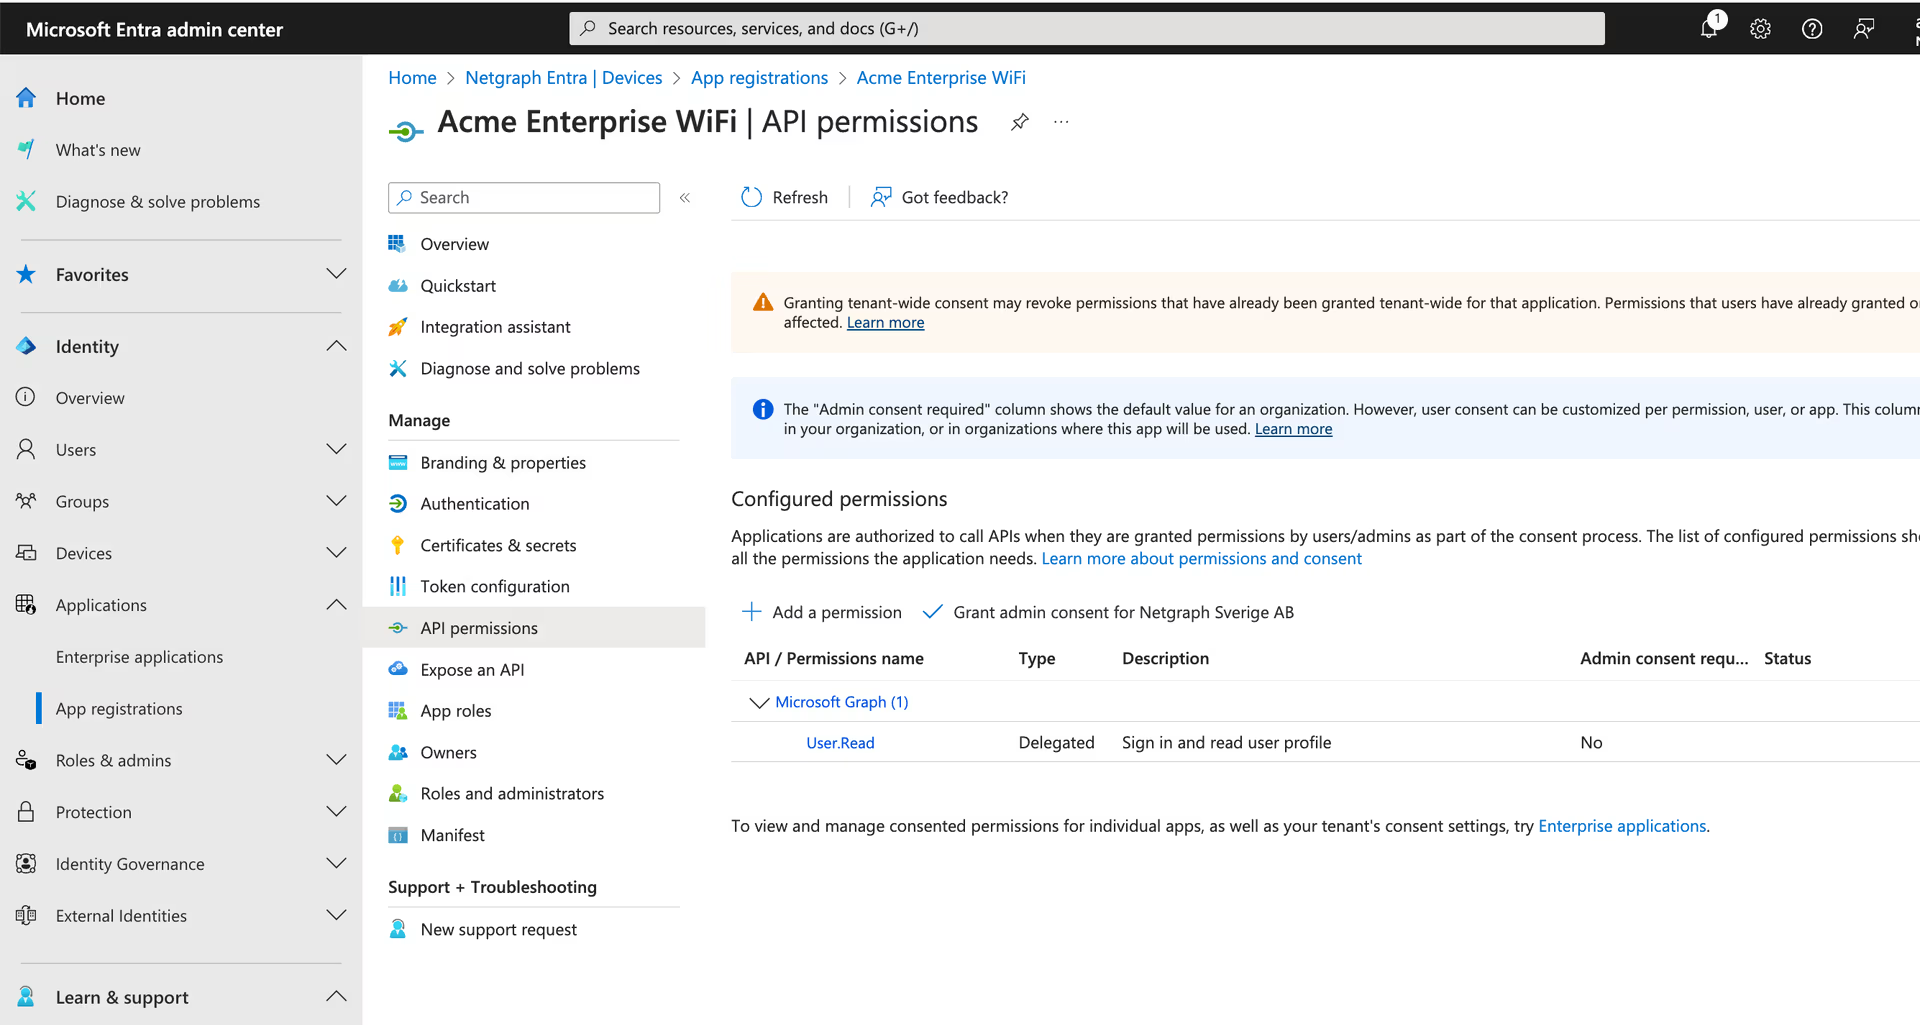
Open API permissions
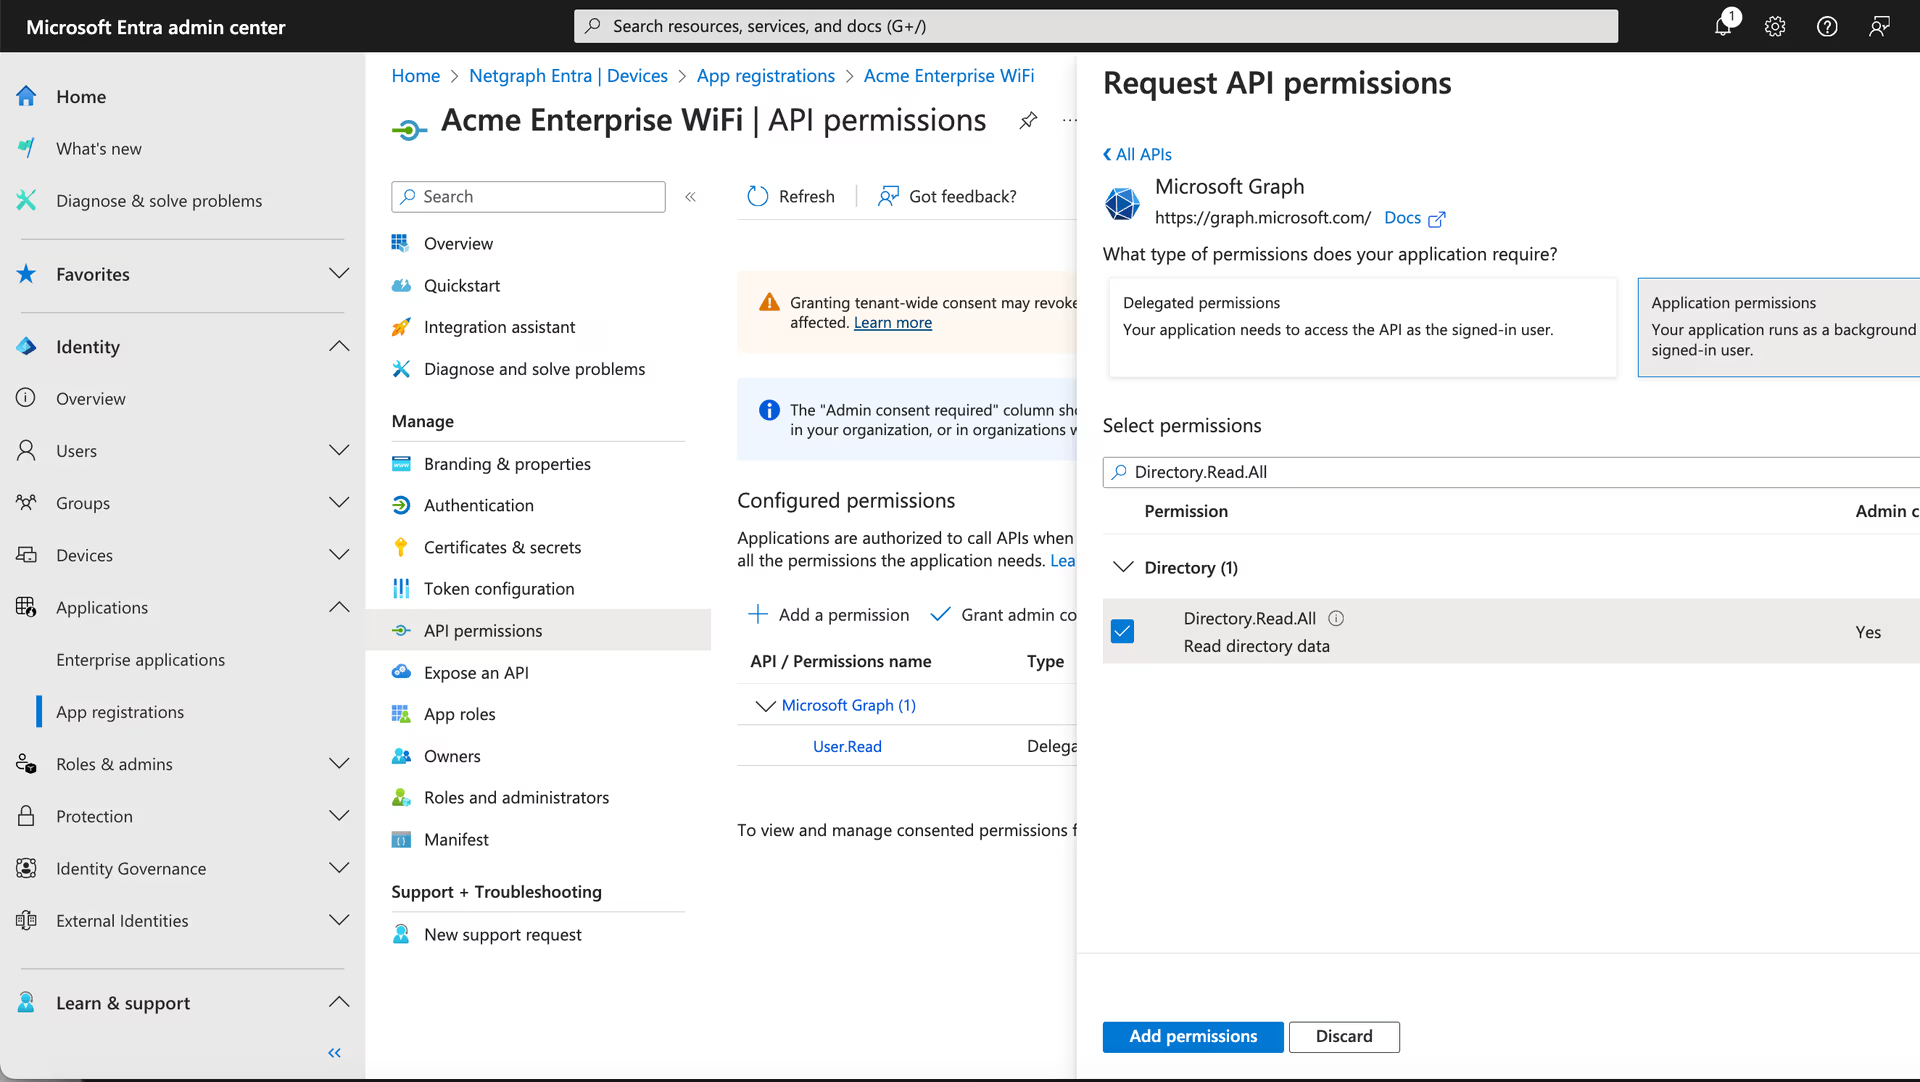
Navigate to API permissions and click Add a permission.
-
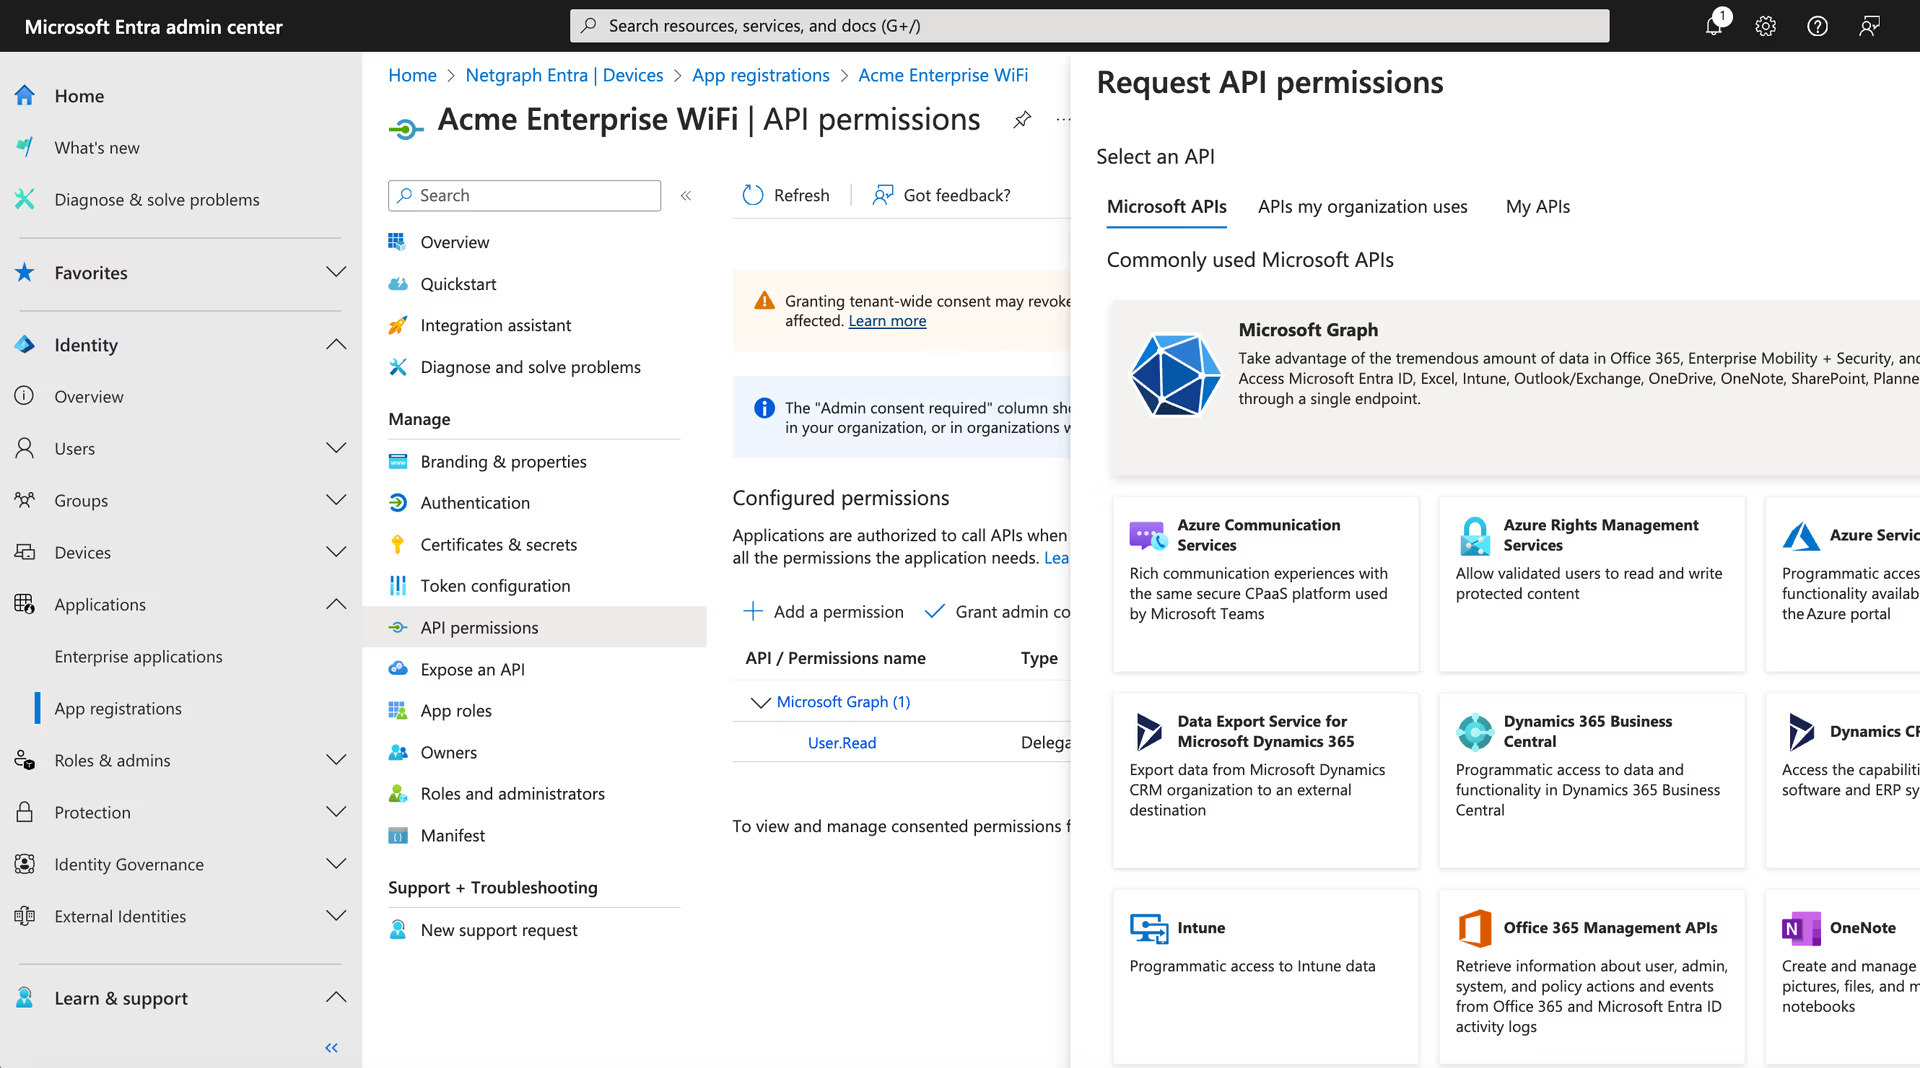
Select Microsoft Graph
Click the Microsoft Graph icon.
-
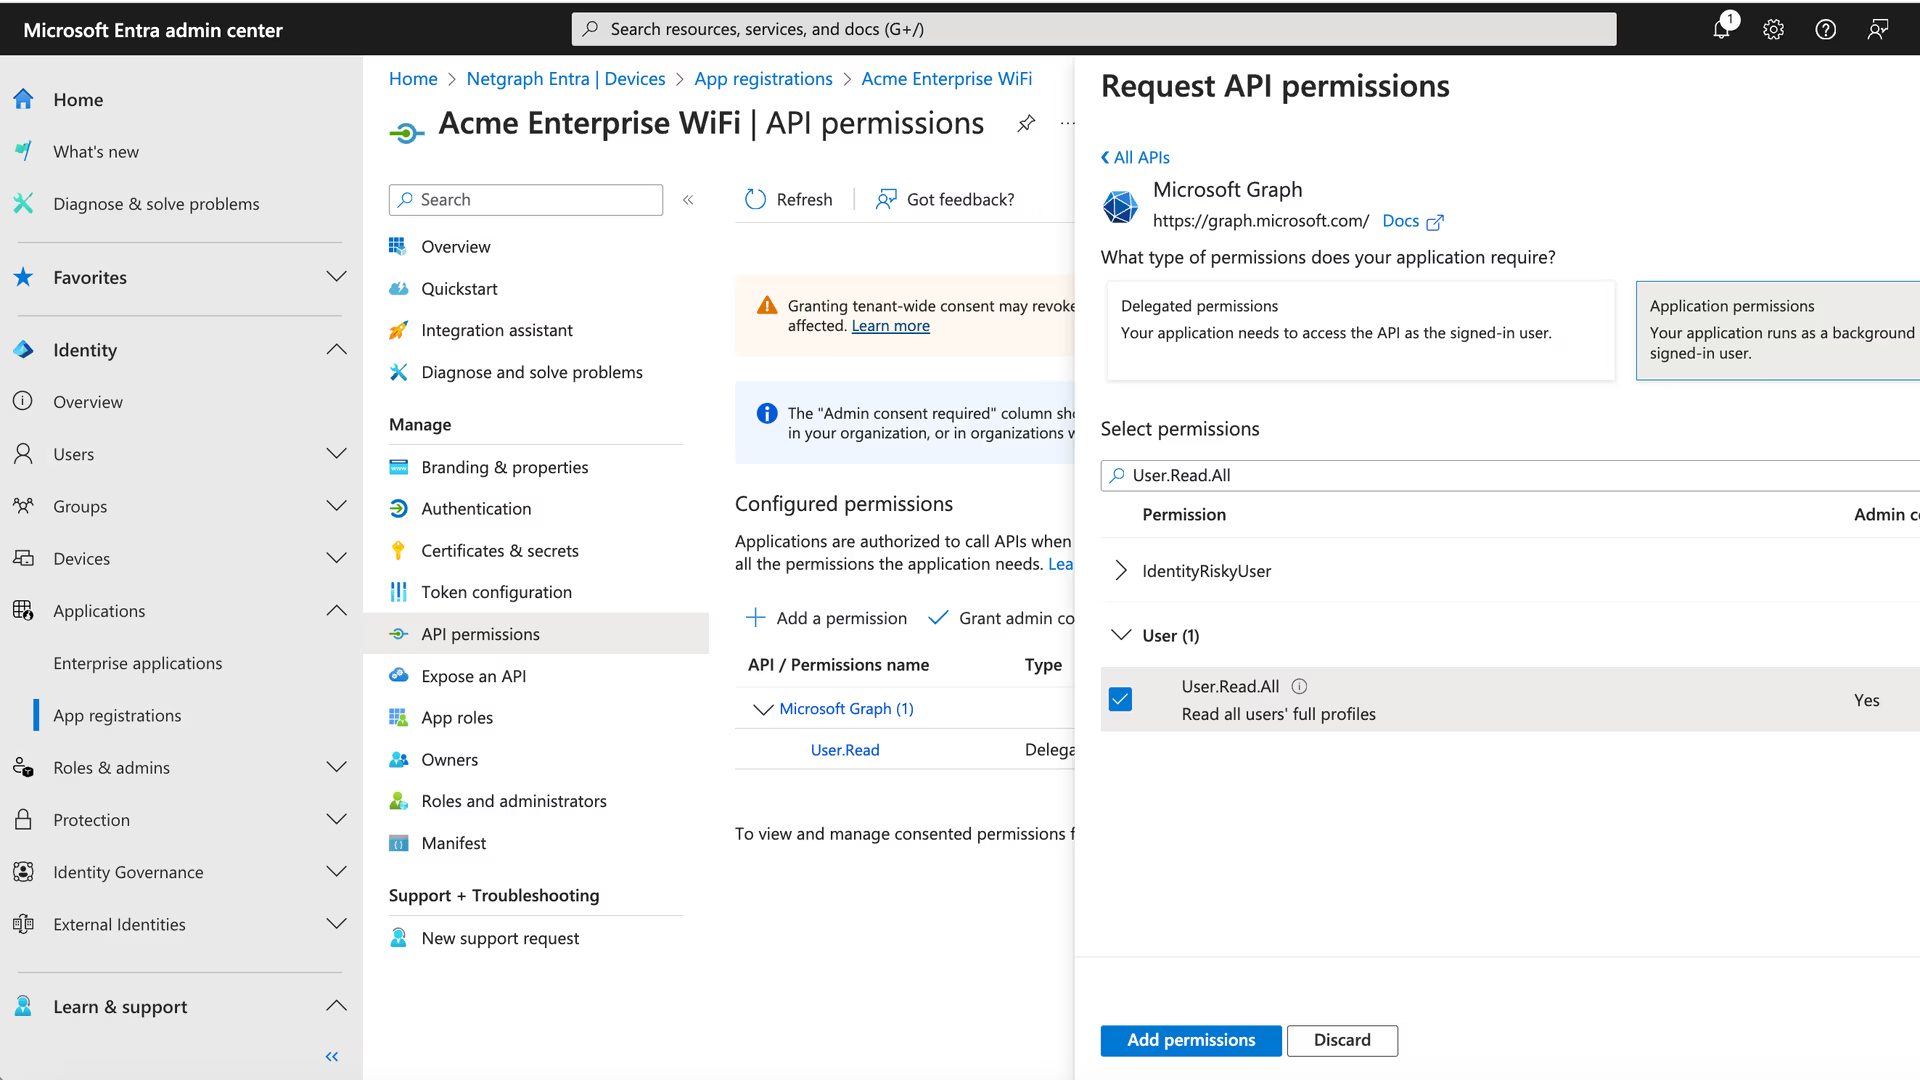
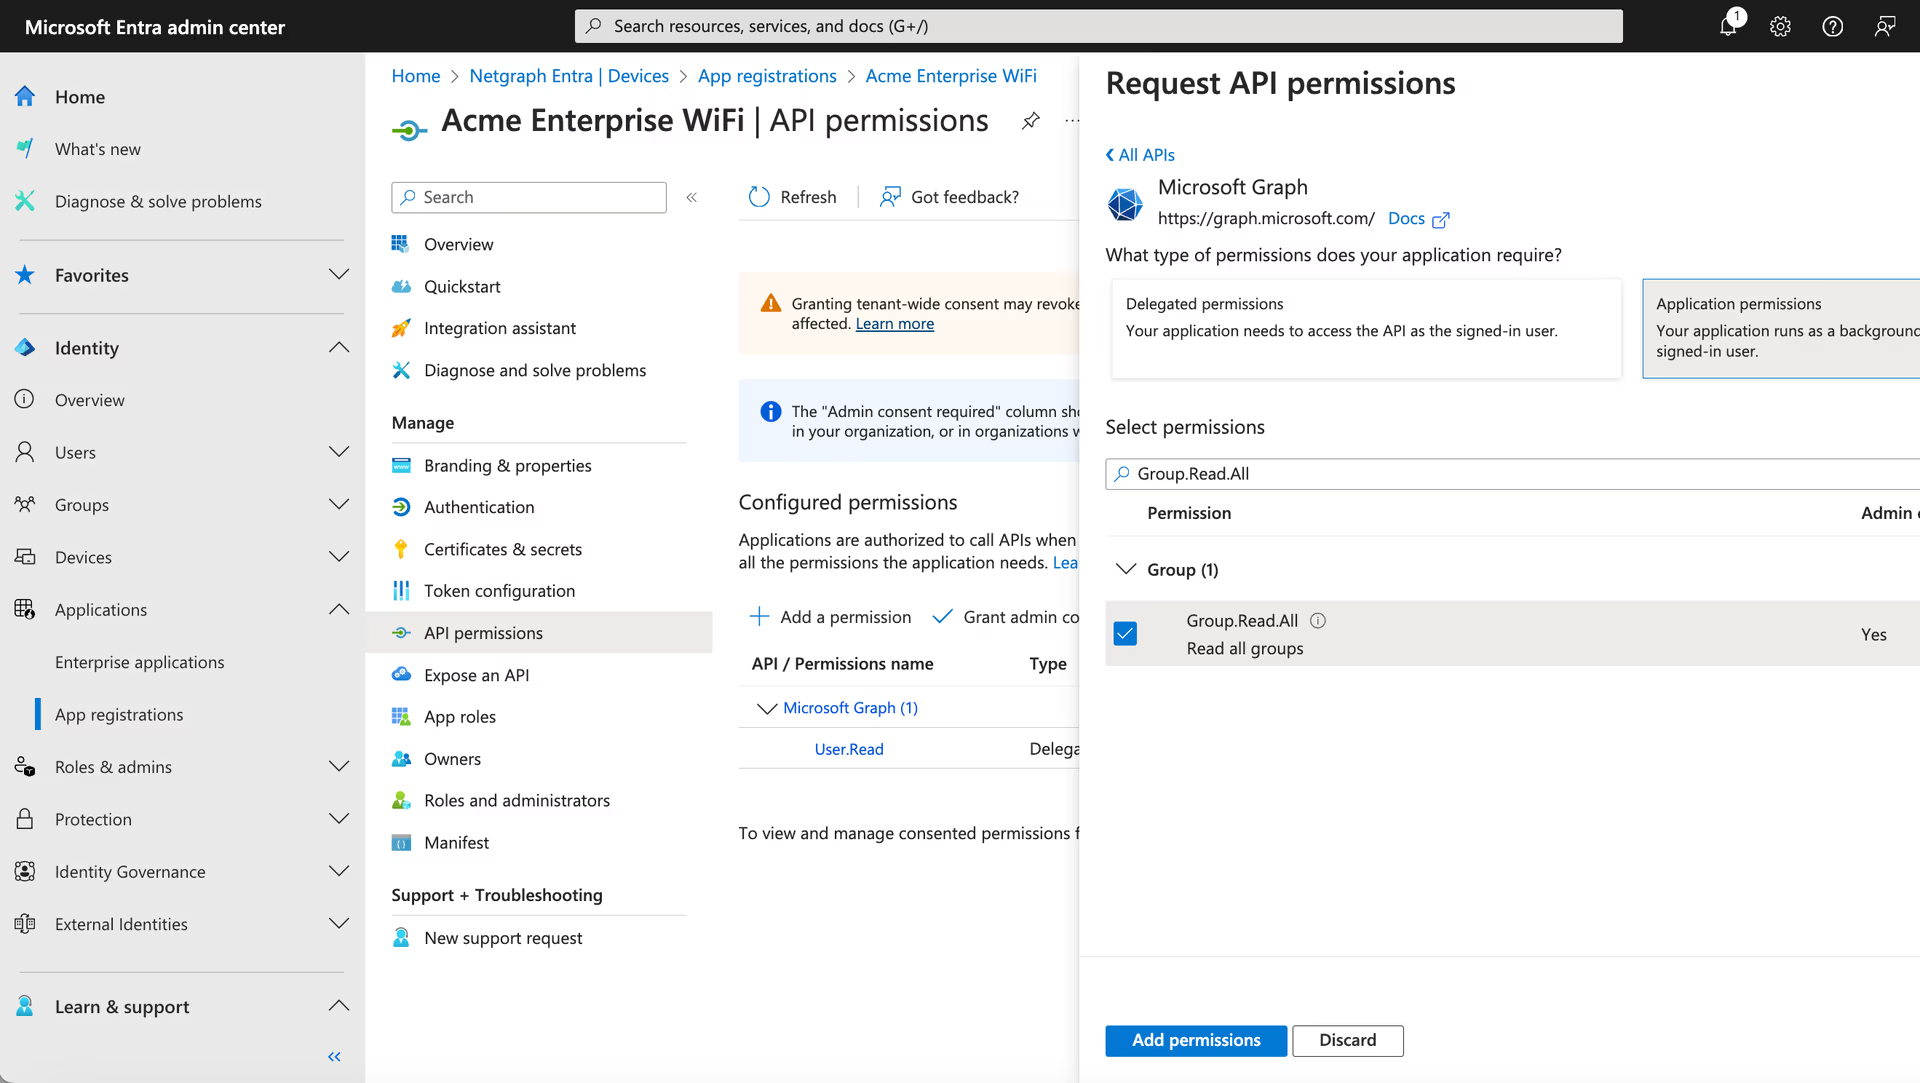
Add three Application permissions
Choose Application permissions and search for the following, adding each one in turn:
User.Read.AllGroup.Read.AllDirectory.Read.All
Click Add permissions once all three are selected.
-
Grant admin consent
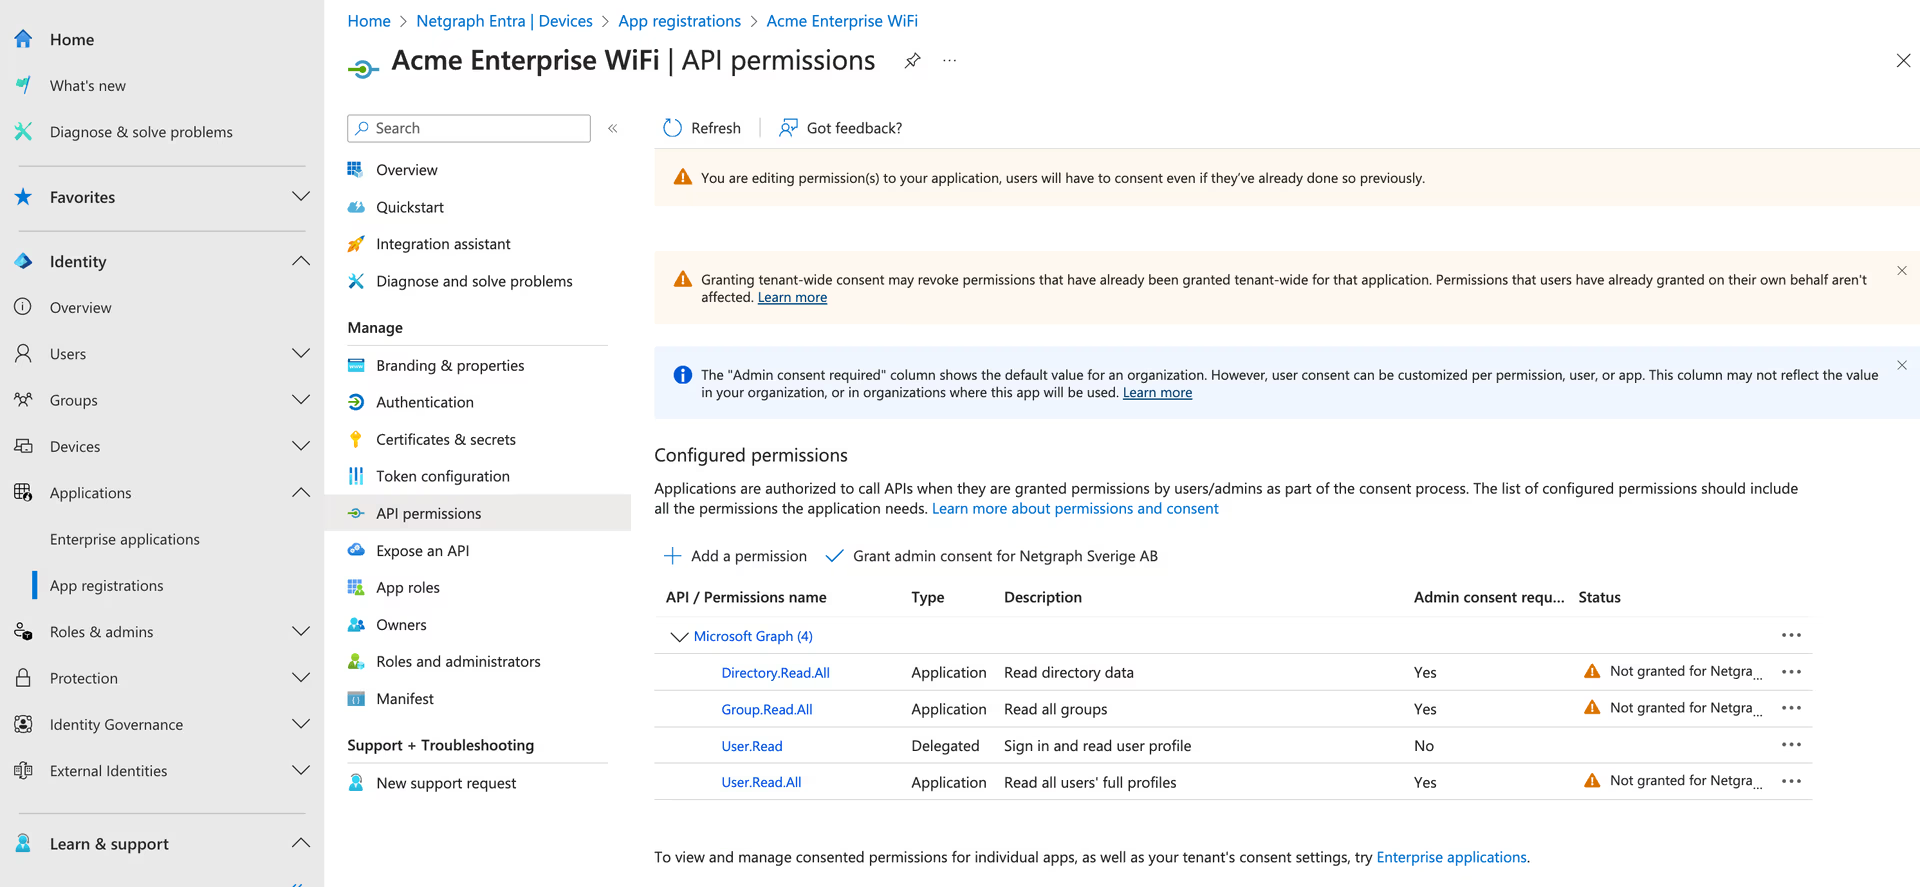
The API permissions list now shows each entry as Not granted for …. Click Grant admin consent for … to authorise them.
-
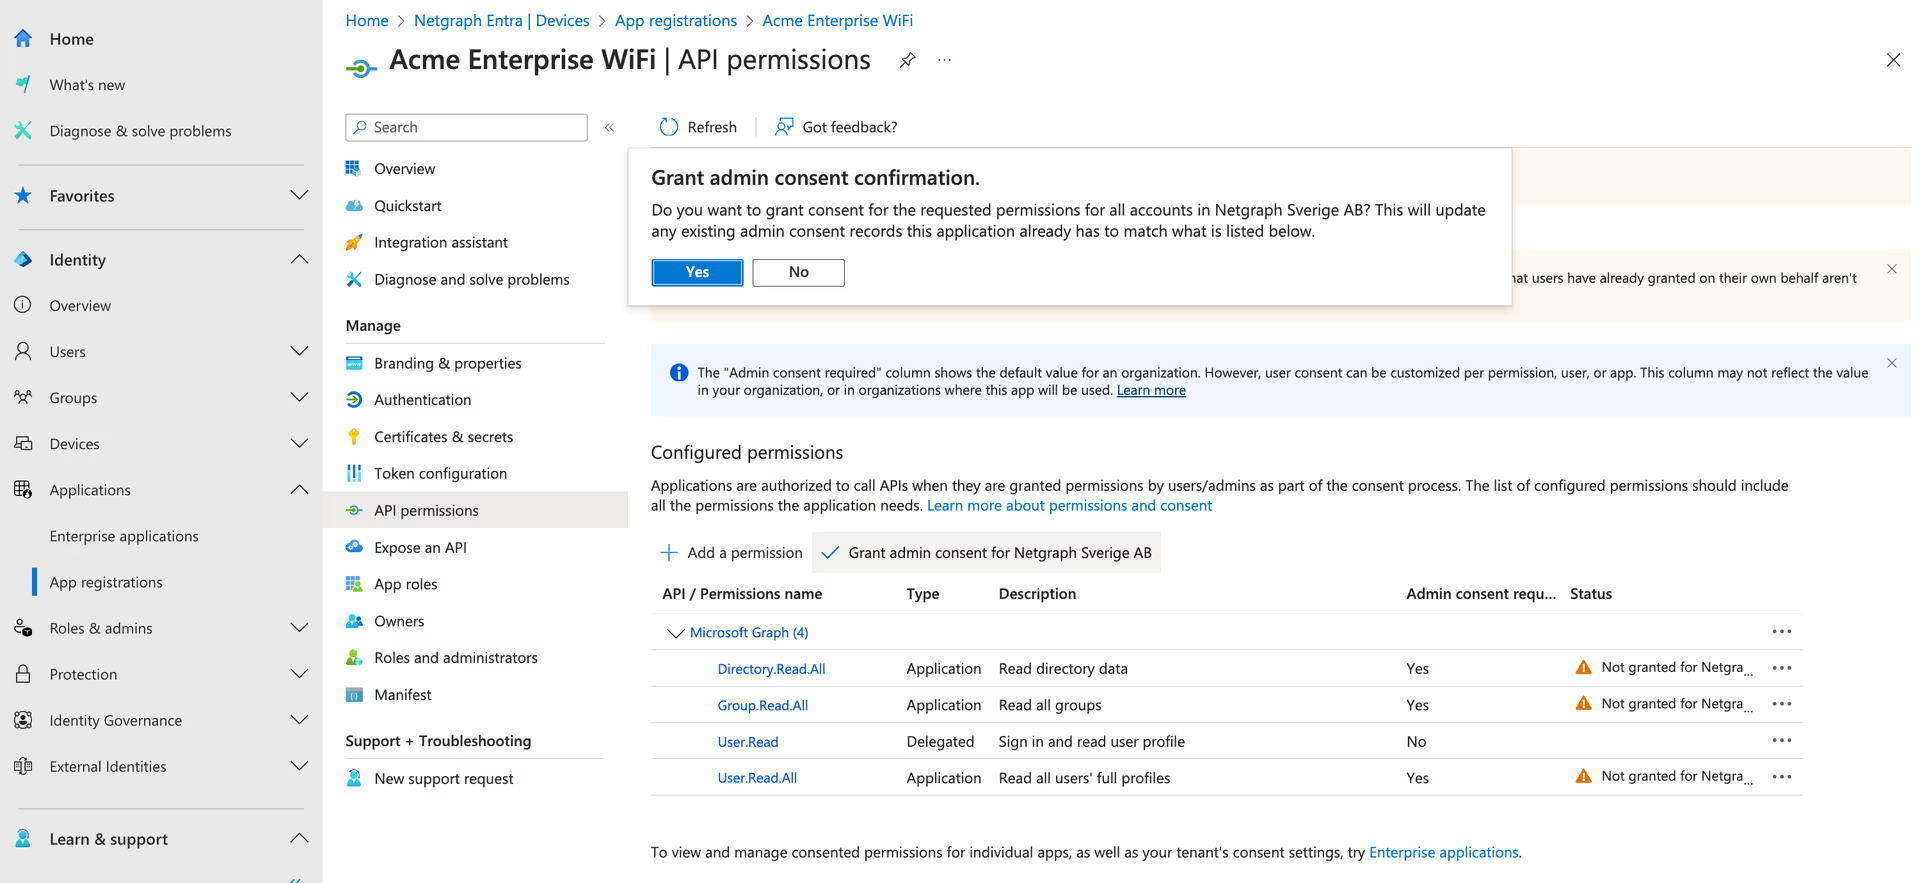
Confirm the consent
Accept the confirmation dialog by clicking Yes.
-
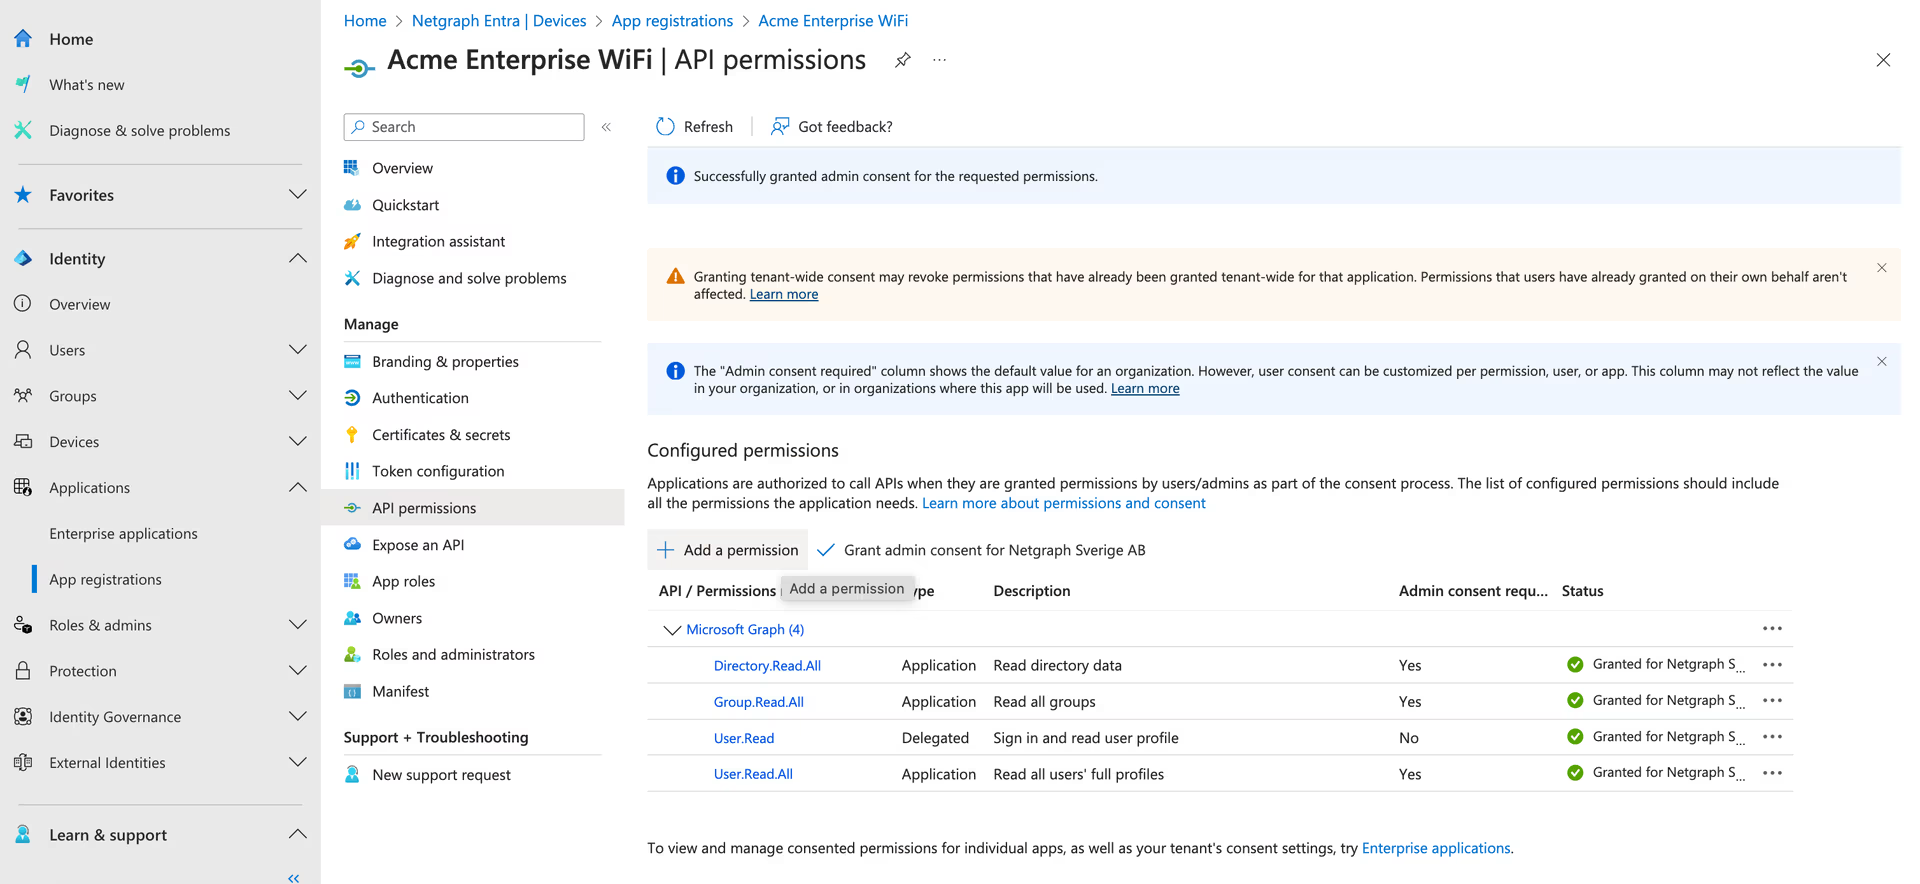
Verify the status
The status now reads Granted for … for each permission.
-
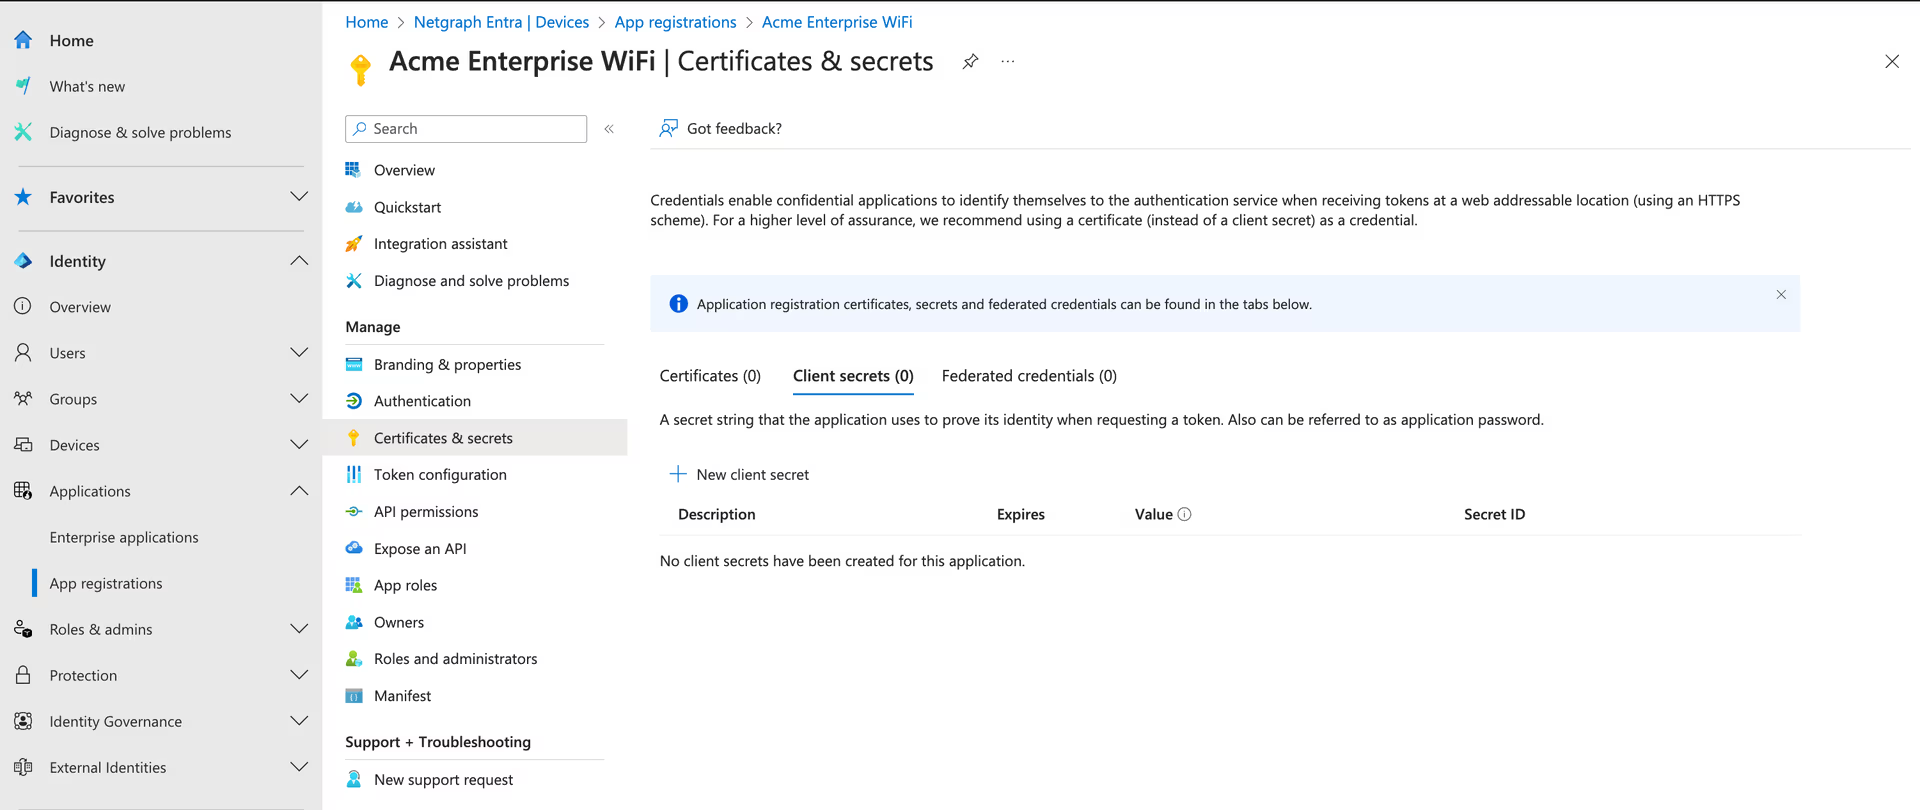
Create a client secret
Open Certificates & secrets in the left panel and click New client secret.
-
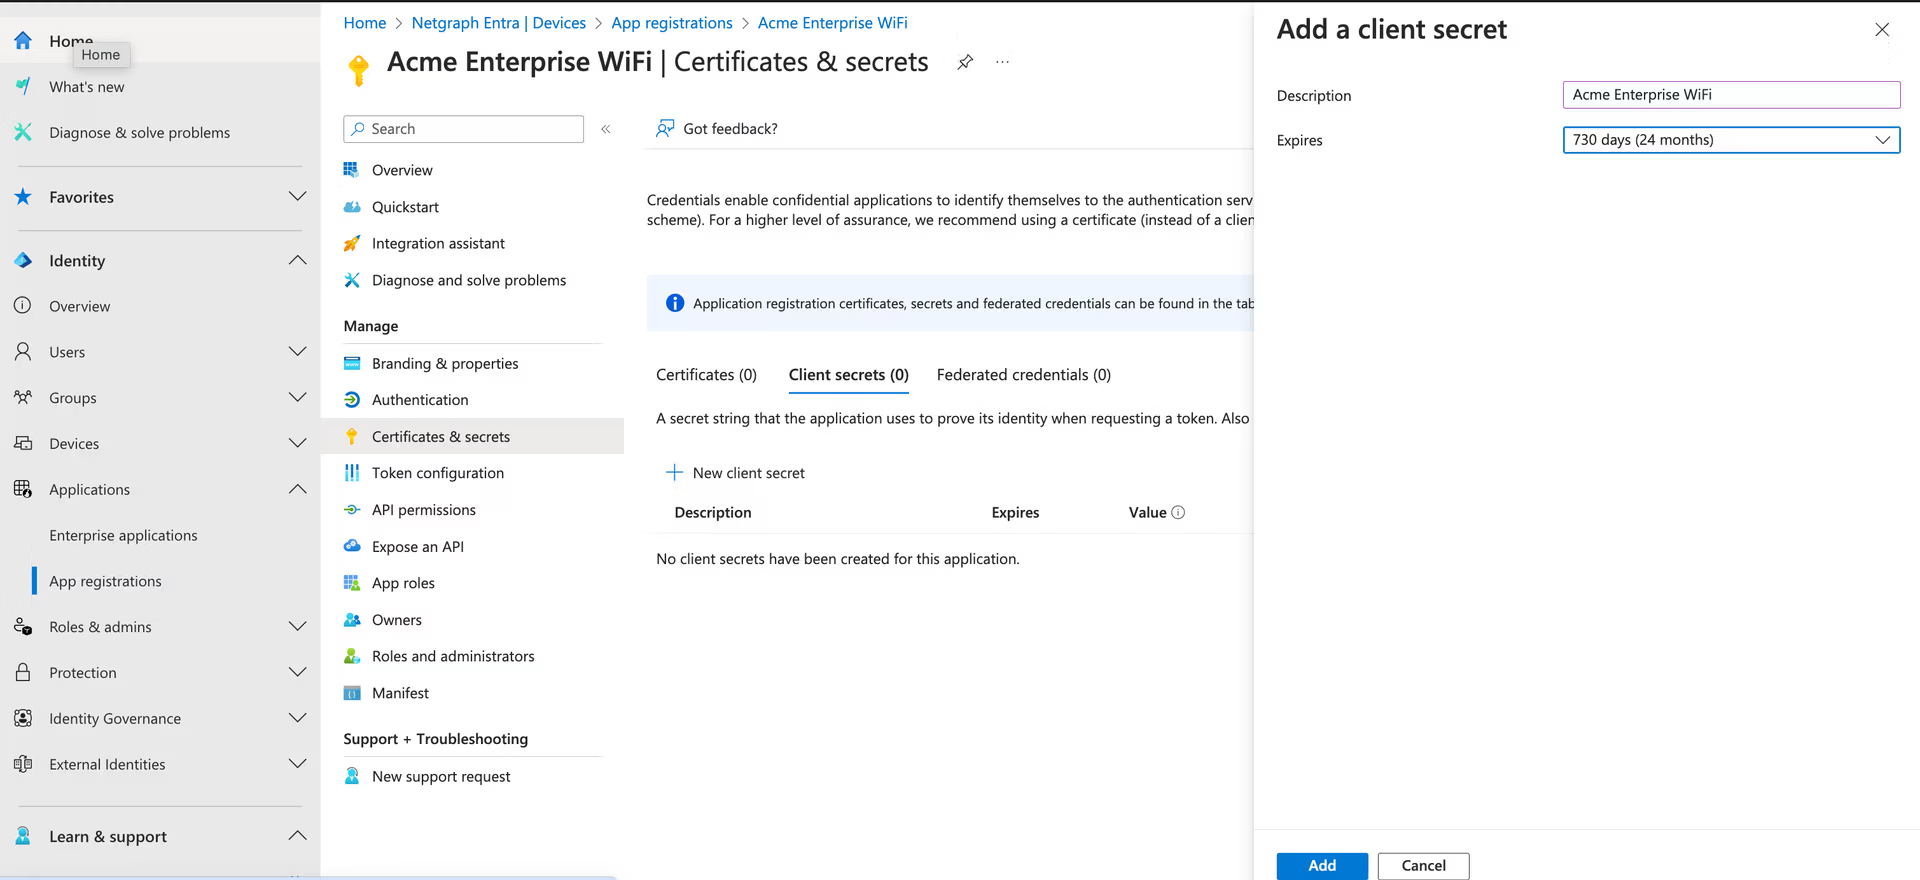
Configure the secret expiry
Enter a description, pick an expiry, then click Add.
-
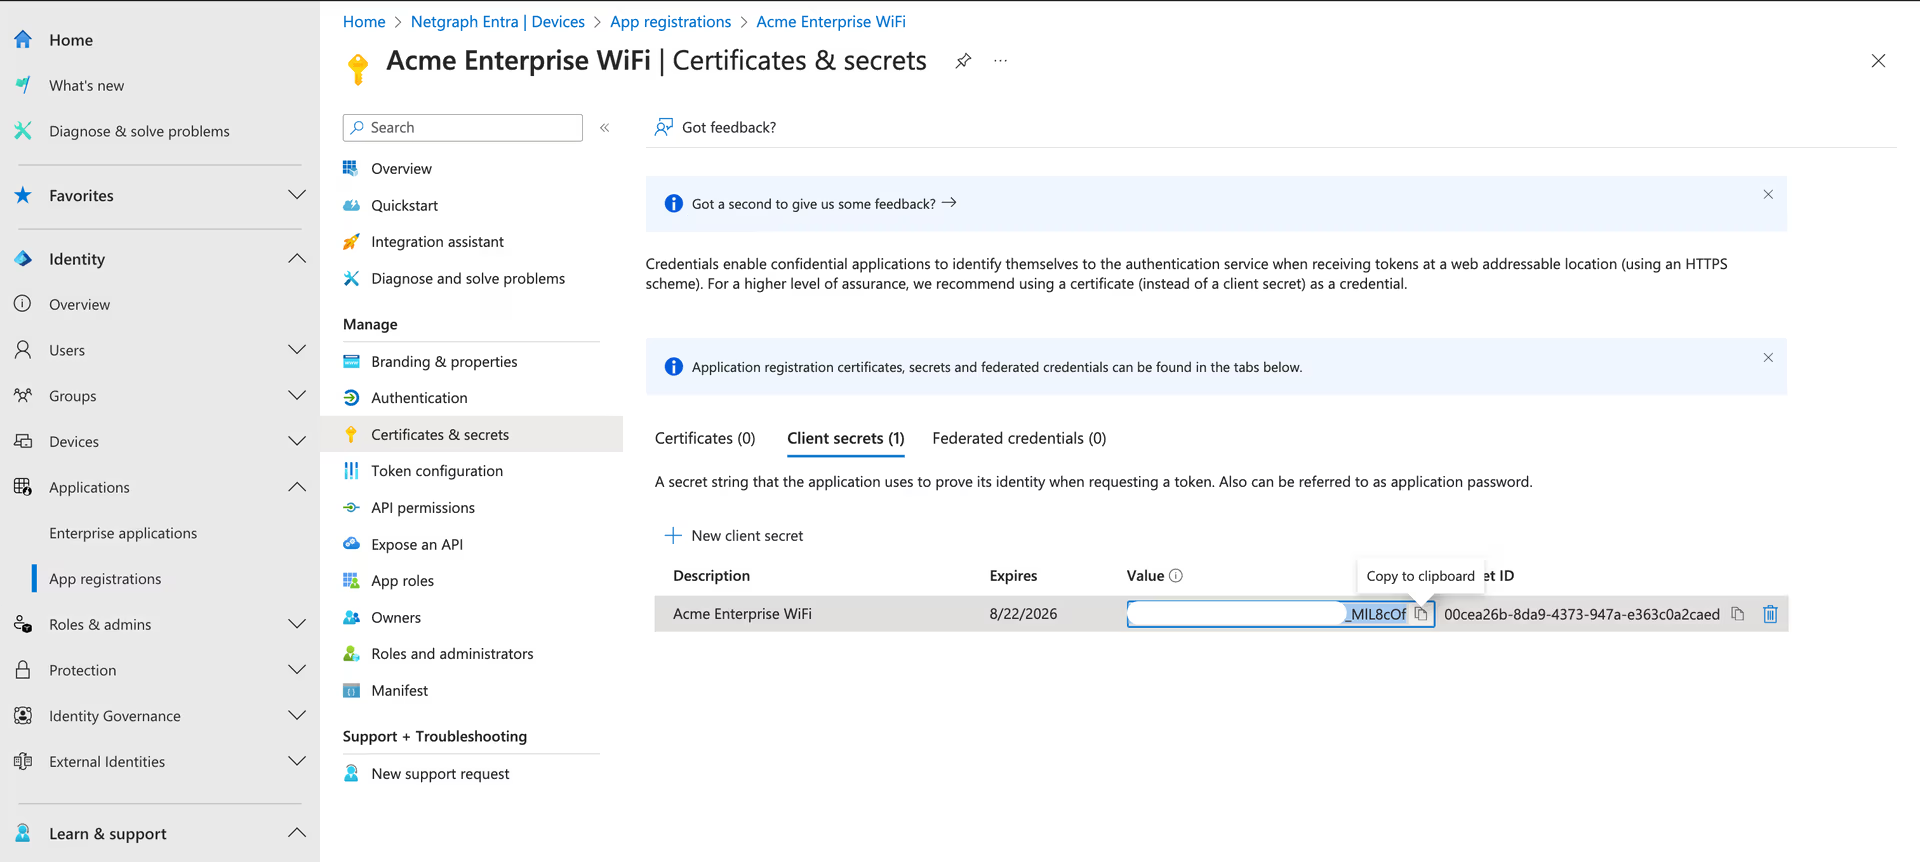
Copy the secret Value
Copy the Value of the secret immediately — it’s only visible once. You’ll paste it into EntryPoint later.
2. Create a Microsoft Cloud PKI (Root + Issuing CA)
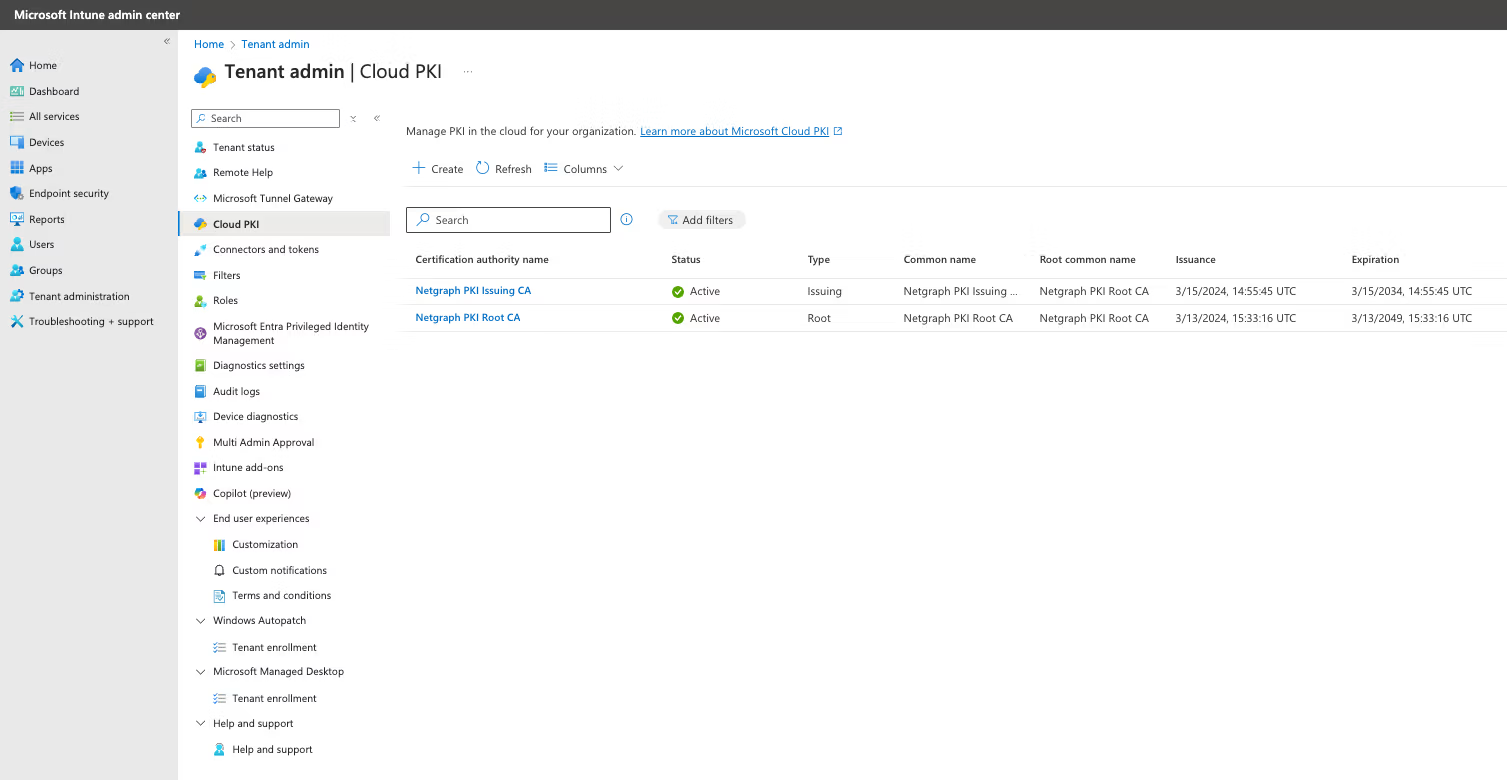
Section titled “2. Create a Microsoft Cloud PKI (Root + Issuing CA)”To issue client certificates to managed devices, your environment needs both a Root Certificate Authority (trust anchor) and an Issuing Certificate Authority (which actually signs device certificates). If you already operate a PKI — on-premises or cloud-based — you can reuse it. The example below shows Microsoft Cloud PKI.
In the Microsoft Intune admin center, open Tenant administration → Cloud PKI.
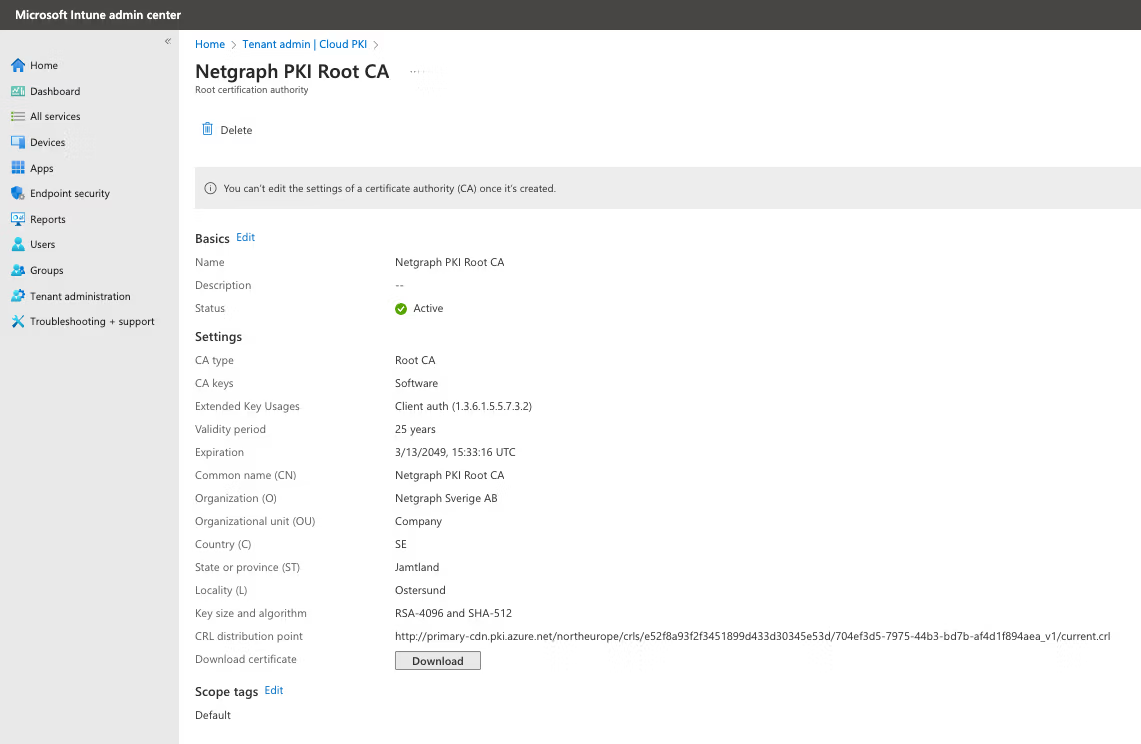
Example: Root CA
Section titled “Example: Root CA”Follow Microsoft’s official guide to create the Root CA. When finished, click Download certificate — you’ll need the Root CA cert later when configuring EntryPoint.
Example: Issuing CA
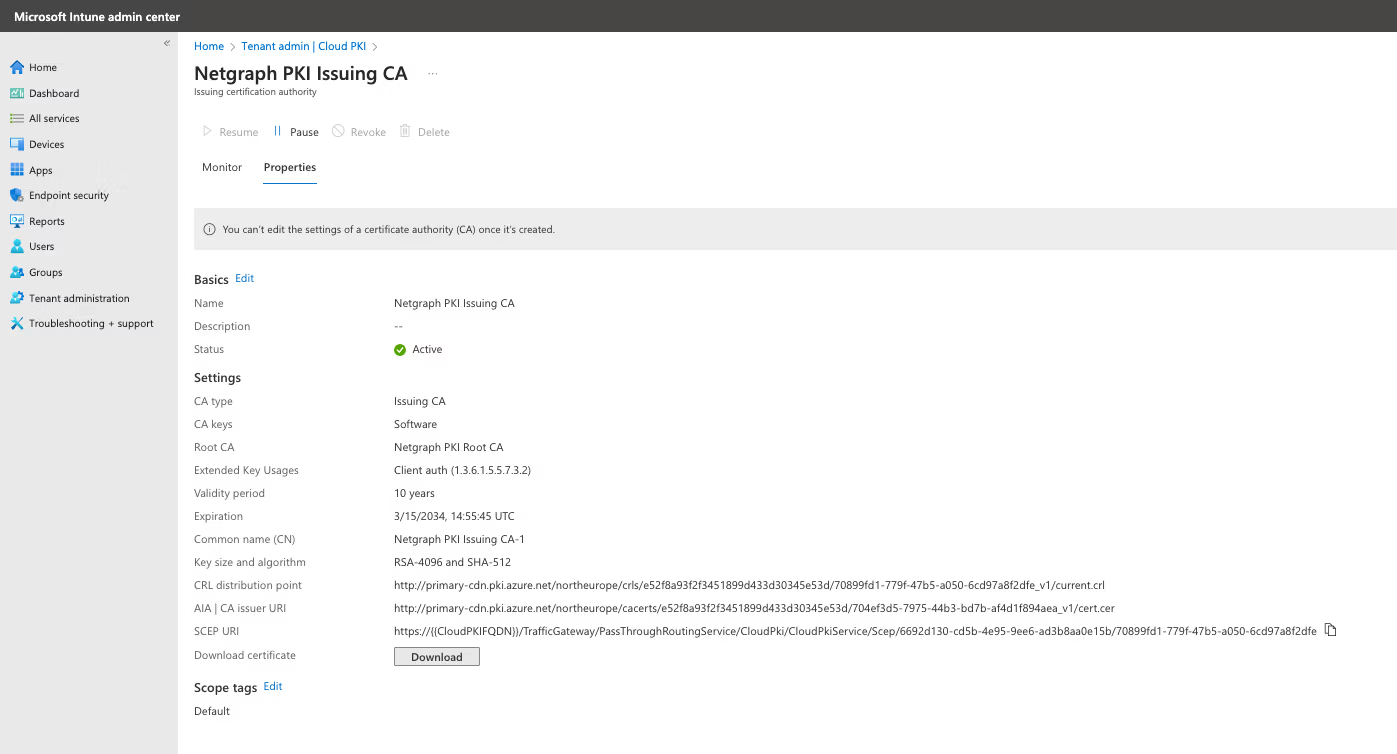
Section titled “Example: Issuing CA”The Issuing CA signs certificates for Intune-managed devices. Microsoft Cloud PKI automatically provides a SCEP service that acts as a certificate registration authority — it requests certificates from the Issuing CA on behalf of Intune-managed devices using a SCEP profile.
Follow Microsoft’s guide to create the Issuing CA. When finished:
- Click Download certificate — you’ll need it later.
- Copy both the CRL distribution point URI and the SCEP URI — they’re needed in the EntryPoint configuration.
3. Create a SCEP certificate profile — device (Windows)
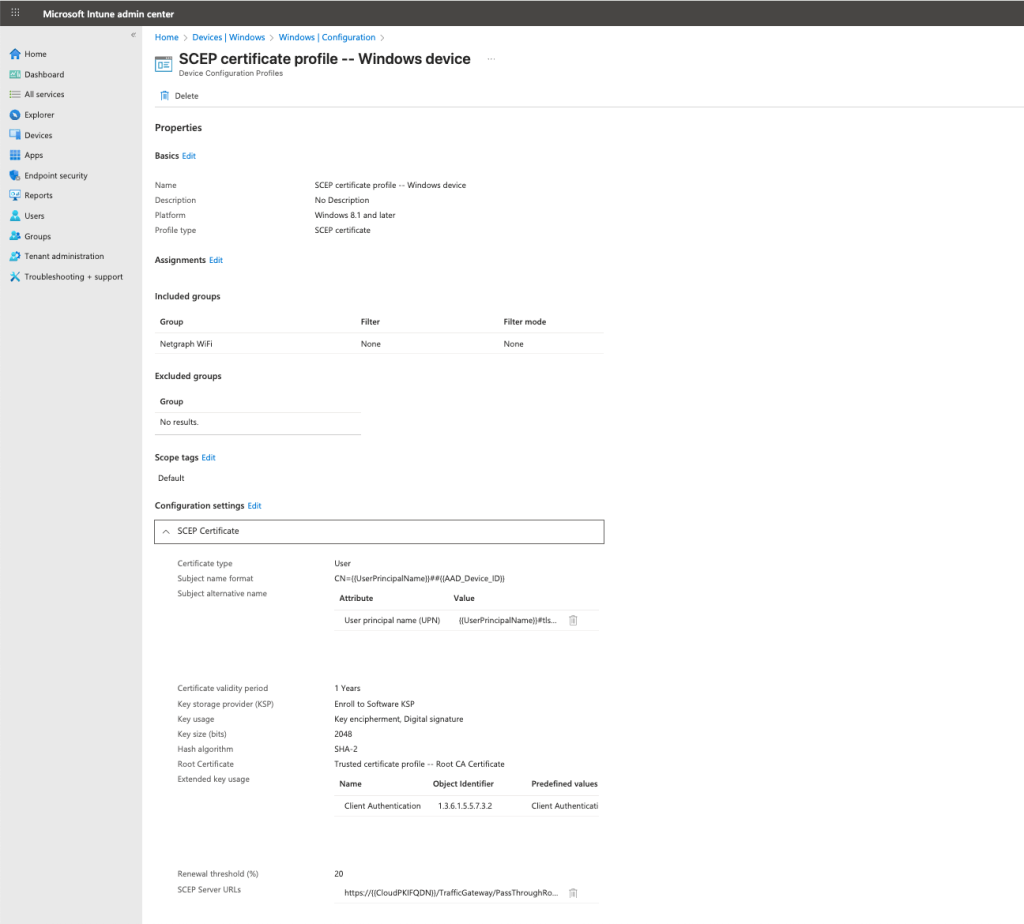
Section titled “3. Create a SCEP certificate profile — device (Windows)”The SCEP certificate profile tells Intune to enroll a device certificate, which the device later presents to EntryPoint during EAP-TLS authentication.
In the Microsoft Intune admin center, navigate to Devices → By Platform → Windows → Manage devices → Configuration. Click Create and configure a new SCEP certificate profile.
Use the SCEP URI copied in the previous step. Configure the subject as follows:
- Subject Name Format:
CN={{UserPrincipalName}}##{{AAD_Device_ID}} - Subject Alternative Name: Attribute
User principal name (UPN), value{{UserPrincipalName}}#tls-user#{{AAD_Device_ID}}
The #tls-user# token tells EntryPoint to use the backend
identity check — in this case, Microsoft Entra.
Tip
Use the Subject Alternative Name to avoid problems with long values that don’t fit in the Subject Name Format field.
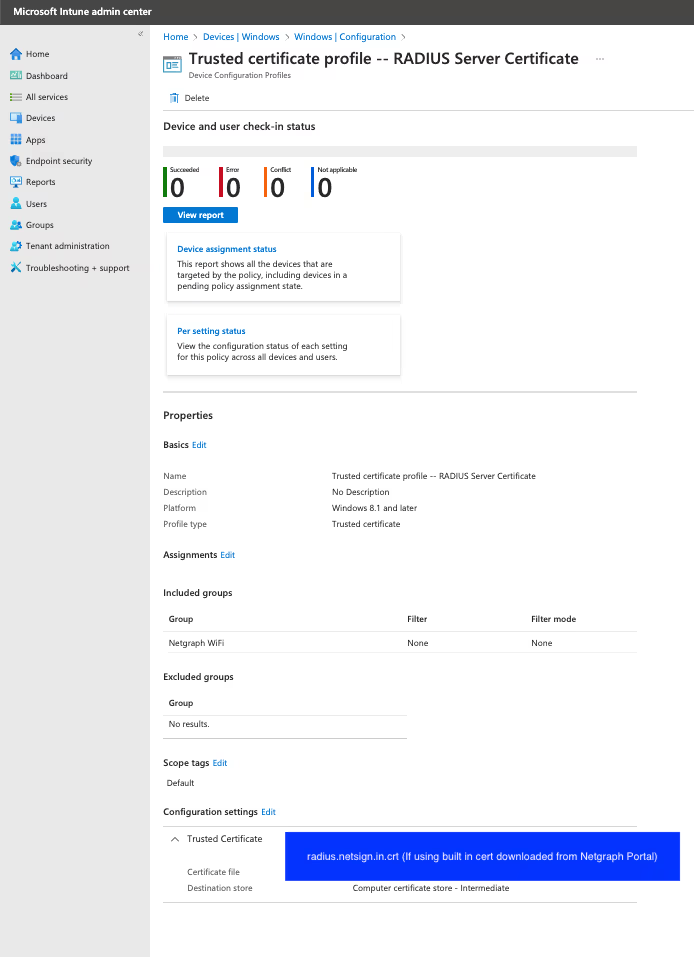
4. Create a Trusted certificate profile — RADIUS Server Certificate (Windows)
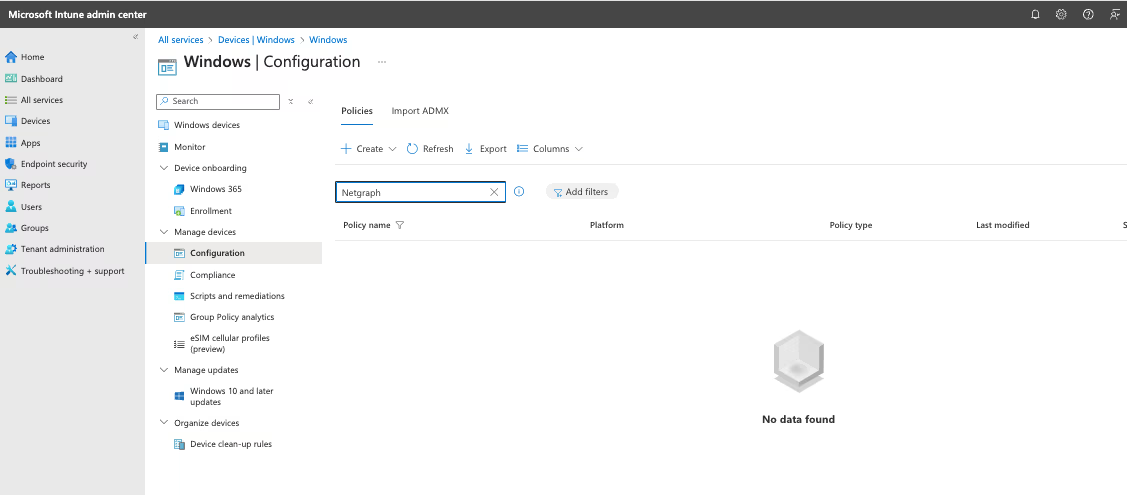
Section titled “4. Create a Trusted certificate profile — RADIUS Server Certificate (Windows)”The Trusted certificate profile tells Windows to trust the certificate EntryPoint presents during the TLS handshake.
In the Microsoft Intune admin center, navigate to Devices → By Platform → Windows → Manage devices → Configuration. Click Create and configure a new Trusted certificate profile.
Note
If you don’t yet have your own RADIUS server certificate, you can use the default certificate that ships with the EntryPoint Entra ID Context — return to this step once it’s in place.
5. Create a Trusted certificate profile — Root CA Certificate (Windows)
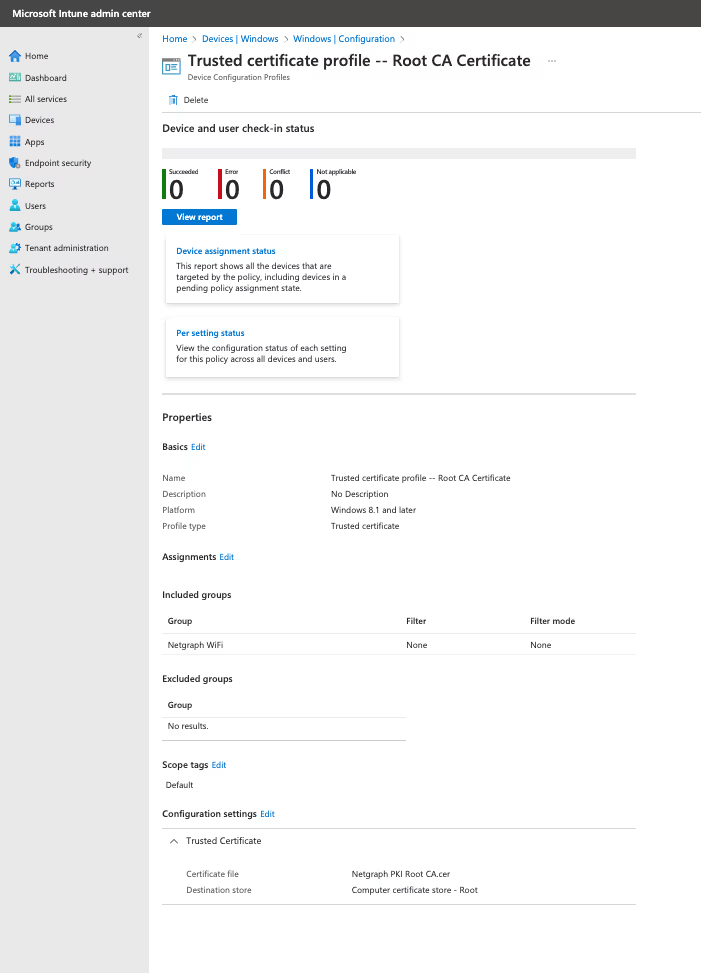
Section titled “5. Create a Trusted certificate profile — Root CA Certificate (Windows)”A second Trusted certificate profile distributes the Root CA certificate (downloaded in step 2) to managed Windows devices.
In the Microsoft Intune admin center, navigate to Devices → By Platform → Windows → Manage devices → Configuration. Click Create and configure a new Trusted certificate profile.
Upload the Root CA certificate downloaded in step 2.
6. Create a Wi-Fi profile (Windows)
Section titled “6. Create a Wi-Fi profile (Windows)”The Wi-Fi profile pushes the SSID configuration to managed Windows devices, telling them to authenticate against EntryPoint using EAP-TLS.
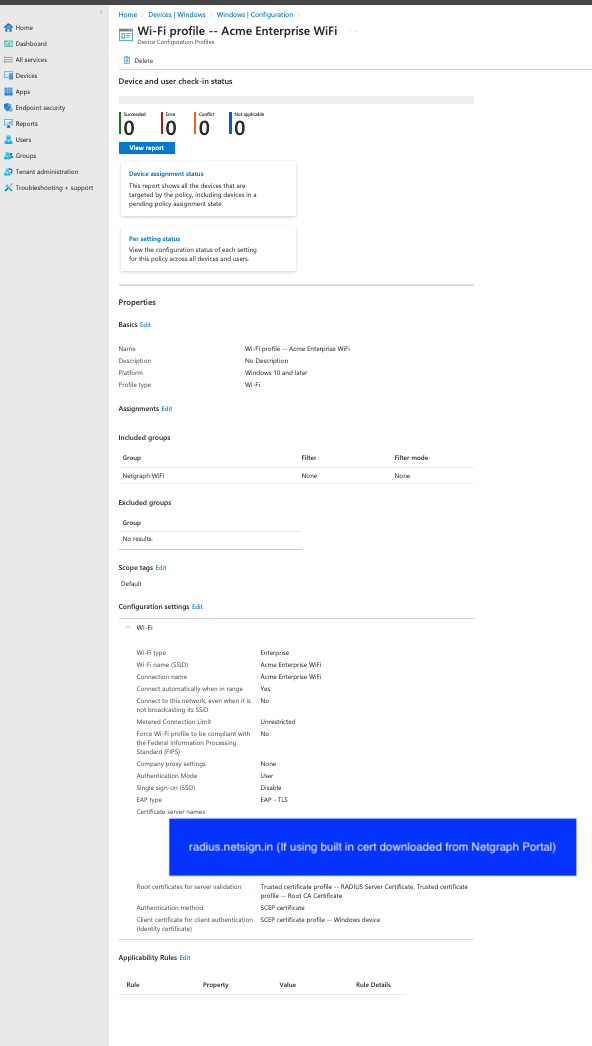
In the Microsoft Intune admin center, navigate to Devices → By Platform → Windows → Manage devices → Configuration. Click Create and configure a new Wi-Fi profile.
The example below shows an “Acme Enterprise WiFi” profile — substitute your own SSID and adjust the trust settings to your deployment.
7. Create an EntryPoint Context
Section titled “7. Create an EntryPoint Context”Sign in to the admin dashboard and create a new EntryPoint RADIUSaaS Context.
Switch to EntryPoint RADIUSaaS
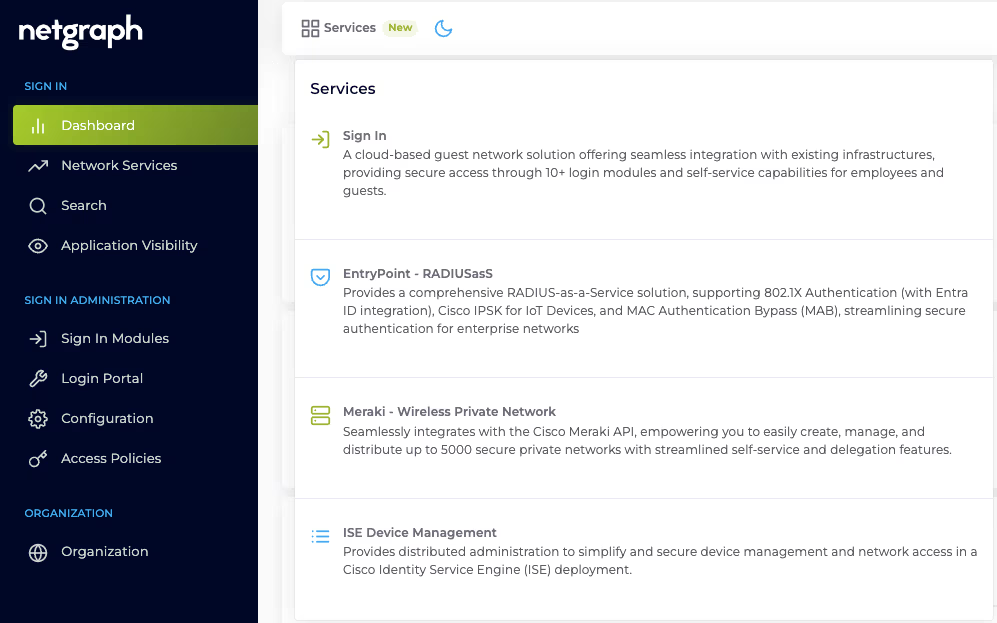
Section titled “Switch to EntryPoint RADIUSaaS”In the Services menu, switch to EntryPoint – RADIUSaaS.
Create a new Context
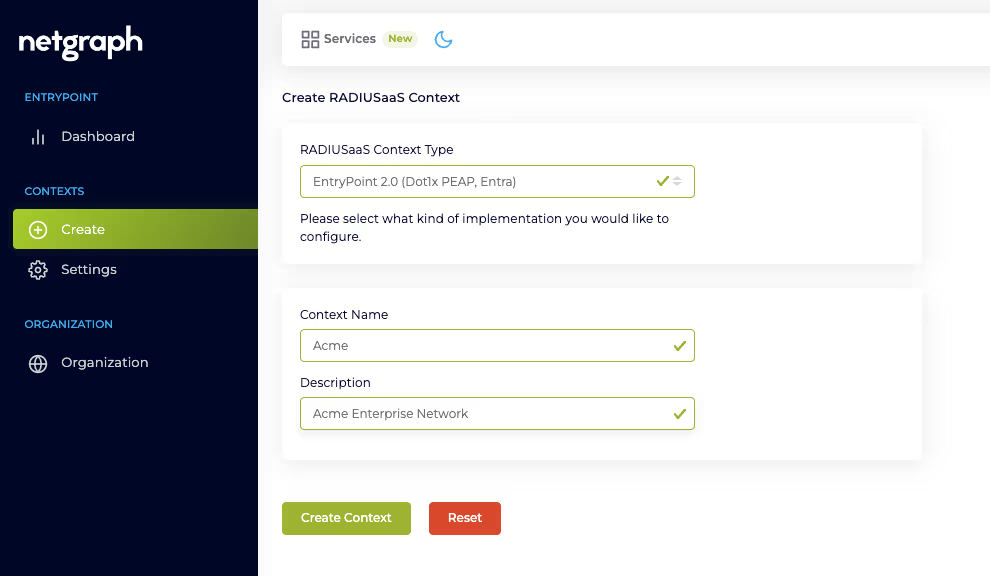
Section titled “Create a new Context”Under Context, click Create. Choose the EntryPoint 2.0 (Dot1x PEAP, Entra) Context type, give your network a name, and click Create Context.
Enable EAP-TLS
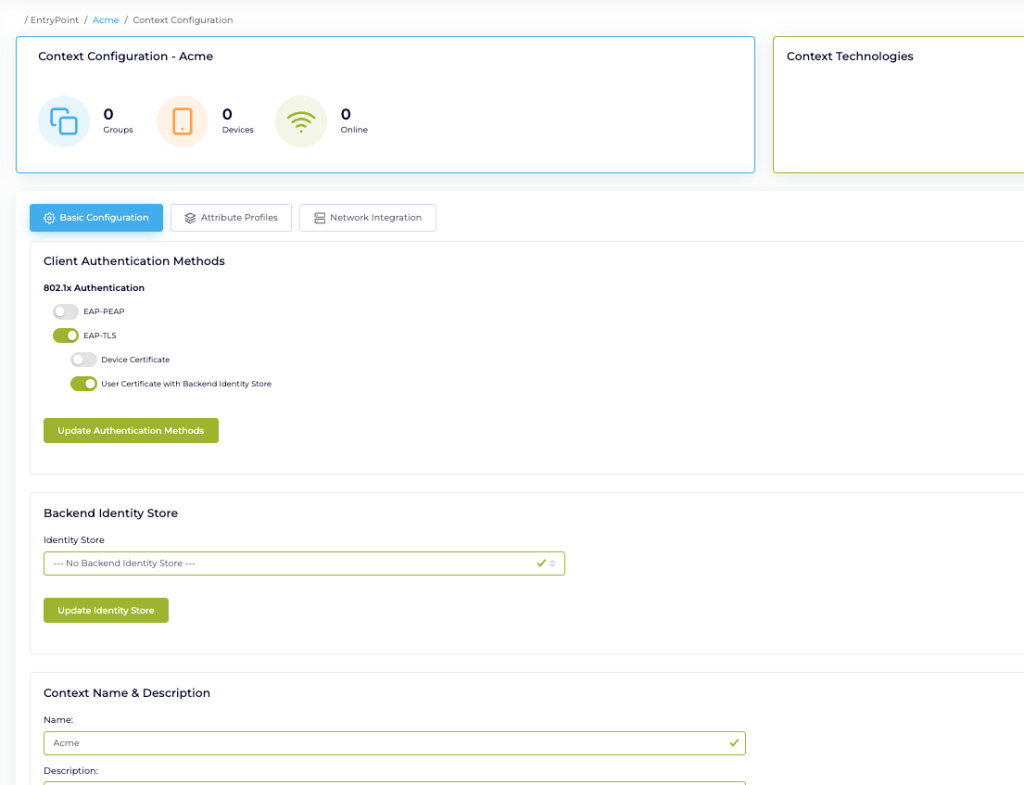
Section titled “Enable EAP-TLS”In Context Configuration, open Client Authentication Methods. Enable EAP-TLS and choose User Certificate with Backend Identity Store. Click Update Authentication Methods.
Select the Identity Store
Section titled “Select the Identity Store”In Backend Identity Store, select Microsoft Entra ID from the Identity Store drop-down.
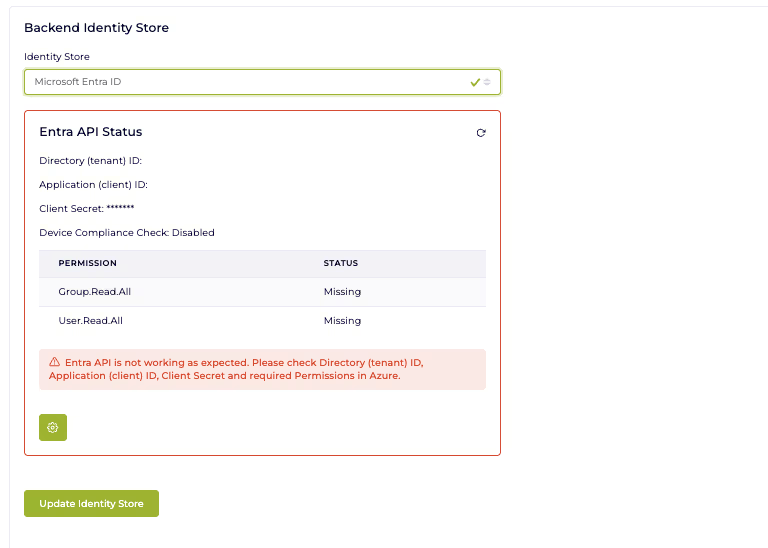
Fill in the Entra API credentials
Section titled “Fill in the Entra API credentials”Paste in the values you recorded in step 1:
- Directory (Tenant) ID.
- Application (Client) ID.
- Client secret value.
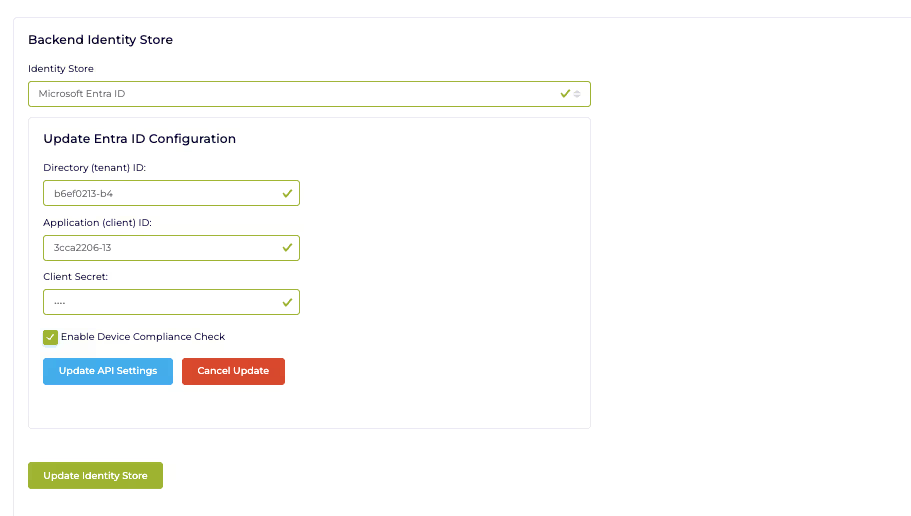
Click Update Identity Store to save.
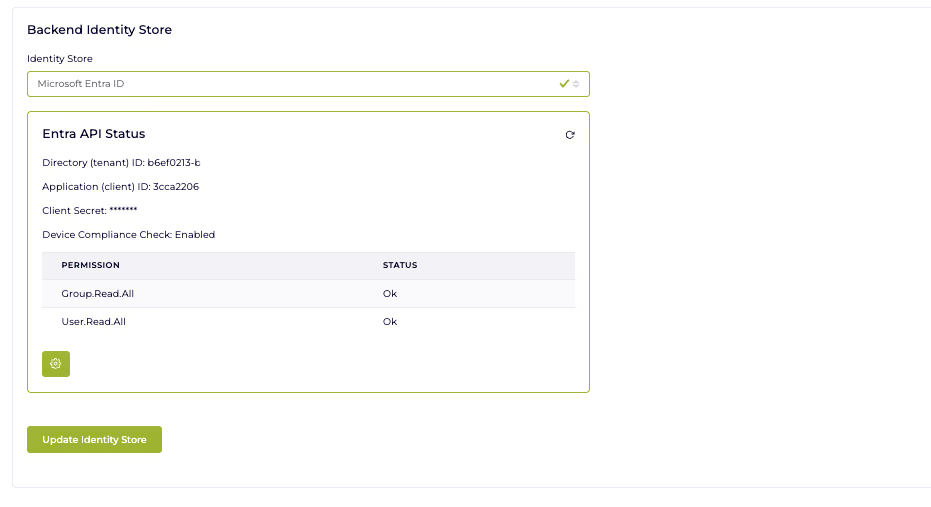
8. Configure 802.1x Authentication (EAP-TLS)
Section titled “8. Configure 802.1x Authentication (EAP-TLS)”This step establishes trust between the EntryPoint Context and Microsoft Cloud PKI so the Context recognises client certificates issued by Intune.
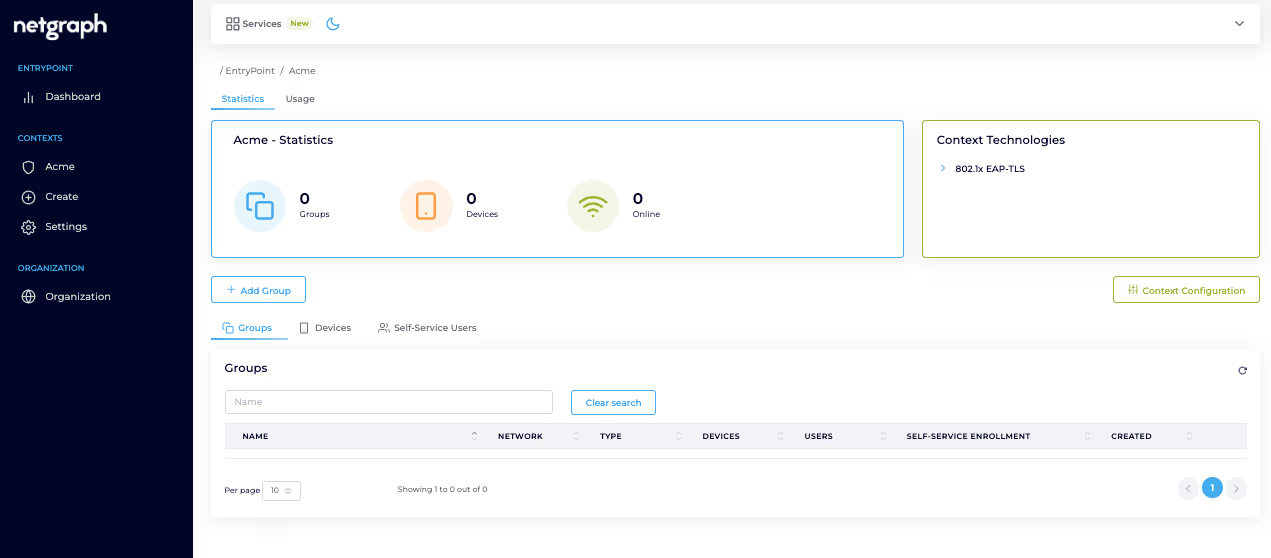
Open Context configuration
Section titled “Open Context configuration”Sign in to the admin dashboard, locate the Context created in step 7 and click Context configuration.
Configure the SSID
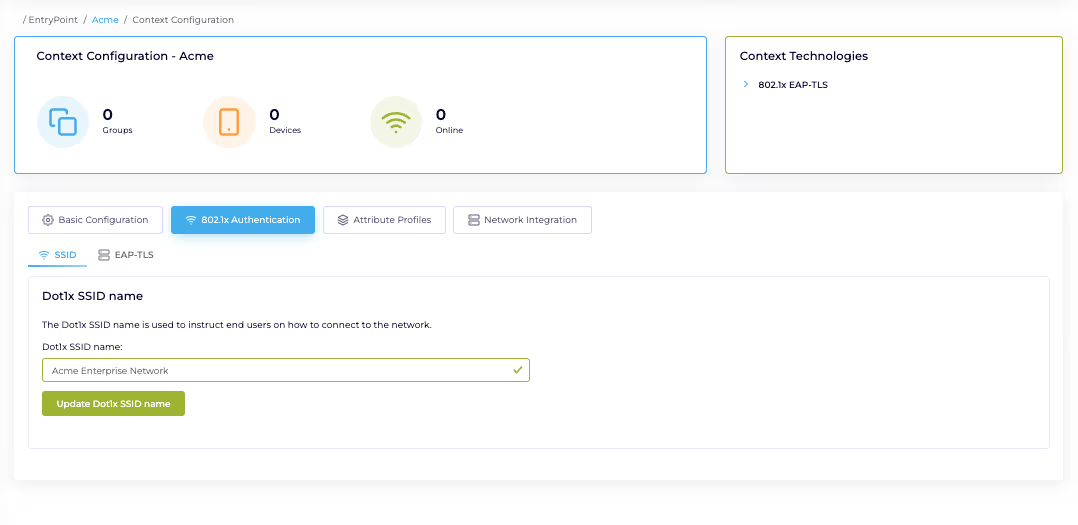
Section titled “Configure the SSID”Open 802.1x Authentication. On the SSID tab, enter your SSID name and click Update Dot1x SSID name to save.
Open the EAP-TLS tab
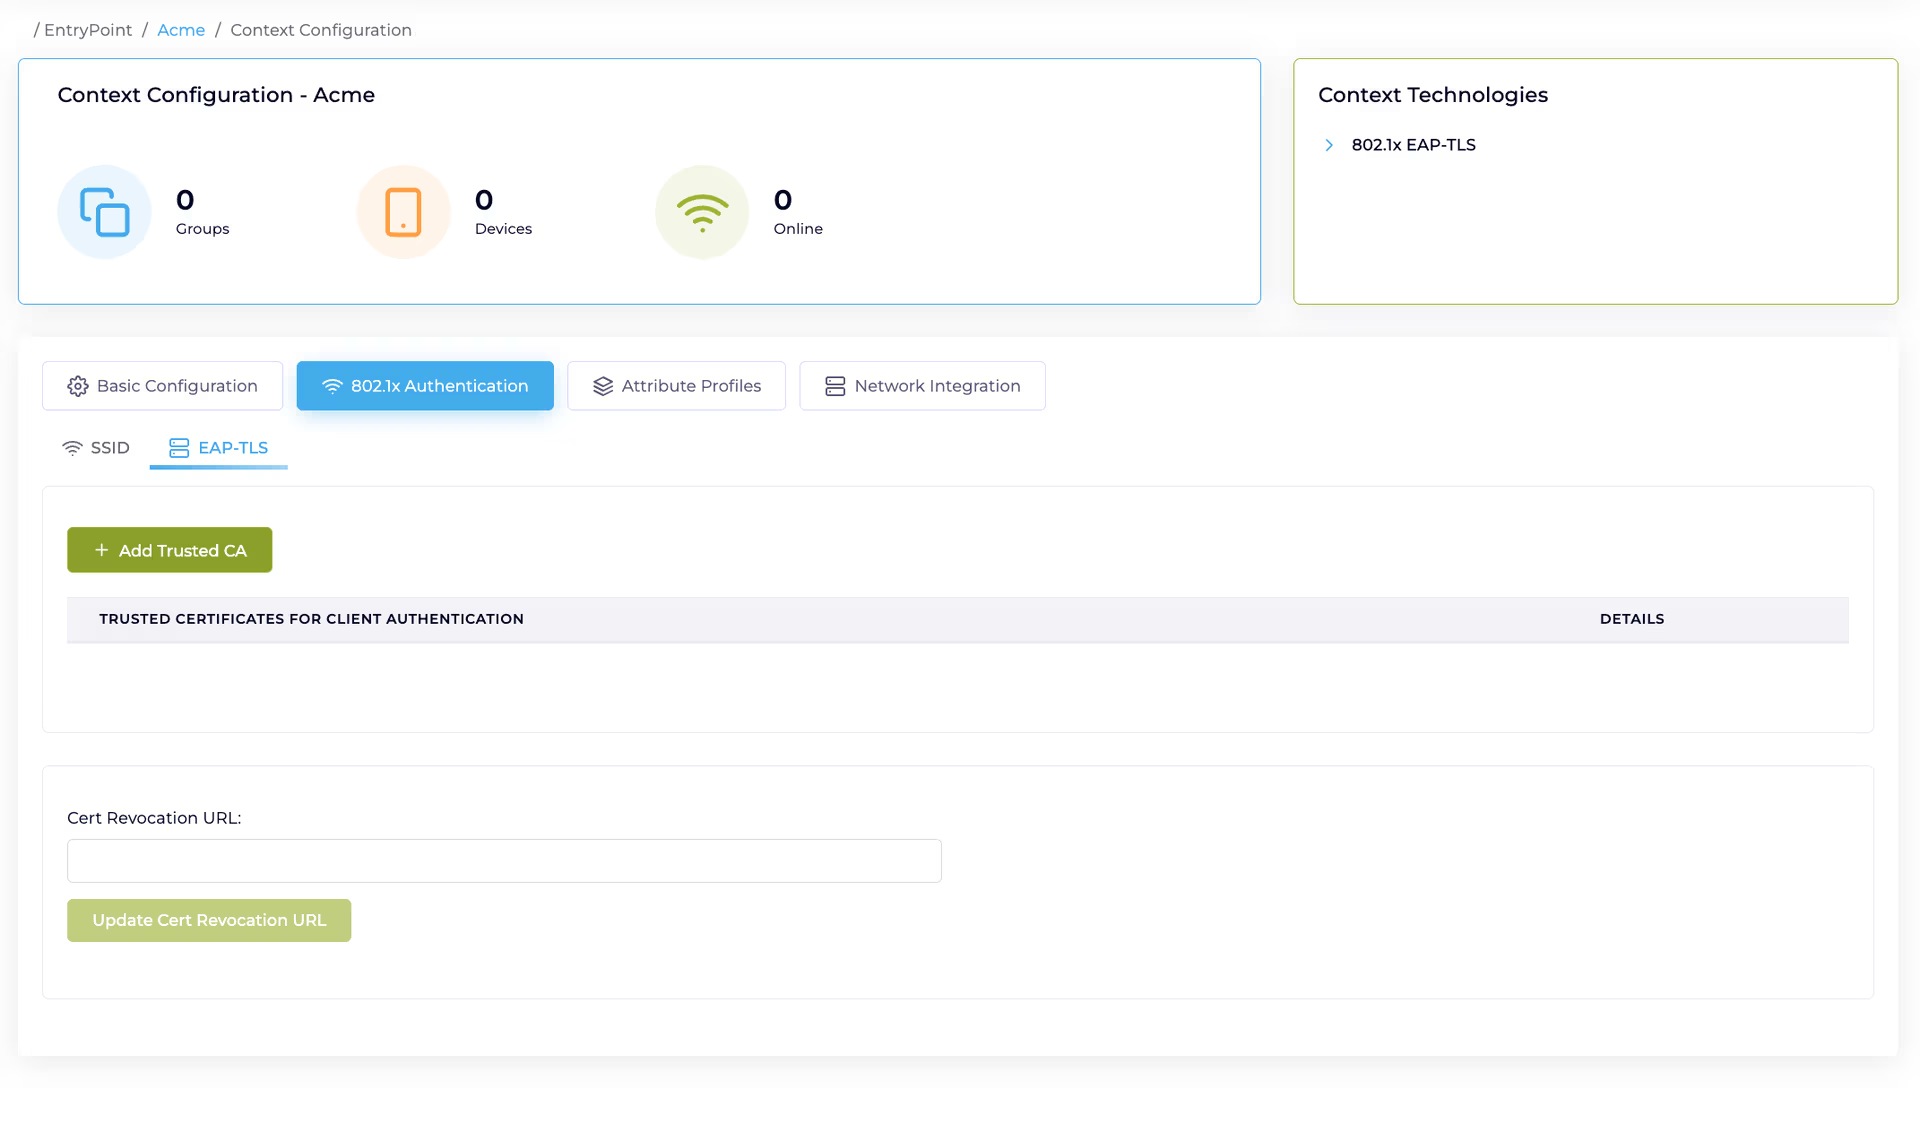
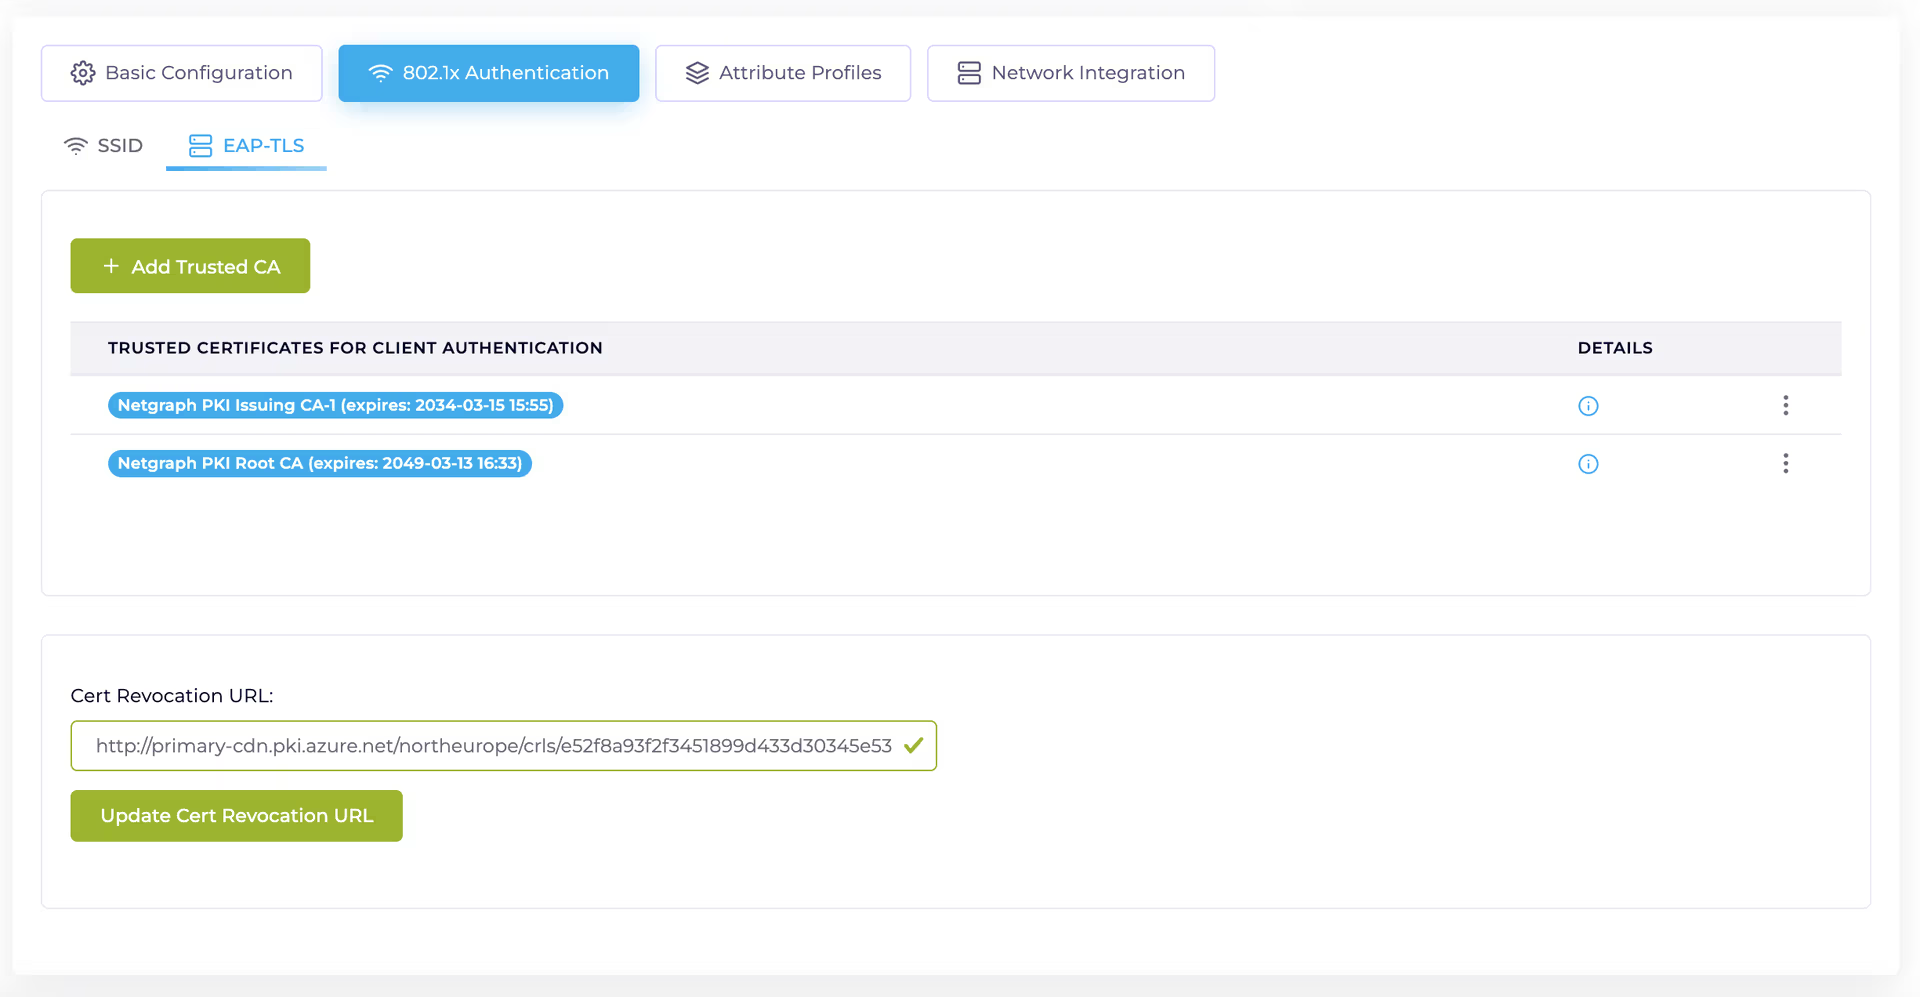
Section titled “Open the EAP-TLS tab”Switch to the EAP-TLS tab to add the trusted CAs.
Upload the Root and Issuing CA certificates
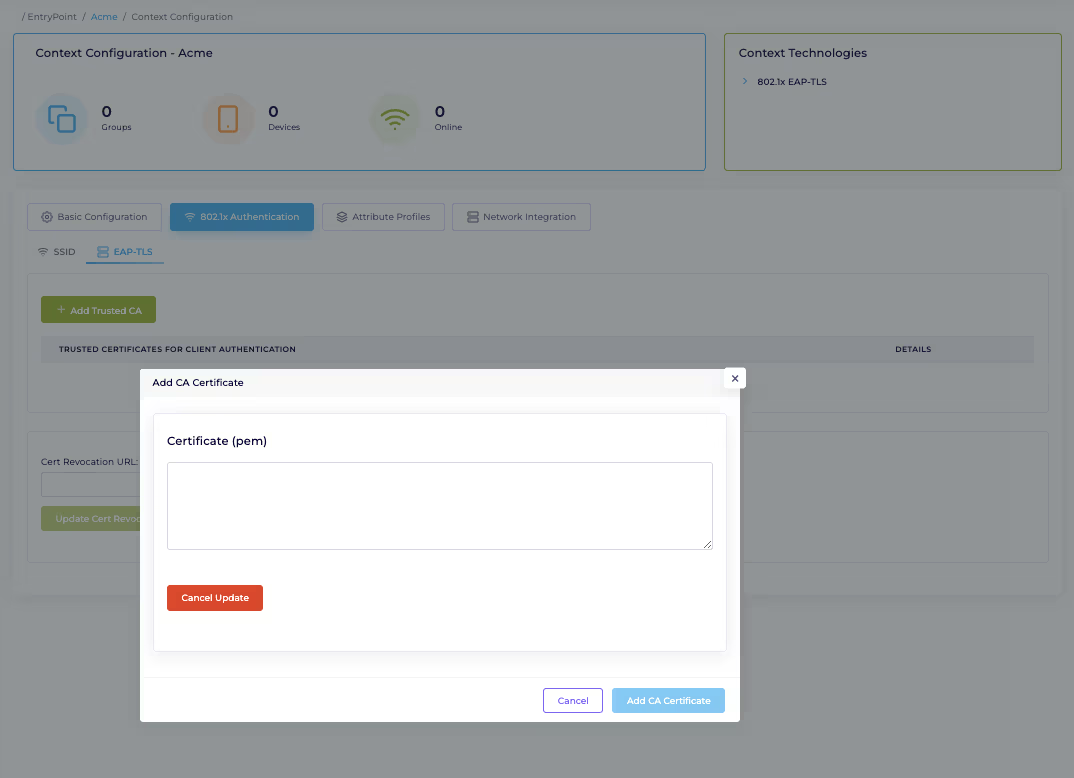
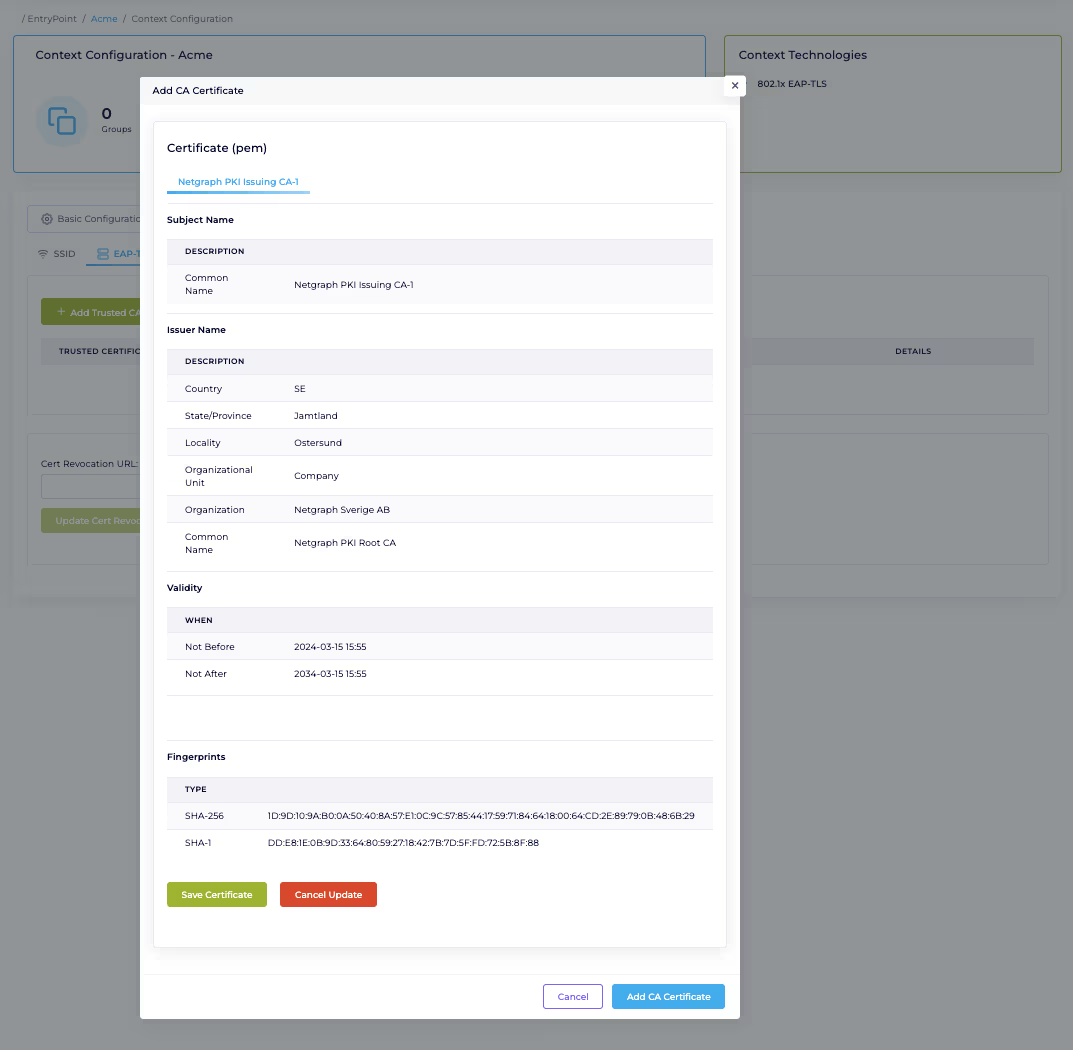
Section titled “Upload the Root and Issuing CA certificates”Upload the Root and Issuing CA certificates downloaded in step 2.
Note
Only PEM-format certificates are supported. Convert DER format using:
- macOS / Linux:
openssl x509 -inform der -in <name>.cer -out <name>.pem - Windows:
certutil.exe -encode <name>.cer <name>.pem
Click Add Trusted CA → Change Certificate and paste the certificate in PEM format. Repeat for both the Root CA and the Issuing CA.
Configure the CRL distribution point
Section titled “Configure the CRL distribution point”Paste in the CRL distribution point URI copied from step 2 and click Update Cert Revocation URL to save.
9. Configure Network Integration
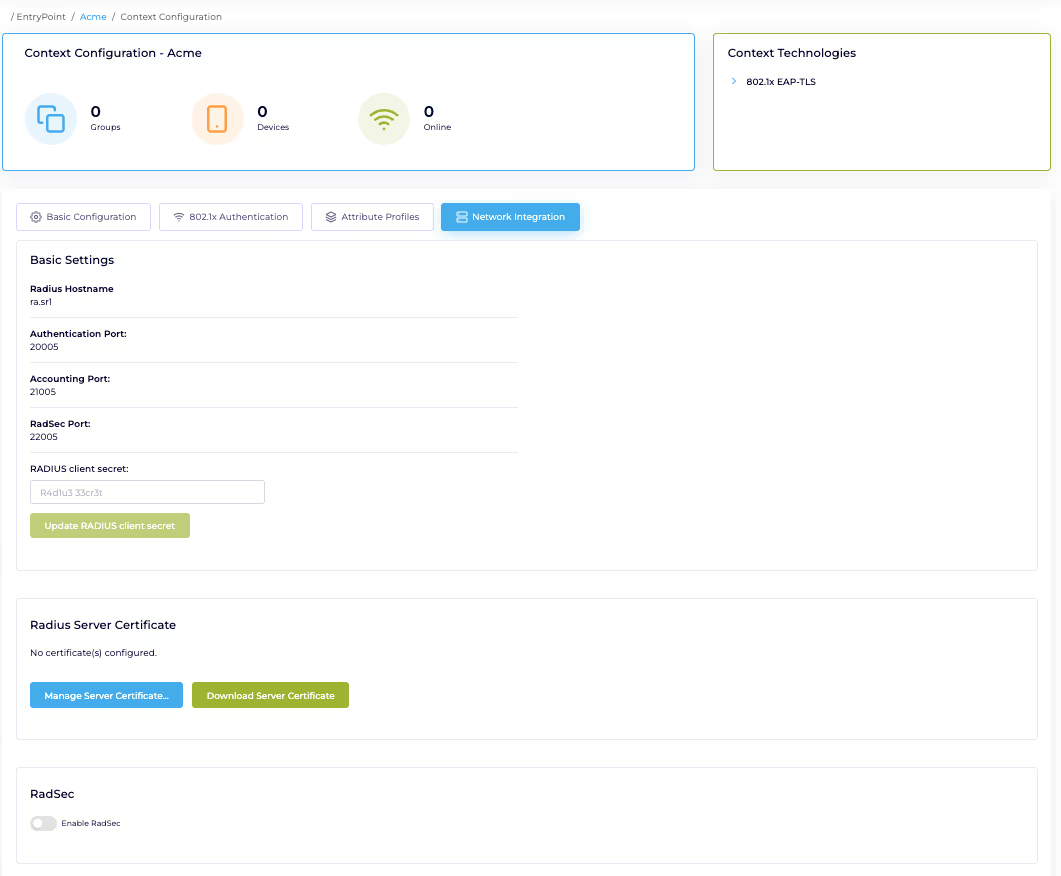
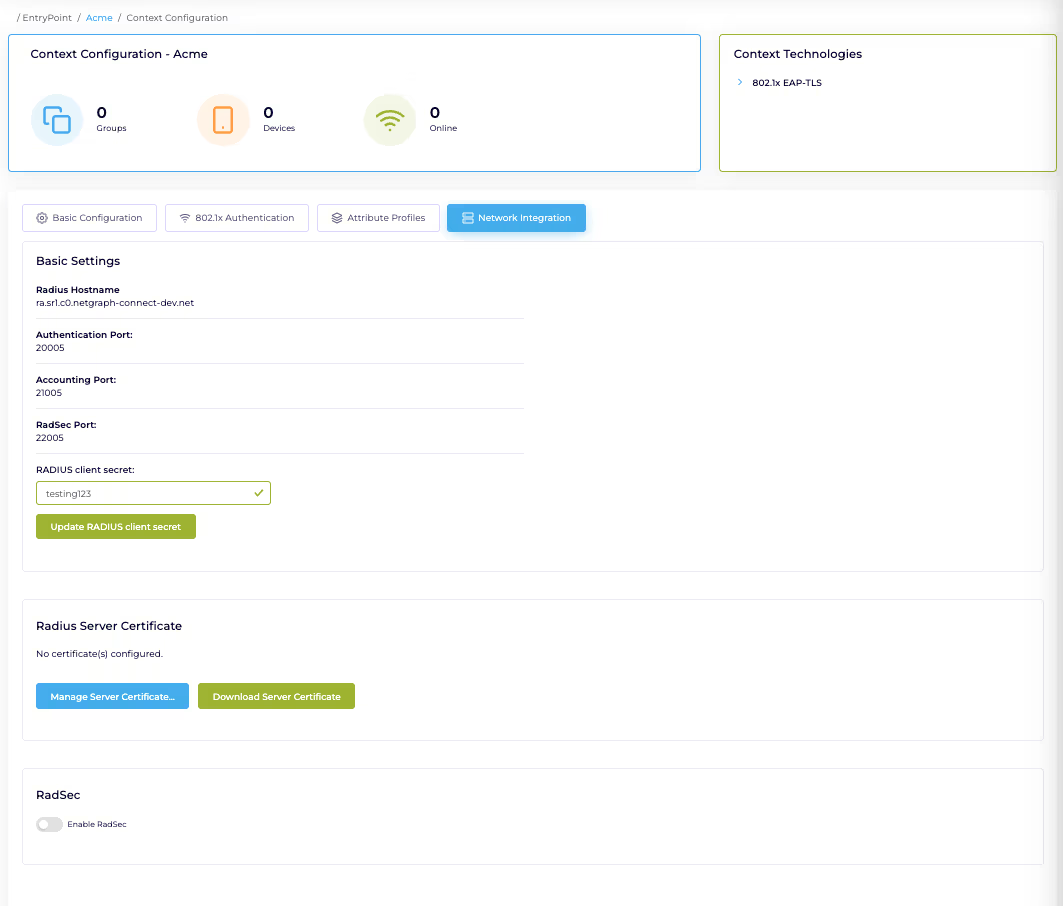
Section titled “9. Configure Network Integration”Network Integration connects your WLAN infrastructure to EntryPoint via three components:
- RADIUS Client Secret — shared secret for the RADIUS protocol between your WLAN controller and EntryPoint.
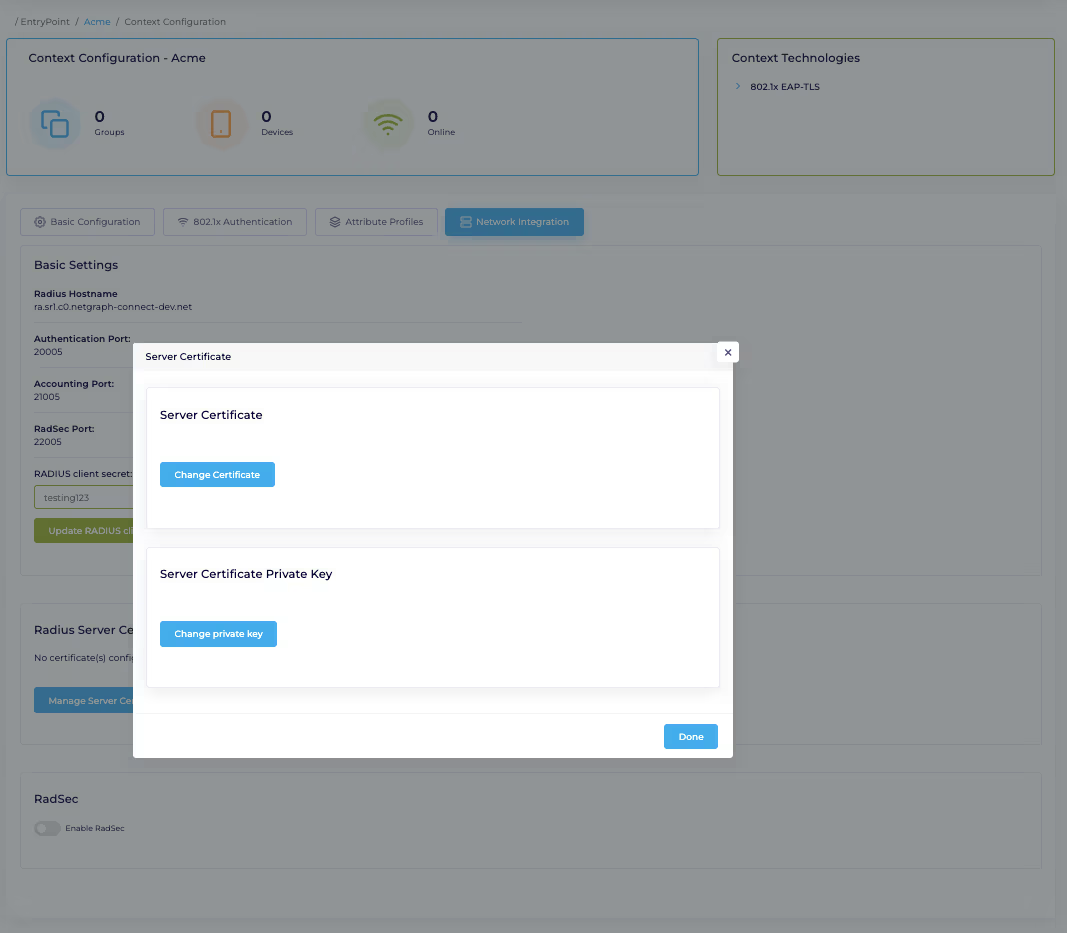
- RADIUS Server Certificate — presented by EntryPoint during the TLS handshake. You can supply your own or use the built-in.
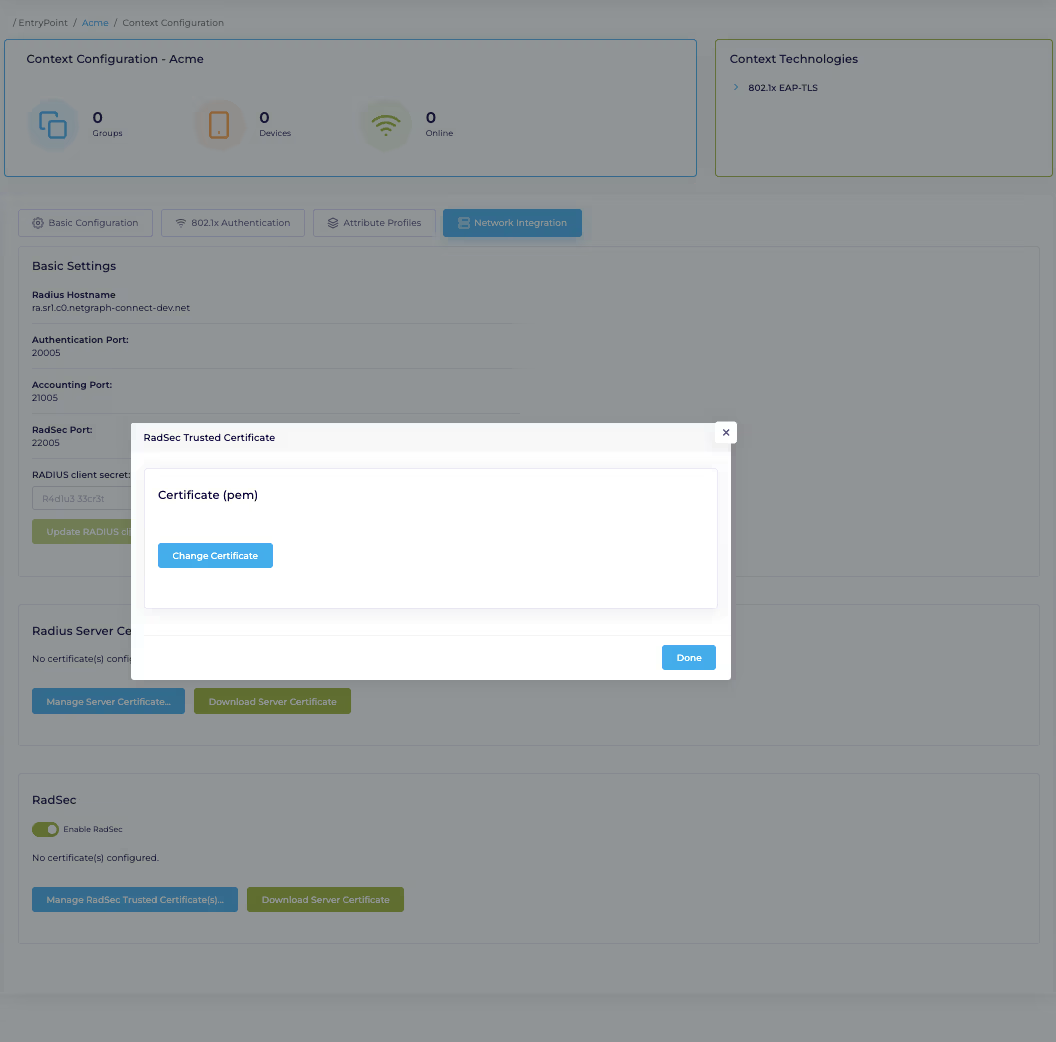
- RadSec — optional. RADIUS over TLS for encrypted transport between the RADIUS client and EntryPoint, protecting against eavesdropping and man-in-the-middle attacks.
Open Context configuration
Section titled “Open Context configuration”Sign in to the admin dashboard, locate the Context and click Context configuration.
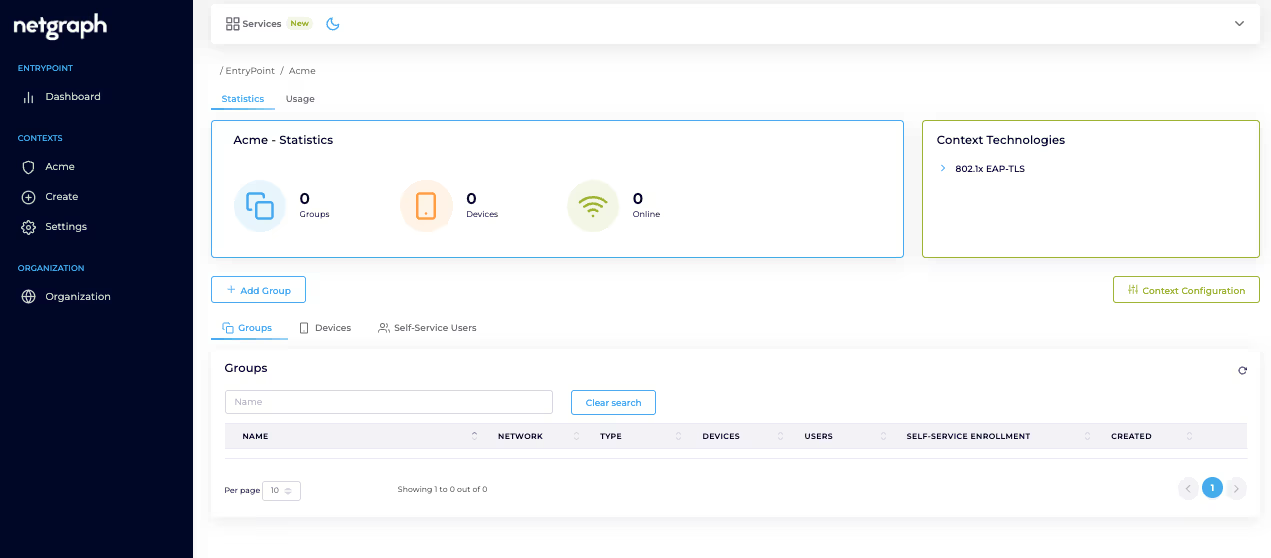
Open Network Integration → Basic Settings. The panel shows the RADIUS Hostname, Authentication Port, Accounting Port and RadSec Port you’ll configure on your WLAN controller.
Set the RADIUS Client Secret
Section titled “Set the RADIUS Client Secret”Enter your RADIUS Client Secret and save.
Upload a RADIUS Server Certificate
Section titled “Upload a RADIUS Server Certificate”Open RADIUS Service → Server Certificate. Click Change certificate for both Certificate and Private Key and paste in your RADIUS Server Certificate and key in PEM format.
Note
Convert formats with openssl or certutil:
- DER → PEM (Linux/macOS):
openssl x509 -inform der -in <name>.cer -out <name>.pem - DER → PEM (Windows):
certutil.exe -encode <name>.cer <name>.pem - PEM → DER (Linux/macOS):
openssl x509 -outform der -in <name>.pem -out <name>.crt - PEM → DER (Windows):
certutil.exe -decode <name>.pem <name>.crt
If you don’t have your own certificate, use the built-in default that ships with the Context.
Enable RadSec (optional)
Section titled “Enable RadSec (optional)”Enable RadSec and upload your infrastructure certificate. If you haven’t obtained the RADIUS Server Certificate yet, download it from EntryPoint via Download Server Certificate and configure RadSec on your WLAN infrastructure accordingly.
10. Map Entra groups to EntryPoint Groups
Section titled “10. Map Entra groups to EntryPoint Groups”Authorisation is decided by Entra group membership: one EntryPoint Group mirrors one Entra group.
Open the Context and add a Group
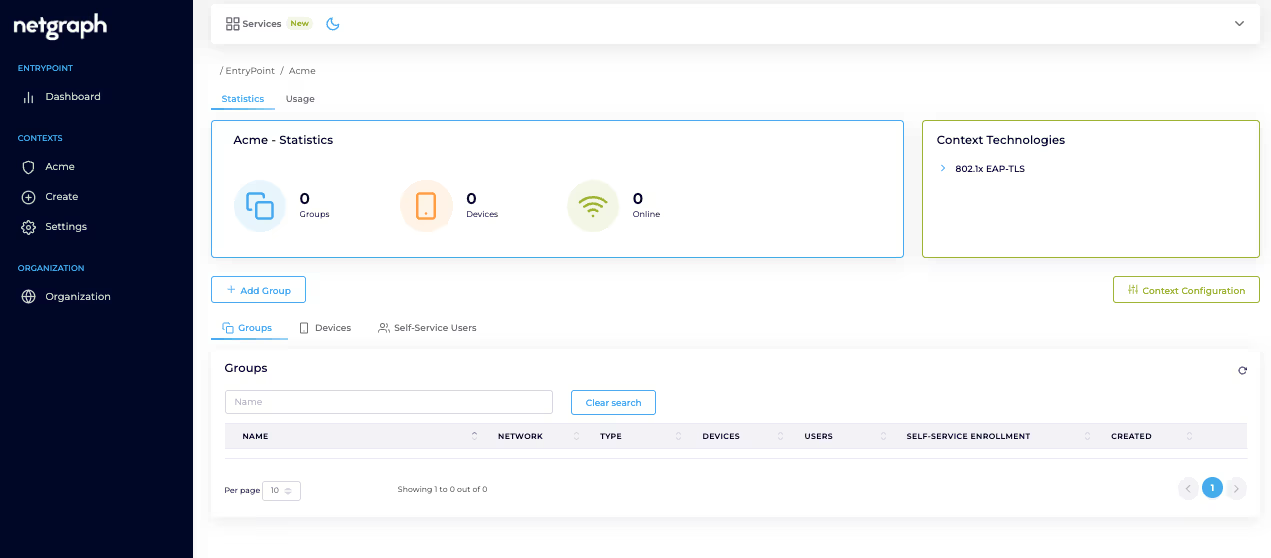
Section titled “Open the Context and add a Group”Sign in, open the Context and click Add Group on the left.
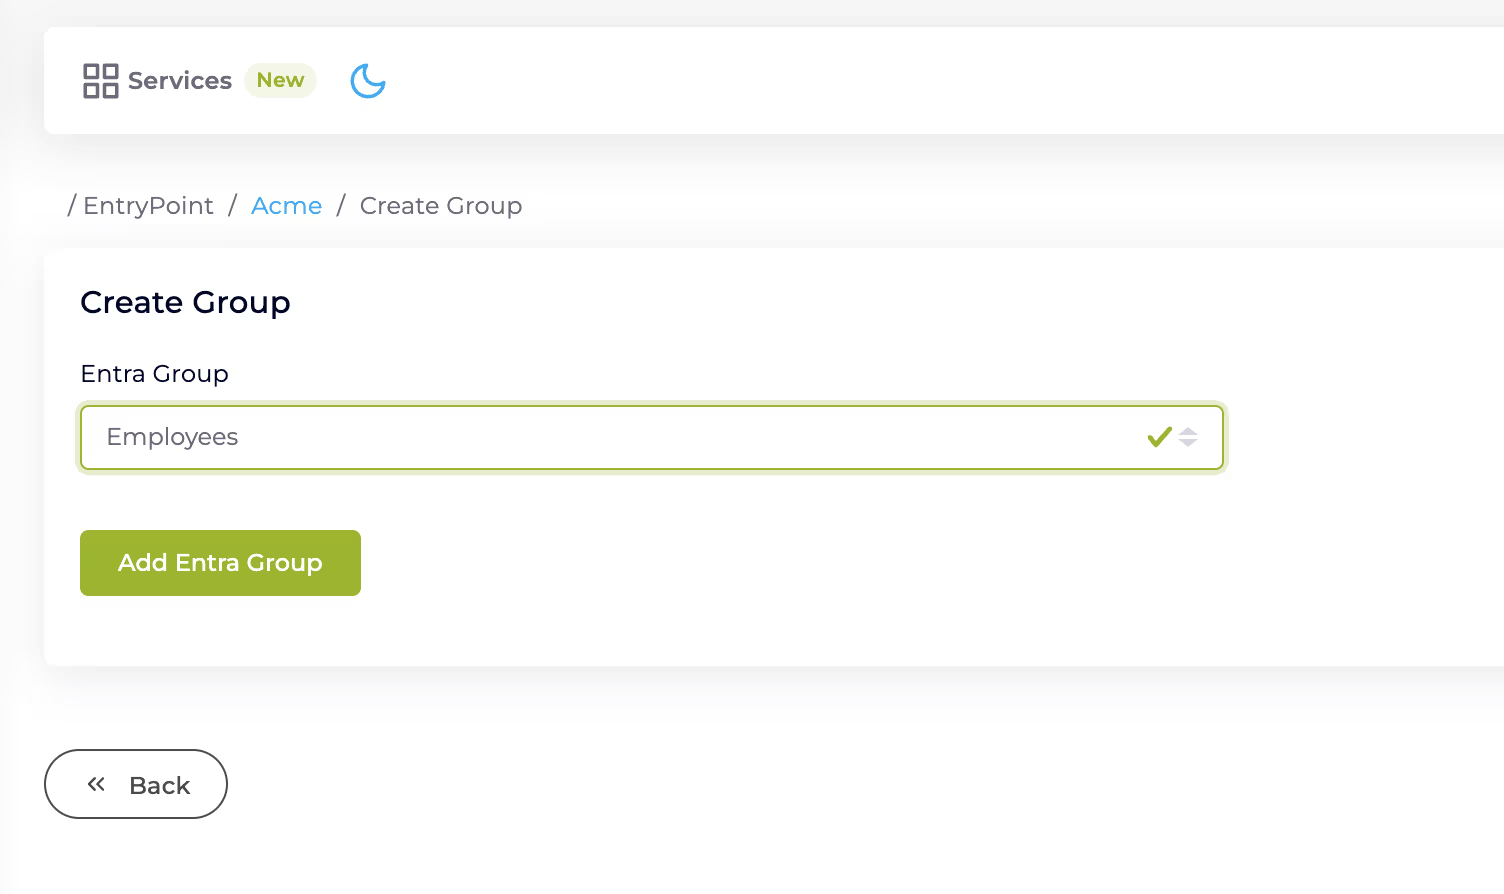
Select the Entra group
Section titled “Select the Entra group”In the drop-down, select the Entra group you want to add and click Add Entra Group.
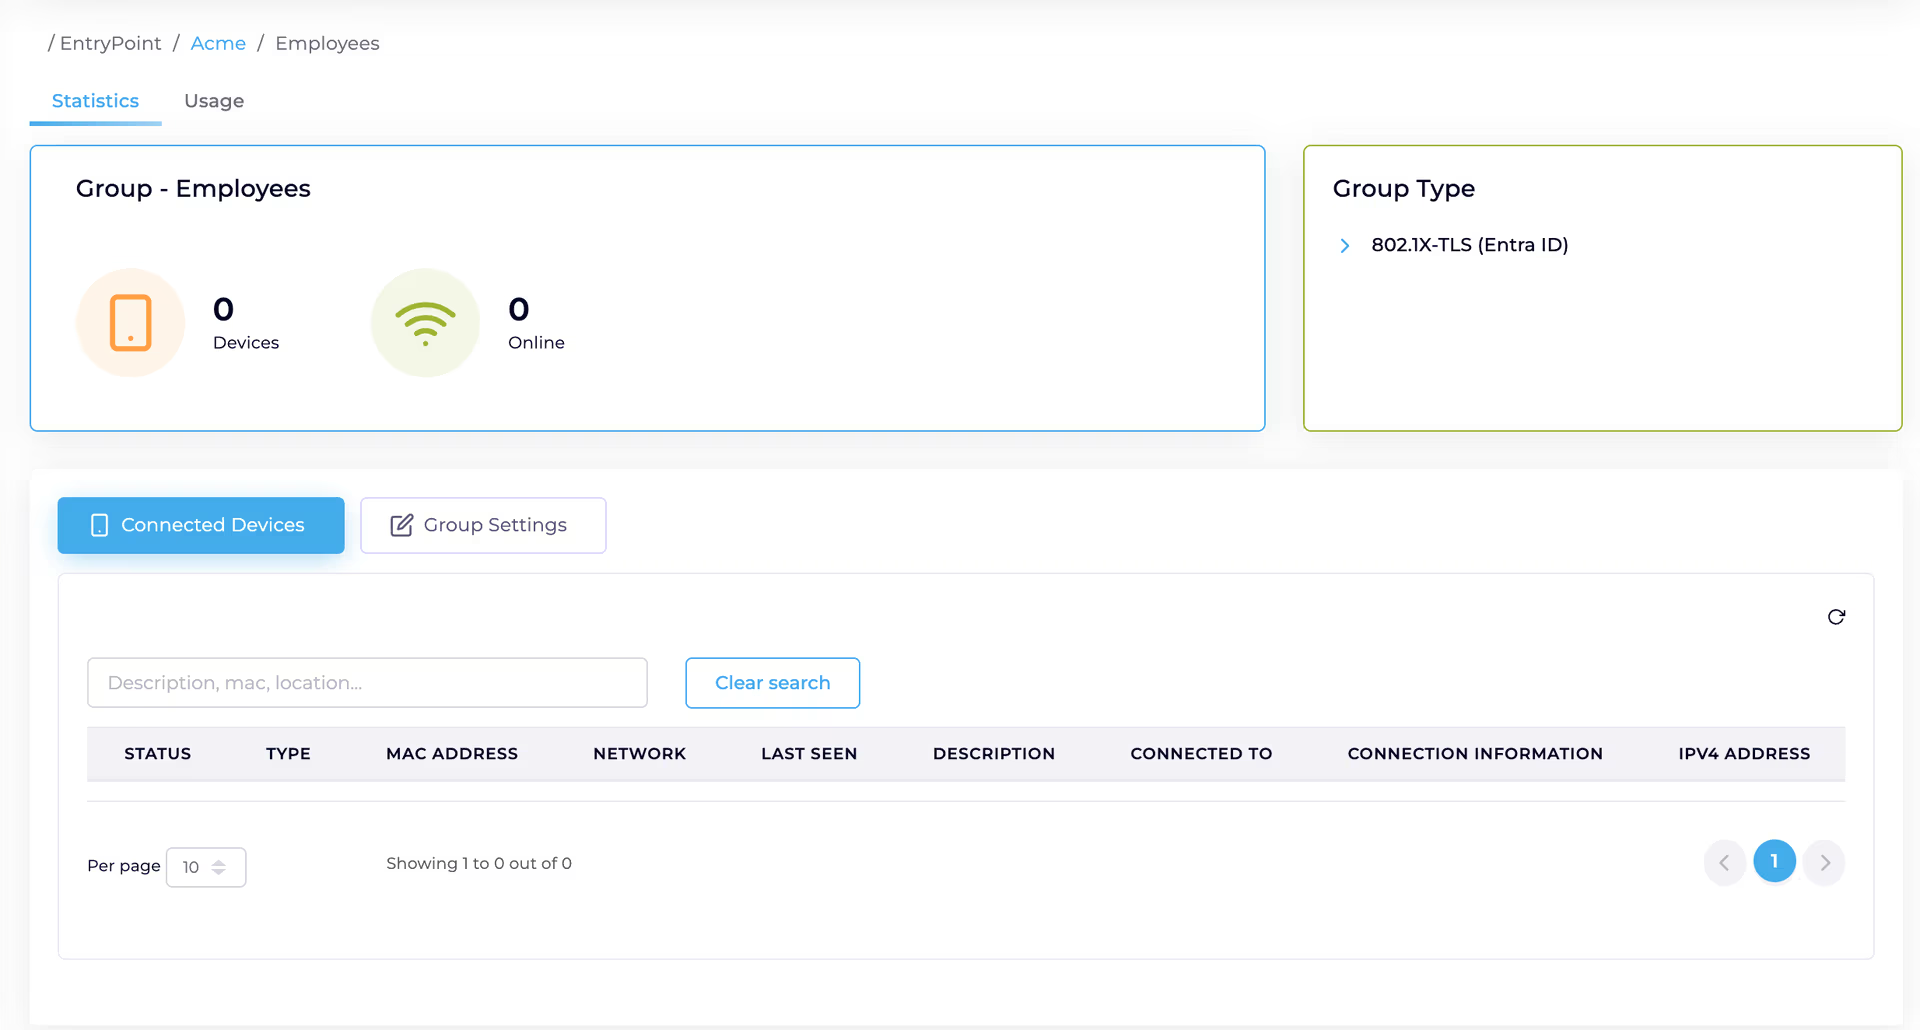
Members can now authenticate
Section titled “Members can now authenticate”Users in the chosen Entra group — Employees in this example — now have the permissions required to authenticate against this Context.
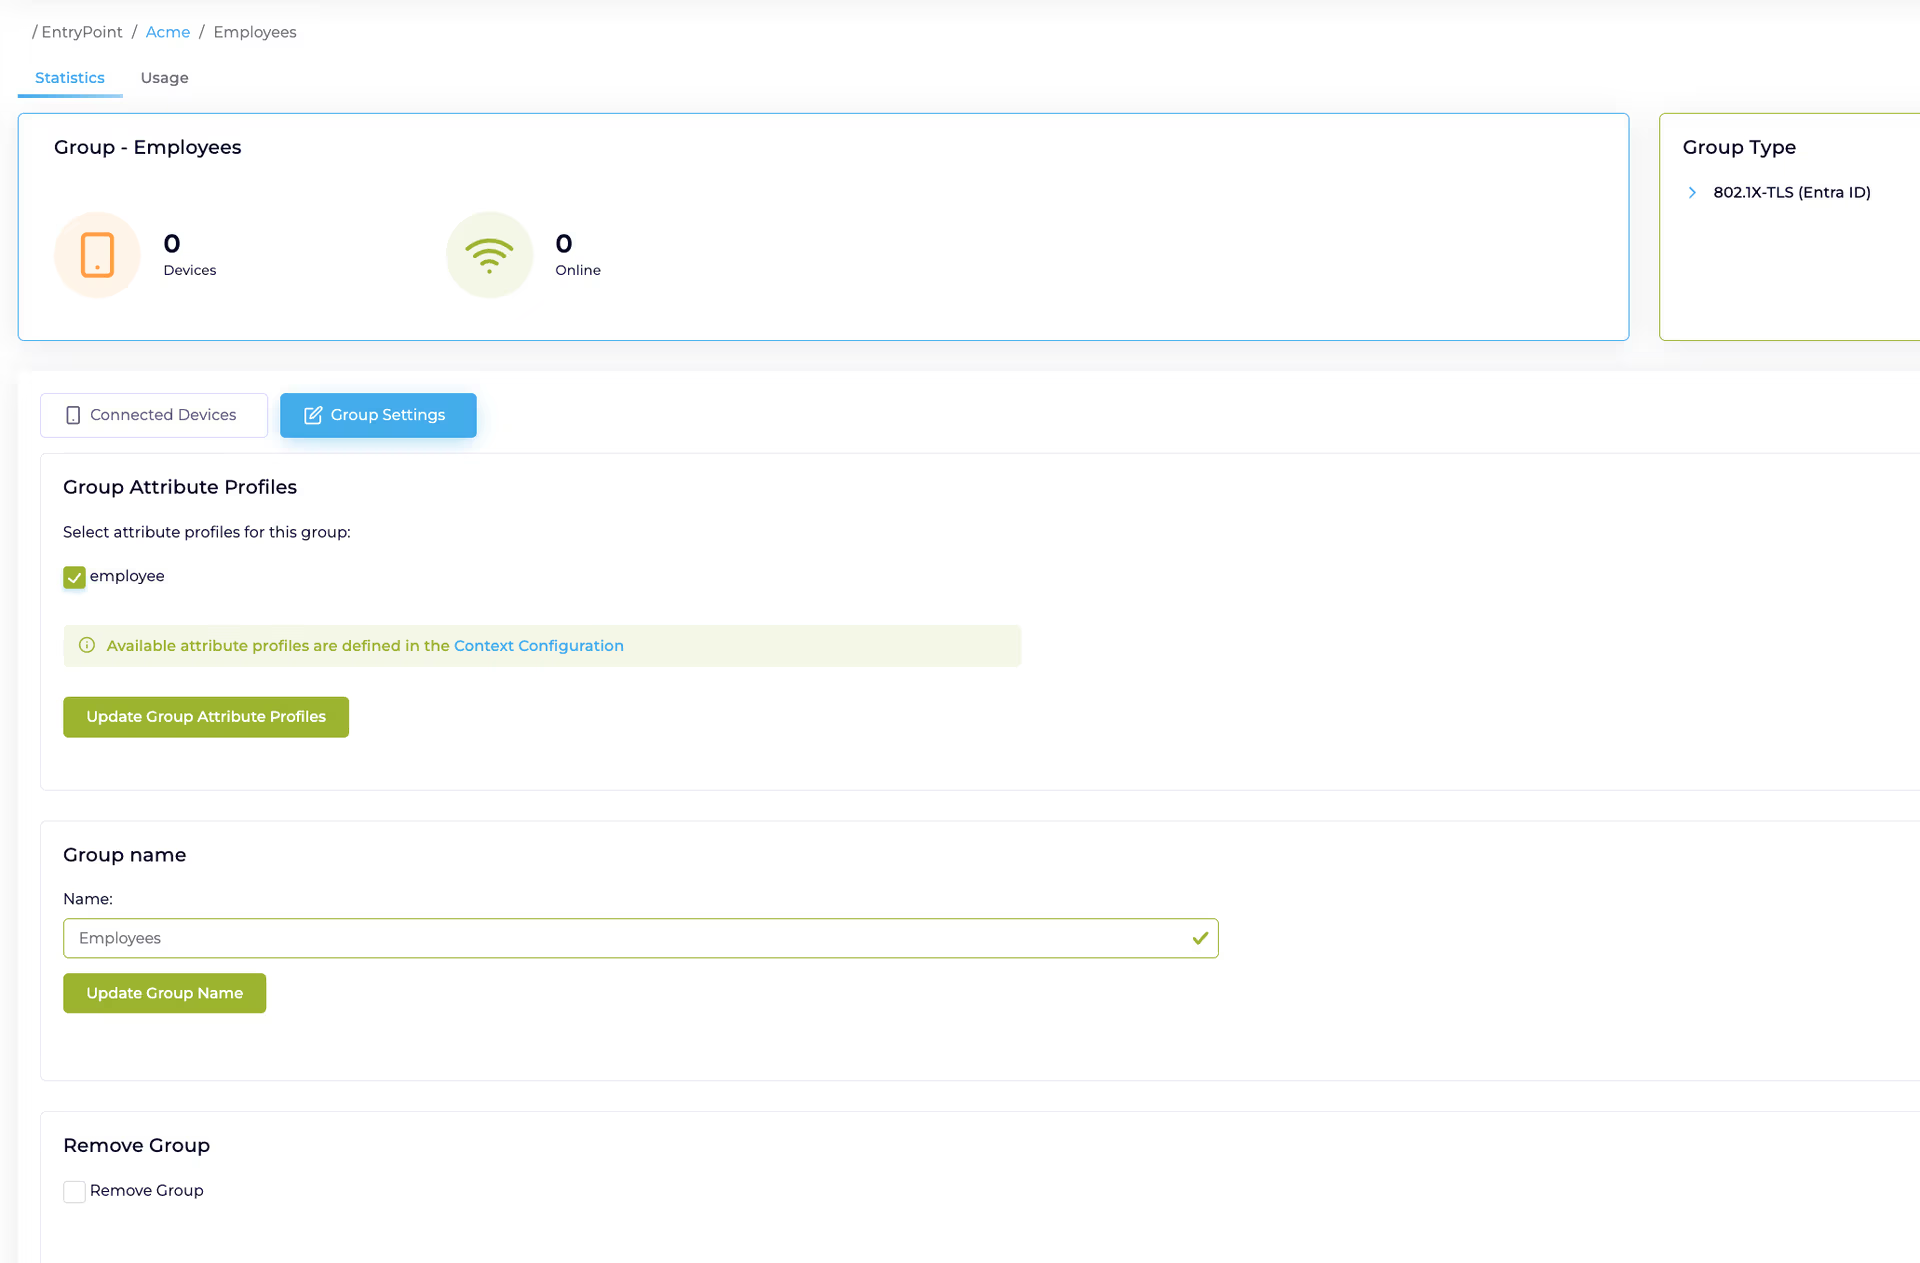
Group Settings
Section titled “Group Settings”On the Group Settings tab you can attach pre-configured Group Attribute Profiles, rename the Group, or remove it by clicking Remove Group.
Related
Section titled “Related”EAP-TLS with Entra overview
The concepts behind certificate-based 802.1X with Entra ID groups.
Entra group mapping
How one EntryPoint Group mirrors one Entra group.
Device certificates and Intune
Device-cert specifics and Device Compliance Check.
Trusted certificates
Uploading the CA chain the Context validates against.