
Managing Self-Service Users
Invite, promote, and revoke delegated administrators on a managed Endpoint Identity Group. Two roles, enrollment via email or SAML, per-group scope throughout.
Self-Service Users are the delegated administrators of Endpoint Manager — the people who actually add, update, and remove endpoints in a managed group from the Self-Service portal. This page covers the admin-side workflow for inviting, promoting, and revoking them.
For what a Self-Service User sees and does, see Self-Service portal.
The two roles, verbatim
Section titled “The two roles, verbatim”Every member of a managed group has User (default) at a minimum. On top of that they may additionally hold Group Administrator.
| Role label | Scope | Authority |
|---|---|---|
| User (default) | One group. | View/Add/Update/Remove devices in this Endpoint Identity Group. |
| Group Administrator | One group. | View/Add/Update/Remove Self-Service users for this group. |
Both labels are what the dialog shows verbatim. The authorities are copied verbatim from the Self-Service portal’s own help text, so admin and delegated-user sides use the same wording.
Scope is always one group. The same person can be a Group
Administrator on IP_Phones and a default user on
Digital_Signage; those are two separate Self-Service User
records.
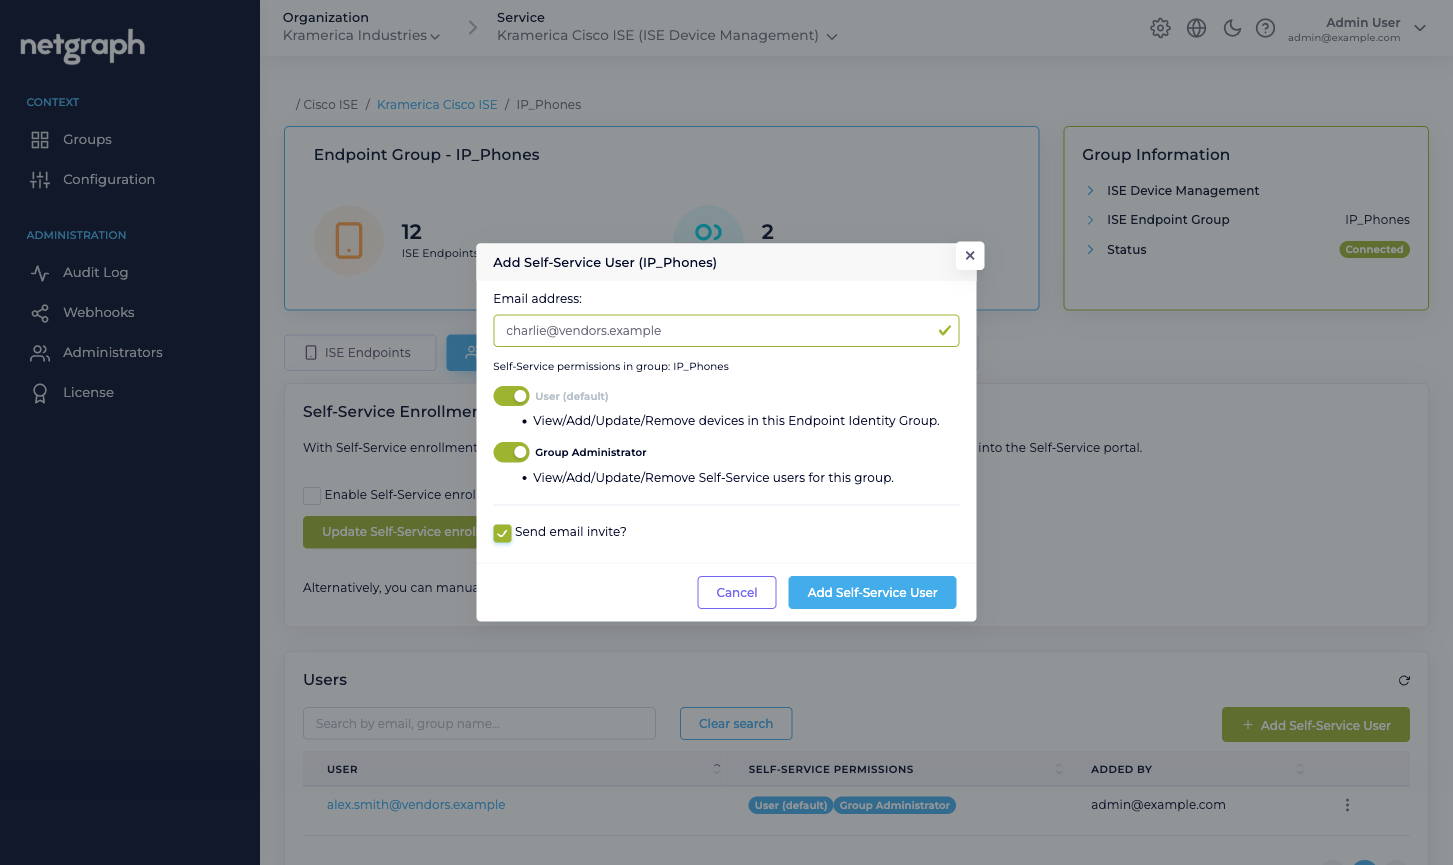
Inviting a Self-Service User
Section titled “Inviting a Self-Service User”Open the group’s Self-Service Users tab.
-
Click Add Self-Service User
Opens the Add Self-Service User (<group>) dialog.
-
Enter the Email address
This becomes the invitee’s sign-in identity — either for the email link they receive, or (if your Organization uses SAML for Self-Service authentication) for the SAML assertion matching.
-
Pick the permissions
User (default) is checked and disabled — it’s always on. Tick Group Administrator as well if this person should be able to manage other Self-Service Users on the group.
-
Choose whether to send an email invitation
Send email invite? is checked by default. Leave it on for typical invites. Uncheck it if the user will sign in via SAML — they don’t need the email.
-
Click Add Self-Service User
The row appears in the Users table.
The Users table
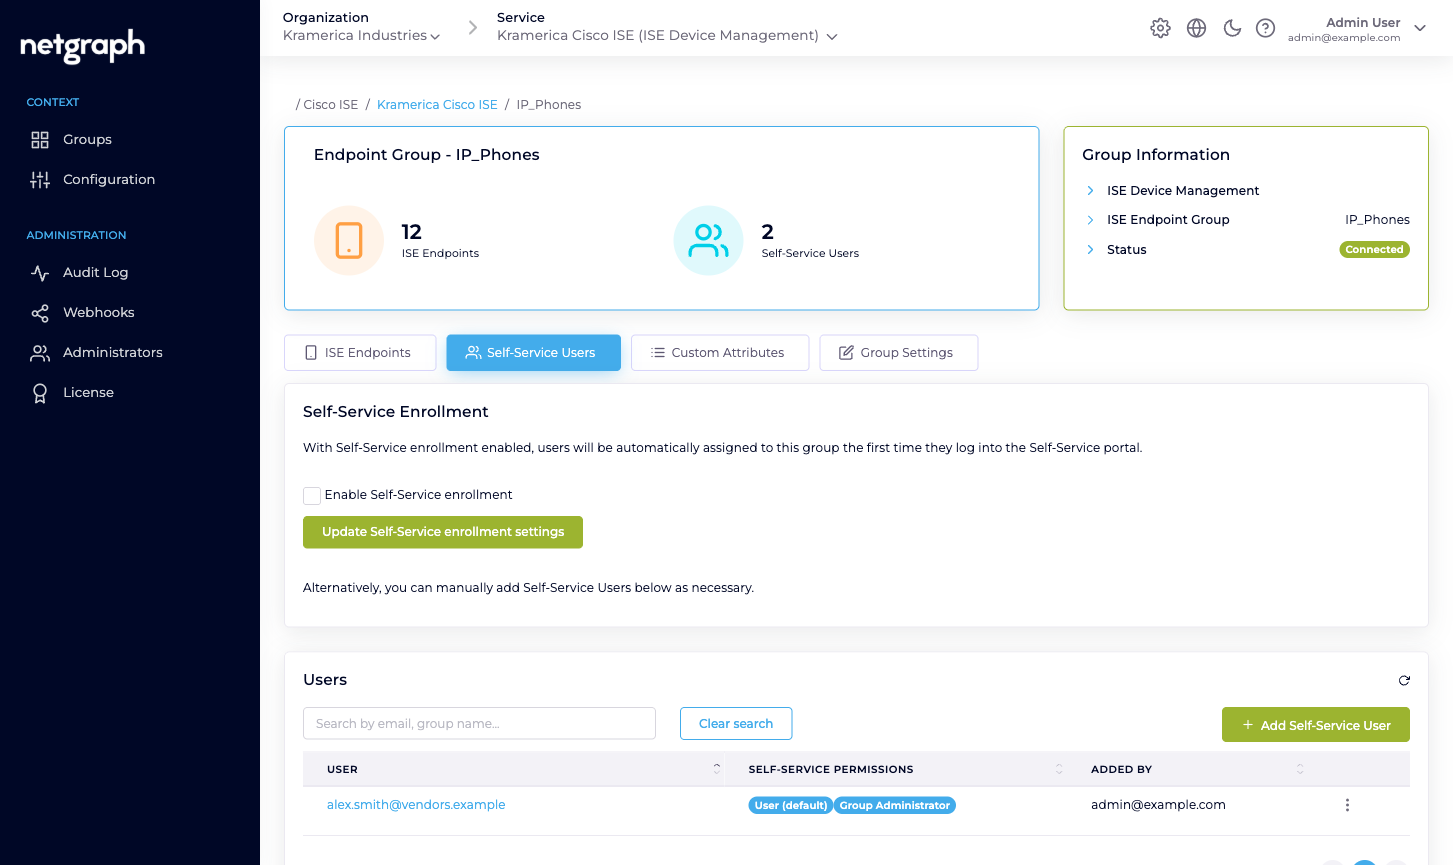
Section titled “The Users table”The table on the Self-Service Users tab has four columns:
- User — the email address they sign in with. Sortable. Click to open the user detail page.
- Self-Service Permissions — badges for the roles they hold (User (default) always; Group Administrator if promoted).
- Added by — either the Organization admin who added them manually, or a Self-Service Enrollment badge if they joined via SAML auto-enrollment on first login.
- Action — per-row menu:
- Resend Invitation — only relevant for manually-added users who haven’t yet signed in.
- Modify User — promote / demote, change scope.
- Remove <email> — revoke from this group.
Self-Service Enrollment — auto-provision via SAML
Section titled “Self-Service Enrollment — auto-provision via SAML”If your Organization has a SAML Identity Provider configured for Self-Service authentication (Organization SAML authentication), you can turn on Self-Service Enrollment per group. When enabled, any user who signs in to the Self-Service portal with a valid SAML assertion and matches the group’s enrollment rules is automatically added as a Self-Service User on that group on first login.
Auto-enrolled users receive whatever default role the group’s Self-Service Enrollment is configured for. User (default) is always granted; in addition, the admin can make Group Administrator a default enrollment role, in which case auto-enrolled users land with that role too. They get a Self-Service Enrollment badge in the Added-by column so you can tell them apart from manually-invited users. If a user only holds User (default) and later needs the Group Administrator role, promote them via Modify User.
Toggle Enable Self-Service enrollment on the Self-Service Users tab, choose the default roles for enrolling users, and save.
Modifying a Self-Service User
Section titled “Modifying a Self-Service User”From the row menu, pick Modify User. You can:
- Promote a User (default) to also hold Group Administrator.
- Demote a Group Administrator back to User (default) only (you can’t remove the default role — that’s built in).
There’s no way to change the email address of a Self-Service User; they are identified by email. Use remove-and-re-invite if someone’s email has changed.
Removing a Self-Service User
Section titled “Removing a Self-Service User”From the row menu, pick Remove <email>. A confirmation dialog names the user and the group, and warns:
You are about to remove the user <email> from the group <group>. This action will not impact any devices previously added by this user.
Confirm to revoke the user. Their Self-Service session on this group is terminated at the next request; if they were a Group Administrator, the Group Users card disappears from their portal view immediately.
Endpoints the user added are unaffected — Cisco ISE still holds them, the group still owns them, and the Added by field on each endpoint still records who added it. The endpoint- level history is preserved even after the person leaves.
Administrators vs Self-Service Users
Section titled “Administrators vs Self-Service Users”Don’t confuse two roles that sound similar but live in different places:
- Organization Administrators (under Administration → Administrators in the Context, and at the Organization level) are the people who operate the Admin Dashboard — configure the Context, approve Managed Attributes, define groups, review audits. See Organization Administrators.
- Self-Service Users (this page) are the delegated administrators who operate the Self-Service portal for one group.
They’re different accounts and different permission models. A person can be both — there’s nothing stopping you being an Organization admin and a Self-Service User on a group at the same time — but the two sign-in paths are independent.