
Endpoint Manager quickstart
From zero to one Endpoint Identity Group — connected to your Cisco ISE, with its Group Administrator invited to the Self-Service portal and the first endpoint added. About 25 minutes.
This quickstart takes an Organization from no Cisco ISE Context to one managed Endpoint Identity Group with a Group Administrator who can add their own endpoints from the Self-Service portal. Expect about 25 minutes, most of it spent on the one-time work of enabling the three ISE APIs on your deployment and minting the API user.
Warning
Before you start, prepare Cisco ISE. You need ERS, Open API and Monitoring (MnT) APIs enabled on the deployment, plus a dedicated API user with read/write permission on endpoints and endpoint identity groups. See Cisco ISE connection if you haven’t done that yet.
If a WAF, reverse proxy or API gateway sits in front of your ISE admin node, it must also allow every HTTP method Endpoint Manager uses: GET, POST, PUT, DELETE and HEAD. Method filtering that only permits GET and POST is a common reason endpoint updates and deletions fail even though the connection looks healthy. The exact calls, with method and path per operation, are listed in Requirements and prerequisites.
Before you begin
Section titled “Before you begin”You have administrator access to the Organization and the Admin Dashboard is open at the Services overview. You’ll also need:
- A Cisco ISE deployment reachable over HTTPS from the platform’s egress FQDN (you’ll see that FQDN during API Configuration).
- Any WAF or proxy in front of ISE configured to pass Endpoint Manager’s API calls, including the PUT and DELETE methods. See Requirements and prerequisites.
- An API username and password for that ISE.
- The email address of the first person you’ll appoint as a Group Administrator.
1. Add the ISE Device Management Context
Section titled “1. Add the ISE Device Management Context”-
Open the Add Service Context picker
From the Organization’s Services overview, click Add Service Context.
-
Pick ISE Device Management
Click the ISE Device Management card.
-
Name the Context
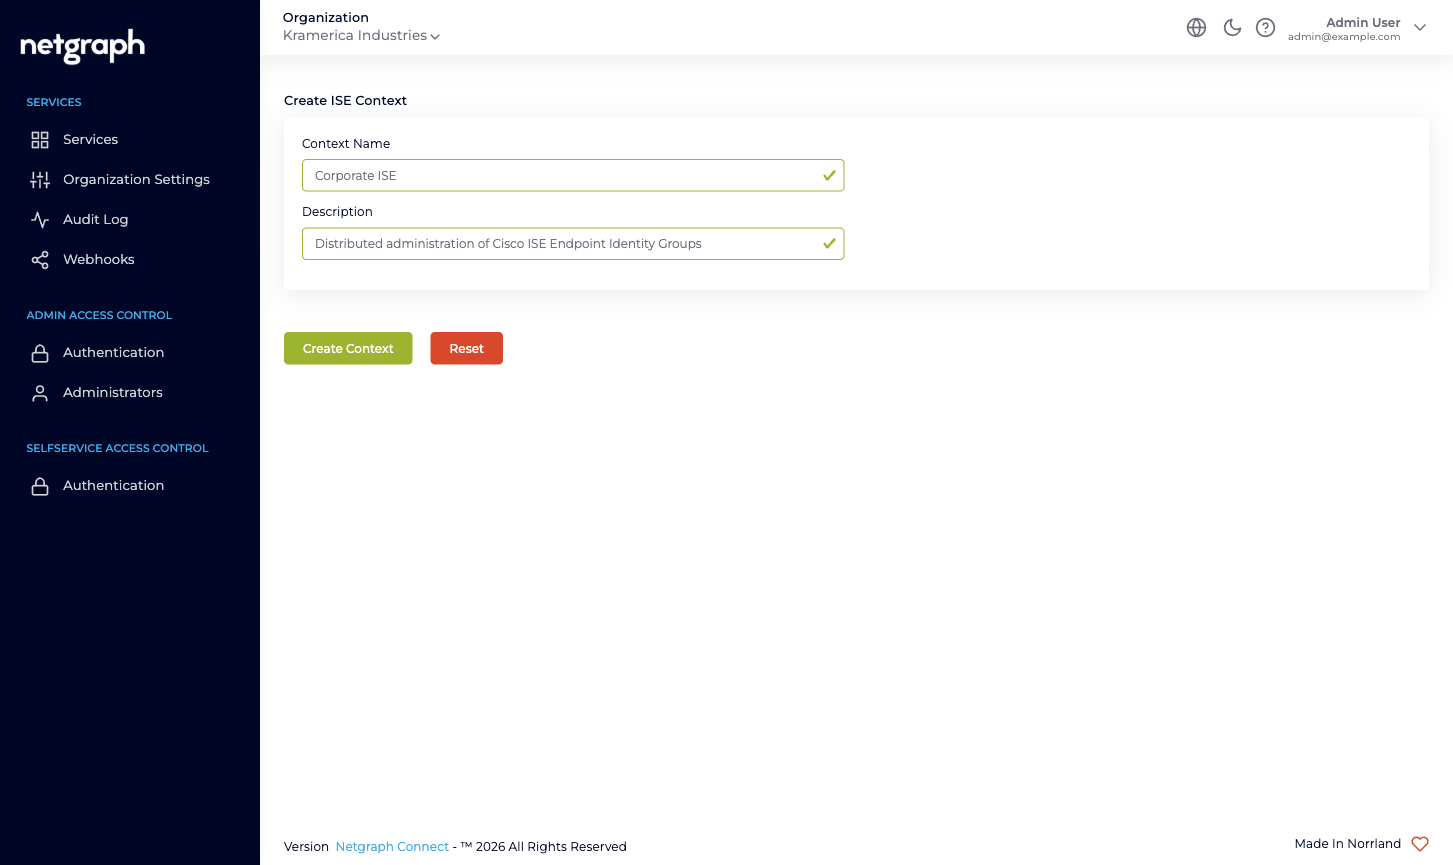
Enter a Context Name (3–20 alphanumeric characters — for example, Corporate ISE) and a short Description (3–200 characters). Click Create Context.
You’ll land on the new Context’s Configuration view with the API Configuration tab already selected.
2. Connect to Cisco ISE
Section titled “2. Connect to Cisco ISE”-
Note the egress FQDN
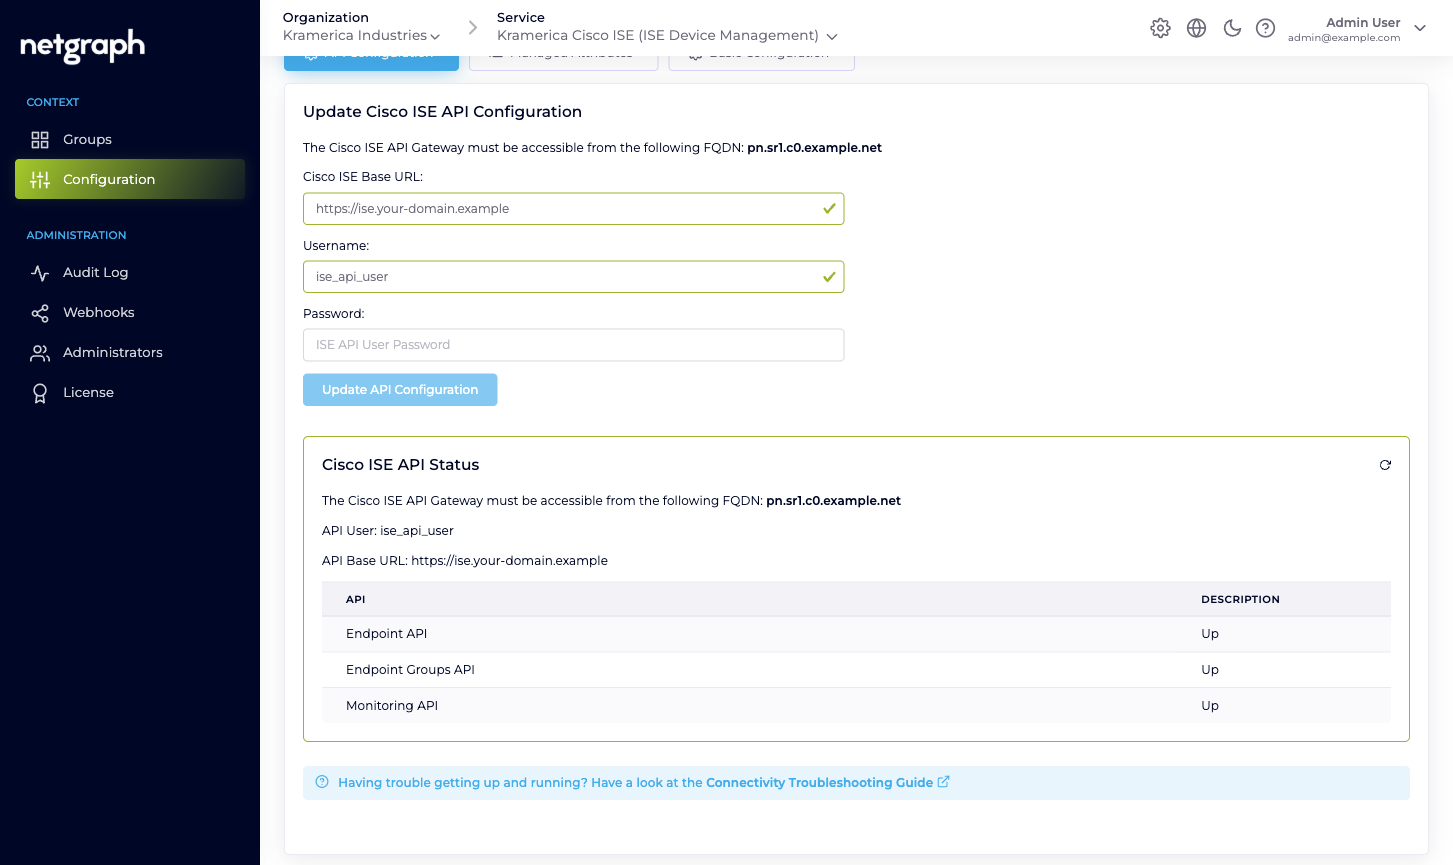
The API Configuration card shows the FQDN your Cisco ISE must accept connections from. Allow it through any firewall or ACL sitting in front of ISE before you paste credentials.
-
Enter the Cisco ISE Base URL
The HTTPS URL of your ISE deployment, for example
https://ise.your-domain.example. The platform will talk to this URL for all three API families (ERS, Open API, Monitoring). -
Enter the Username and Password
The credentials of the ISE API user you prepared.
-
Click Update API Configuration
The platform immediately exercises the credentials against all three API families and shows a Cisco ISE API Status table. All three rows — Endpoint API, Endpoint Groups API, Monitoring API — must read Up before the Context can manage groups. If one is down, fix the ISE-side API enablement or the API user’s permissions and retry.
3. Manage the first Endpoint Identity Group
Section titled “3. Manage the first Endpoint Identity Group”With the API Configuration verified, click Groups in the left navigation. The list shows every Endpoint Identity Group in your ISE — some of them already there, some you can create from this screen.
-
Click New ISE Endpoint Identity Group
The platform opens a dialog asking for a Name and Description. Enter the name you want in Cisco ISE — for example
IP_Phones— and a short description. Click Create new ISE Endpoint Group. -
Confirm it's Connected
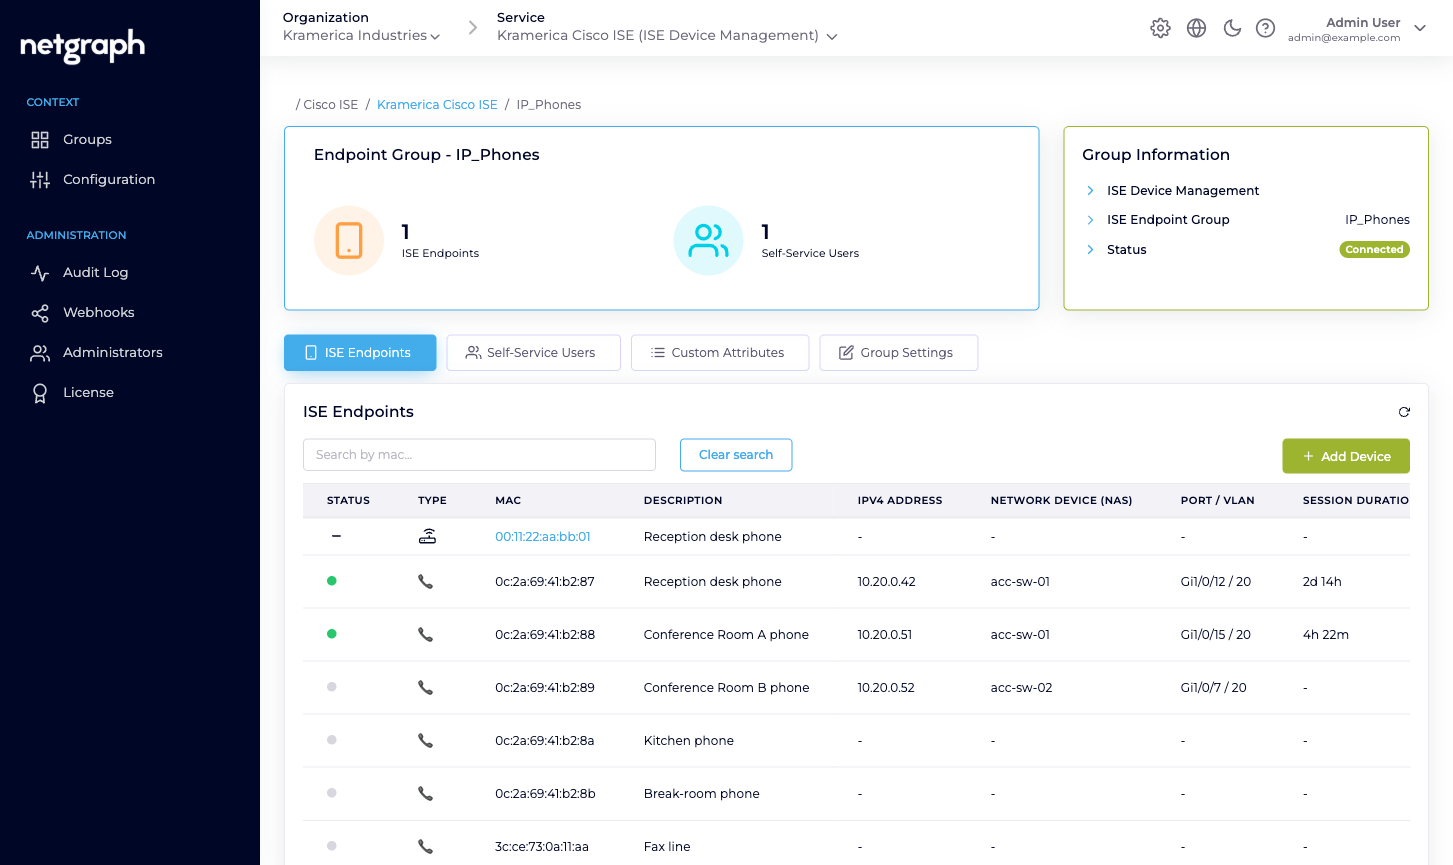
The platform creates the group in Cisco ISE and immediately brings it under managed administration. You’ll land on the new group’s detail view with Status: Connected in the Group Information card.
Tip
Already have the group in ISE? Go back to Groups, find it in the list, open its row, and click Connect this Group. That brings an existing ISE group under managed administration without duplicating it.
4. Invite the Group Administrator
Section titled “4. Invite the Group Administrator”-
Open the Self-Service Users tab
From the group’s detail view, click the Self-Service Users tab.
-
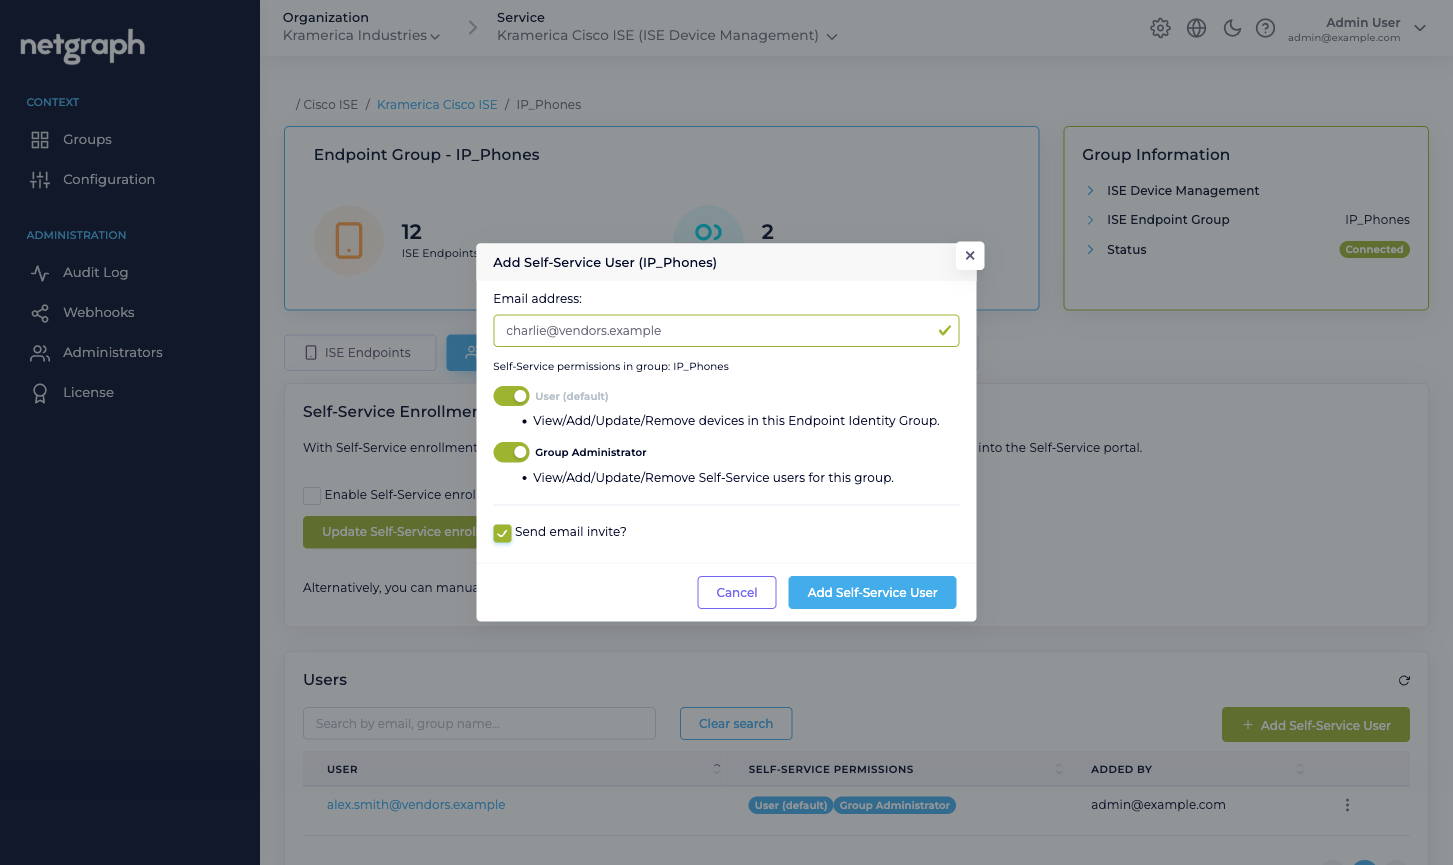
Click Add Self-Service User
Enter the delegated administrator’s Email address. Tick Group Administrator — the User (default) permission is always on and can’t be removed. Leave Send email invite? checked and click Add Self-Service User.
The invitee receives a Self-Service portal login email. When they click the link they land on their own group’s detail view, with Devices, Group Users, and Batch Add Devices cards to work from.
5. Add the first endpoint
Section titled “5. Add the first endpoint”From the Self-Service portal, the Group Administrator can add endpoints one at a time or upload a CSV. For the quickstart, one is enough:
-
Open Devices
On the Self-Service landing page, click the Devices card for the group.
-
Click Add Device
Enter the MAC address of the endpoint, a short Description (for example, Reception desk phone), and an optional Device type. Click Add Device.
Back on the admin side, under the group’s ISE Endpoints tab, the endpoint appears within moments. If the endpoint is online and its Cisco ISE session is live, you’ll see its NAS, port, VLAN, session duration and data usage here. If it’s offline, those columns show a dash until the endpoint next authenticates.