
Self-Service Portal authentication
The Self-Service Portal — used by EasyPSK for Cisco Networks residents, Sign-In Self-Service Users, conference hosts, and Endpoint Manager for Cisco ISE delegated administrators — supports two authentication methods: Email Magic Link (default, passwordless) and SAML 2.0. Each Service Context decides who is granted Self-Service access; this page configures only how those users sign in.
The Self-Service Portal is what your end users — residents managing a Wireless Personal Network, hosts running a conference, Endpoint Manager for Cisco ISE delegated administrators looking after one Endpoint Identity Group, Sign-In Self-Service Users managing whitelistings or conferences — sign in to.
Open Selfservice Access Control → Authentication in the Organization left navigation to see the two methods available and toggle each one on or off. The configuration here is shared by every Service Context’s Self-Service Portal.
Email Magic Link (default)
Section titled “Email Magic Link (default)”Passwordless sign-in via a one-click link the platform emails to the address the Self-Service User was invited under. Always on by default — the Email Magic Link card on the Authentication page shows Enabled with the toggle disabled.
The link is one-shot: click it, you land on the Self-Service Portal already authenticated, no password screen and no MFA prompt. The link’s validity period is set in Organization Settings → Self-Service Portal Settings as Mail Login Token Lifetime (default 300 seconds).
This is the right default for the kinds of audiences the Self-Service Portal serves: occasional users who don’t want to manage another password, who already prove control of their email through invitation, and whose access is already scoped tightly by each Service Context’s Self-Service User list.
SAML 2.0
Section titled “SAML 2.0”If your end users (residents, group administrators, conference hosts) are already in your enterprise IdP, federate the Self-Service Portal with SAML 2.0 so they get the same single sign-on experience they use for everything else.
Click Enable on the SAML 2.0 card to open the configuration page. The structure mirrors the Admin Portal SAML configuration in most respects, with two important differences highlighted below.
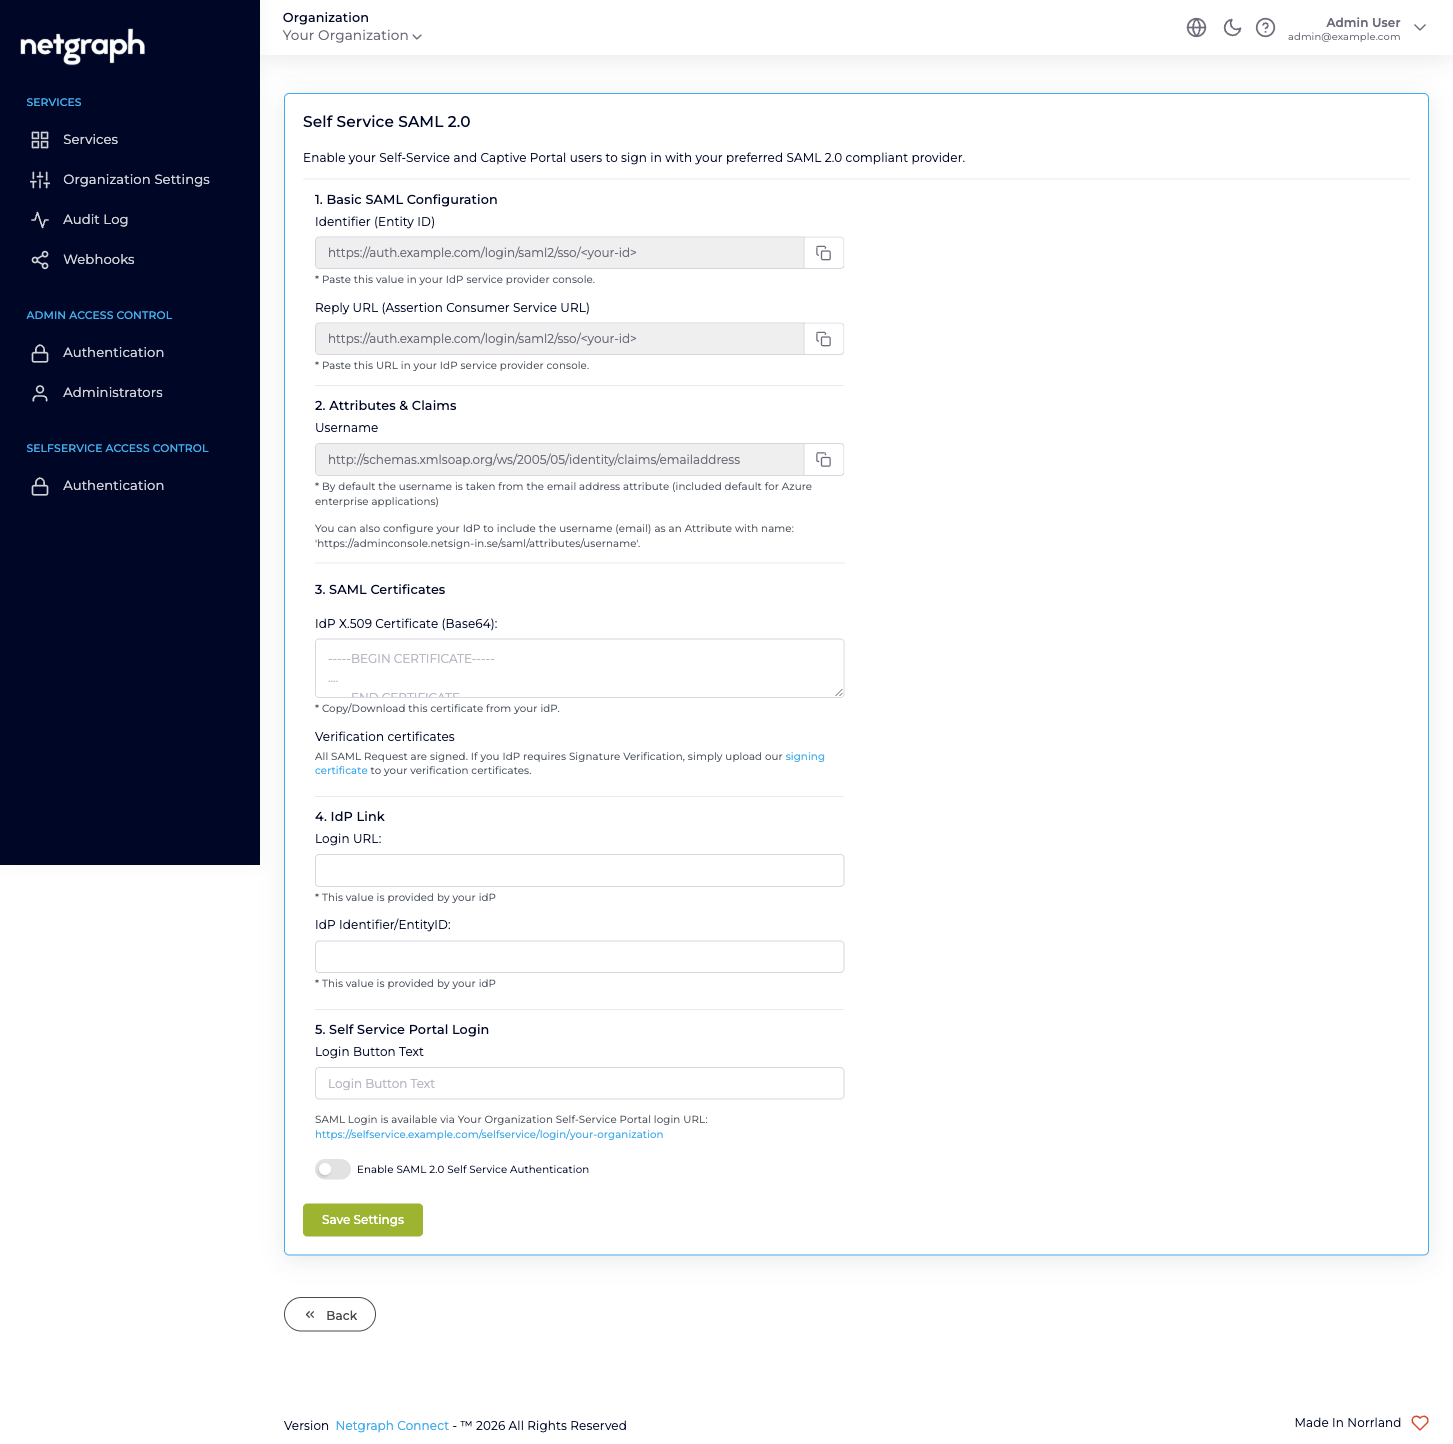
1. Basic SAML Configuration
Section titled “1. Basic SAML Configuration”Two read-only values, both copyable.
- Identifier (Entity ID). The platform-side Service Provider identifier for the Self-Service Portal target. The trailing hash is different from the Admin Portal’s; this is a separate SP.
- Reply URL (Assertion Consumer Service URL). The endpoint the IdP POSTs the assertion to. Same value as the Entity ID.
Paste these into your IdP. Most teams register the Self-Service Portal as a second SAML application in their IdP, separate from the Admin Portal application — same IdP, different SP.
2. Attributes & Claims
Section titled “2. Attributes & Claims”Same shape as the Admin Portal: the Username attribute defaults
to the standard email-address claim
(http://schemas.xmlsoap.org/ws/2005/05/identity/claims/emailaddress),
with an alternative attribute name (shown in the setup form)
available if your IdP can’t be re-configured.
The username the IdP returns must match an email that is a Self-Service User on at least one Service Context in your Organization. Authenticated users with no Self-Service User membership land on a sign-in error — SAML proves who they are, but the platform decides what they can see by looking at each Service Context’s Self-Service User list.
No Default Role Mapping
Section titled “No Default Role Mapping”The Self-Service Portal SAML configuration does not include a Default Role Mapping section, and that’s deliberate.
Self-Service Users don’t sit in one global permission catalog the way Organization administrators do. What a Self-Service User can do is decided per Service Context, and per resource within a Service Context:
- Inside a Sign-In Context, by an Access Policy that grants Self-Service Permissions (Manage Conferences, Manage Whitelistings).
- Inside an EasyPSK Context, by which Wireless Personal Networks the user has been invited to and what role they hold on each (User / Group Administrator).
- Inside an Endpoint Manager Context, by which Endpoint Identity Groups the user has been added to and what permission level (User (default) / Group Administrator).
SAML, here, is just a sign-in method. It doesn’t grant any permissions of its own — the per-Service permission model already does.
3. SAML Certificates
Section titled “3. SAML Certificates”Paste your IdP’s signing certificate (Base64 PEM format) into IdP X.509 Certificate (Base64). As with the Admin Portal configuration, the Verification certificates note offers the platform’s own signing certificate as a download for IdPs that require SP signature verification.
Warning
Rotating the IdP certificate while users are mid-session breaks the next round of authentications. Paste the new certificate before the old one expires; existing sessions are unaffected.
4. IdP Link
Section titled “4. IdP Link”The two IdP-provided values that close the trust:
- Login URL — the IdP endpoint the platform redirects to when a Self-Service Portal SAML sign-in starts.
- IdP Identifier/EntityID — the IdP’s identifier as it appears in the SAML Issuer field.
5. Self Service Portal Login
Section titled “5. Self Service Portal Login”Final controls before saving:
- Login Button Text. The label on the SAML sign-in button on the Self-Service Portal sign-in page.
- Self-Service Portal Login URL. A read-only link showing the Self-Service Portal sign-in page for your Organization. Bookmark it; share it; bake it into the welcome emails your operations team sends to new Self-Service Users.
- Enable SAML 2.0 Self Service Authentication. The toggle that activates SAML for end users. Until this is ticked, the configuration is saved but never used.
Click Save Settings.
Running both methods at the same time
Section titled “Running both methods at the same time”Email Magic Link and SAML 2.0 can be enabled together. When both are on, the Self-Service Portal sign-in page presents both options to the user. Email Magic Link continues to work for any Self-Service User regardless of whether they are in your IdP; SAML works for users who are.
This is the gentlest migration path: enable SAML alongside the default magic link, communicate the new option to Self-Service Users, and only disable the magic link once you’ve confirmed every end user is reachable through your IdP.
What this configuration is not
Section titled “What this configuration is not”- Not the place to grant Self-Service access. Inviting a resident to a Wireless Personal Network, a delegated admin to an Endpoint Identity Group, or a host to a conference is done inside each Service Context’s own Self-Service Users tab. SAML here only changes how they sign in once they’ve been invited.
- Not shared with the Admin Portal. Configuring SAML for the Self-Service Portal does not federate the Admin Portal. See Admin Portal authentication for that — it’s a separate SP endpoint, separate IdP application.
Note
Also used by the Captive Portal SAML Sign-In Module. Sign-In Contexts that publish a SAML Login Module on a Captive Portal reuse this Self-Service Portal SAML configuration as the underlying federation. If you change the certificate or IdP URL here, the Sign-In Module’s SAML logins follow. See Sign In SAML SSO module.