
Managing Applications
Create API keys on the Applications page and manage their API permissions, IP access lists, tokens and audit.
Applications is under Admin Access Control → Applications in the Organization left navigation. Creating and managing API keys requires the Organization Owner role. See Who can manage API keys.
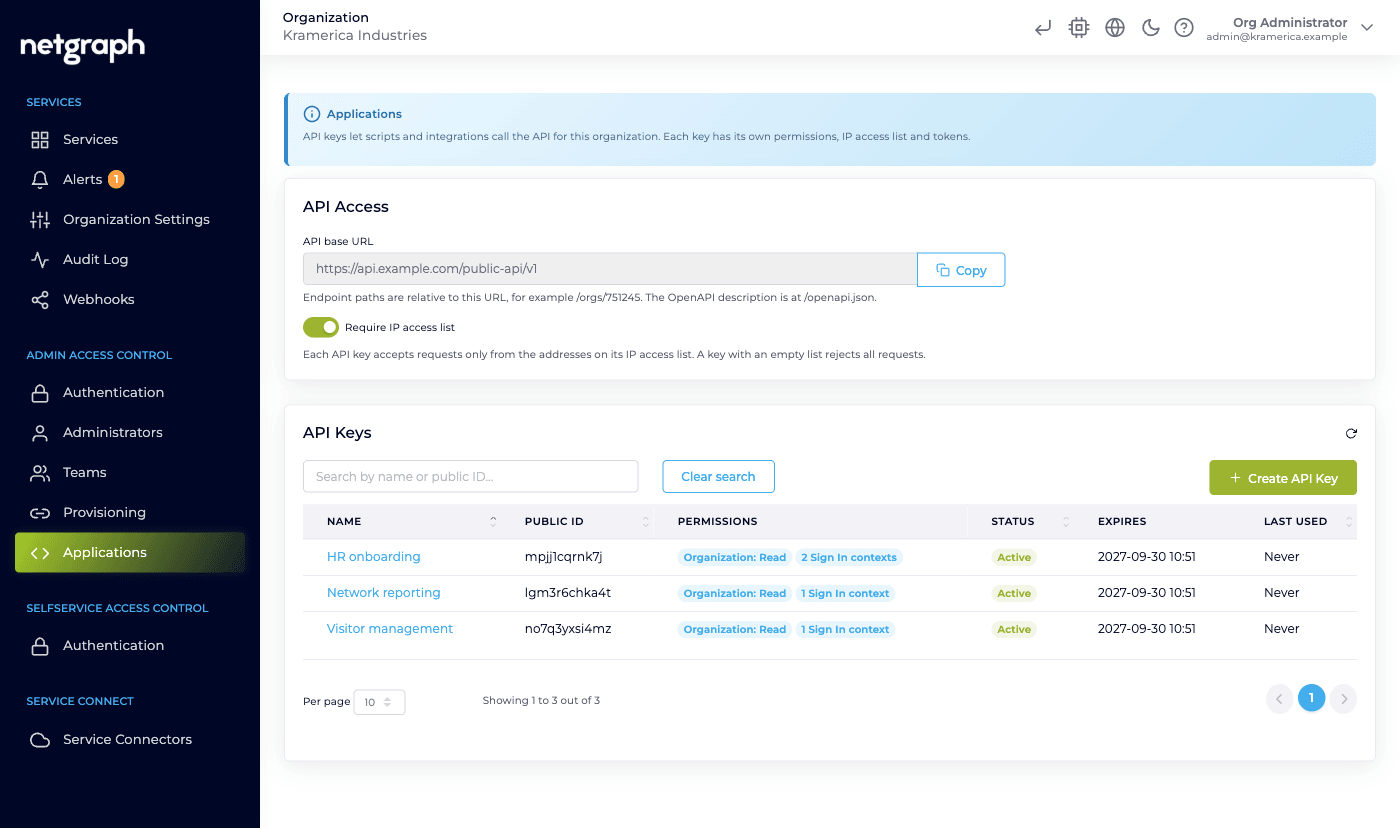
Applications page
Section titled “Applications page”The API Access card applies to every API key of the Organization:
- API base URL is the address every request path is relative to. Copy copies it. The hint under the field shows the path of your Organization and the location of the OpenAPI document.
- Require IP access list is on by default. Each API key then accepts requests only from the addresses on its own IP access list. See IP access list.
The API Keys card lists the API keys. Search by name or public ID.
| Column | Description |
|---|---|
| Name | The name of the API key. Click it to open API key details. |
| Public ID | The identifier of the API key. Every token of the API key starts with ncp_ followed by this ID. |
| Permissions | The Organization permission, All Sign In contexts when the API key has Sign In permissions in every Sign-In Context, and the number of Sign-In Contexts with levels of their own. Hover over a badge for the details. No access when the API key holds no permissions. |
| Status | Active or Disabled. |
| Expires | When the last valid token of the API key expires, or Never. A badge appears 30 days before expiry. |
| Last used | When a request last used the API key. |
Create an API key
Section titled “Create an API key”-
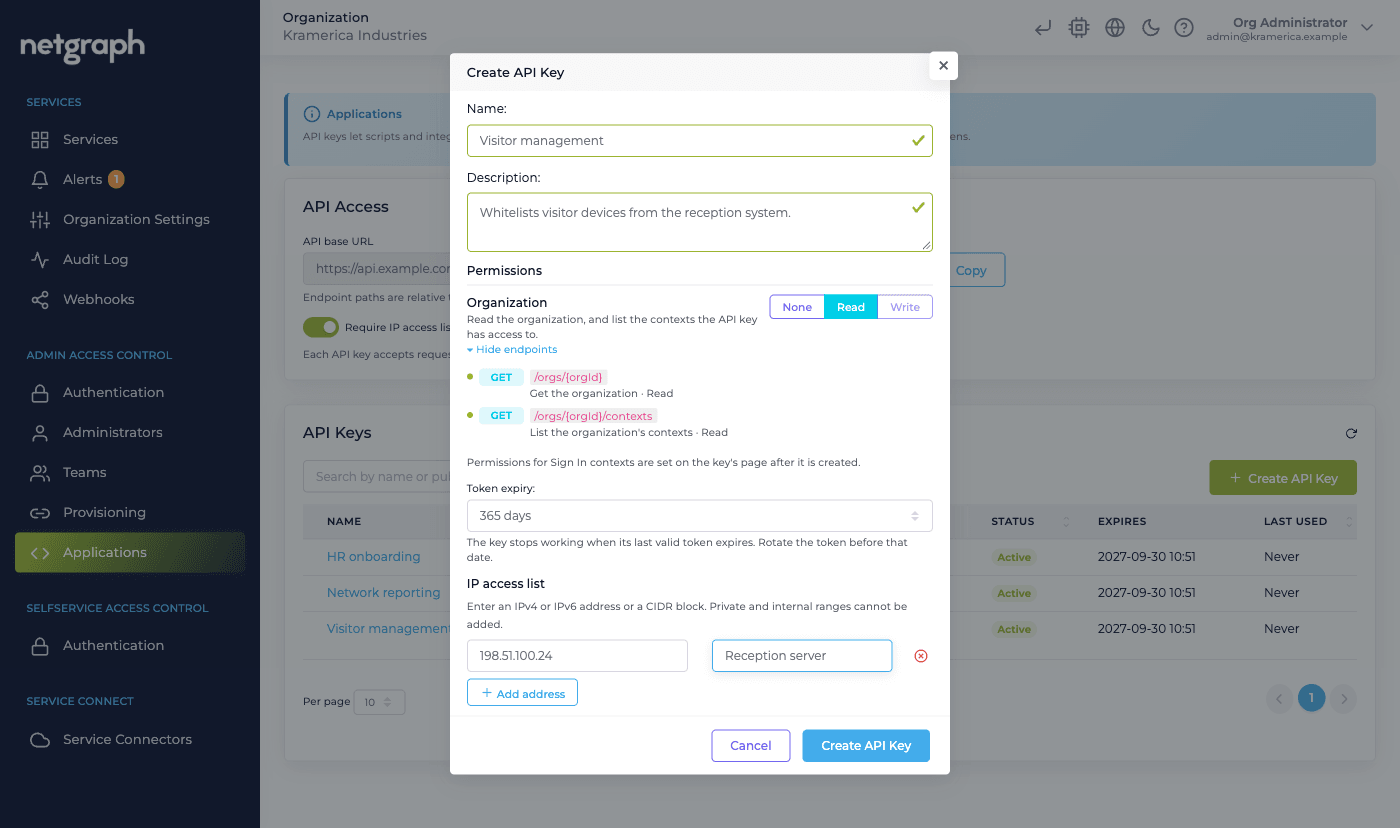
Open the form
In the API Keys card, click Create API Key.
-
Name the API key
Enter a Name that identifies the integration, for example Visitor management. The name can be up to 100 characters and cannot have the form of an email address. Description is optional.
-
Set the permissions
Under Organization permissions, set Organization to Read if the integration reads the Organization or lists its contexts. Under Sign In permissions, set the level of each Sign In API, then choose the contexts under 2. Contexts: All Sign In contexts, including new ones or Selected contexts. Nothing is preselected. See API permissions.
-
Choose the token expiry
Under Token expiry, keep No expiry, the default, or choose 30, 90, 180 or 365 days.
-
Add the addresses of the integration
Under IP access list, click Add address and enter the public address or CIDR block the integration sends requests from, with an optional comment. Addresses can also be added later.
-
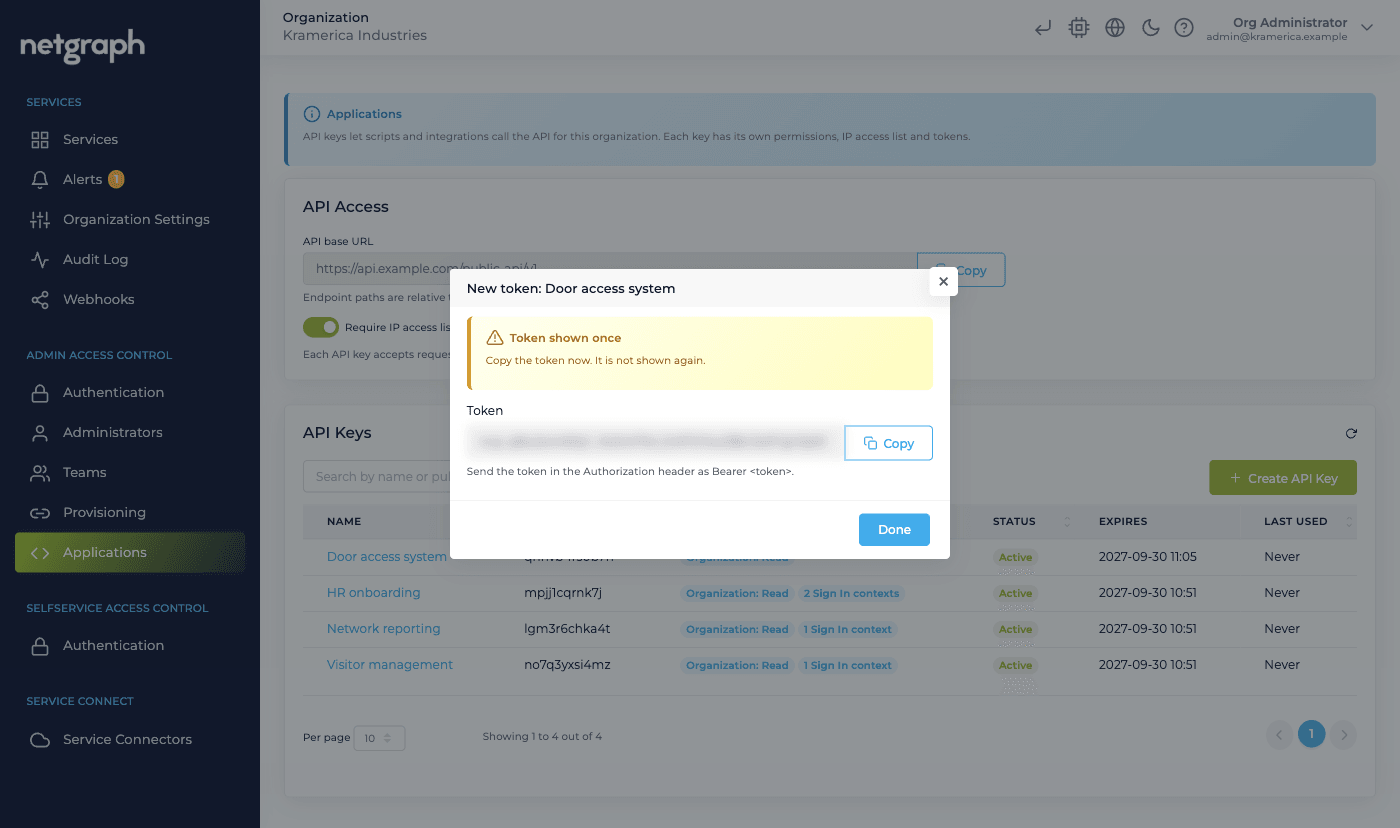
Create the API key and copy the token
Click Create API Key. In the New token dialog, click Copy, store the token in the secret store of the integration, and click Done. The token is shown only once. To issue a new one, rotate the token.
An Organization can have up to 100 API keys.
API key details
Section titled “API key details”Click the name of an API key to open API key details: the public ID, the description, the creator and the last use, and the Permissions, IP Access List and Tokens cards.
- Edit changes the name and the description.
- Disable and Enable switch the API key off and on. See Disable or delete an API key.
- Delete API Key deletes the API key.
API permissions
Section titled “API permissions”An API key does not hold roles. It holds API permissions: a level for each API it may use, for example:
| API | Set for | Allows |
|---|---|---|
| Organization | The Organization | Reading the Organization and listing the contexts where the API key has access. |
| Sign In › Access Policies | All Sign-In Contexts or selected ones | Read: reading the access policies. Write: also creating, updating and deleting them and changing their email patterns. |
| Sign In › Sign In Modules › Whitelisting | All Sign-In Contexts or selected ones | Read: reading the active whitelistings, and any whitelisting by its ID. Write: also creating, updating and ending them. |
- None: no access.
- Read: the read operations of the API.
- Write: also the operations that make changes. Write includes Read. Some APIs offer Read only.
The Permissions card of API key details has the Organization permission at the top and, under Sign In, the Sign In permissions in two steps:
- APIs: the level of each Sign In API.
- Contexts: where the levels apply.
- All Sign In contexts, including new ones: every Sign-In Context of the Organization, also contexts created or moved to the Organization later.
- Selected contexts: only the contexts selected in the list.
Set the levels, then click Save permissions. Discard changes restores the saved levels.
API base URL at the top of the Permissions card has a Copy
button. The endpoints listed under each API are relative to it, with
the IDs filled in, for example /organizations/<Organization ID>/contexts/sign-in/<context ID>/whitelistings.
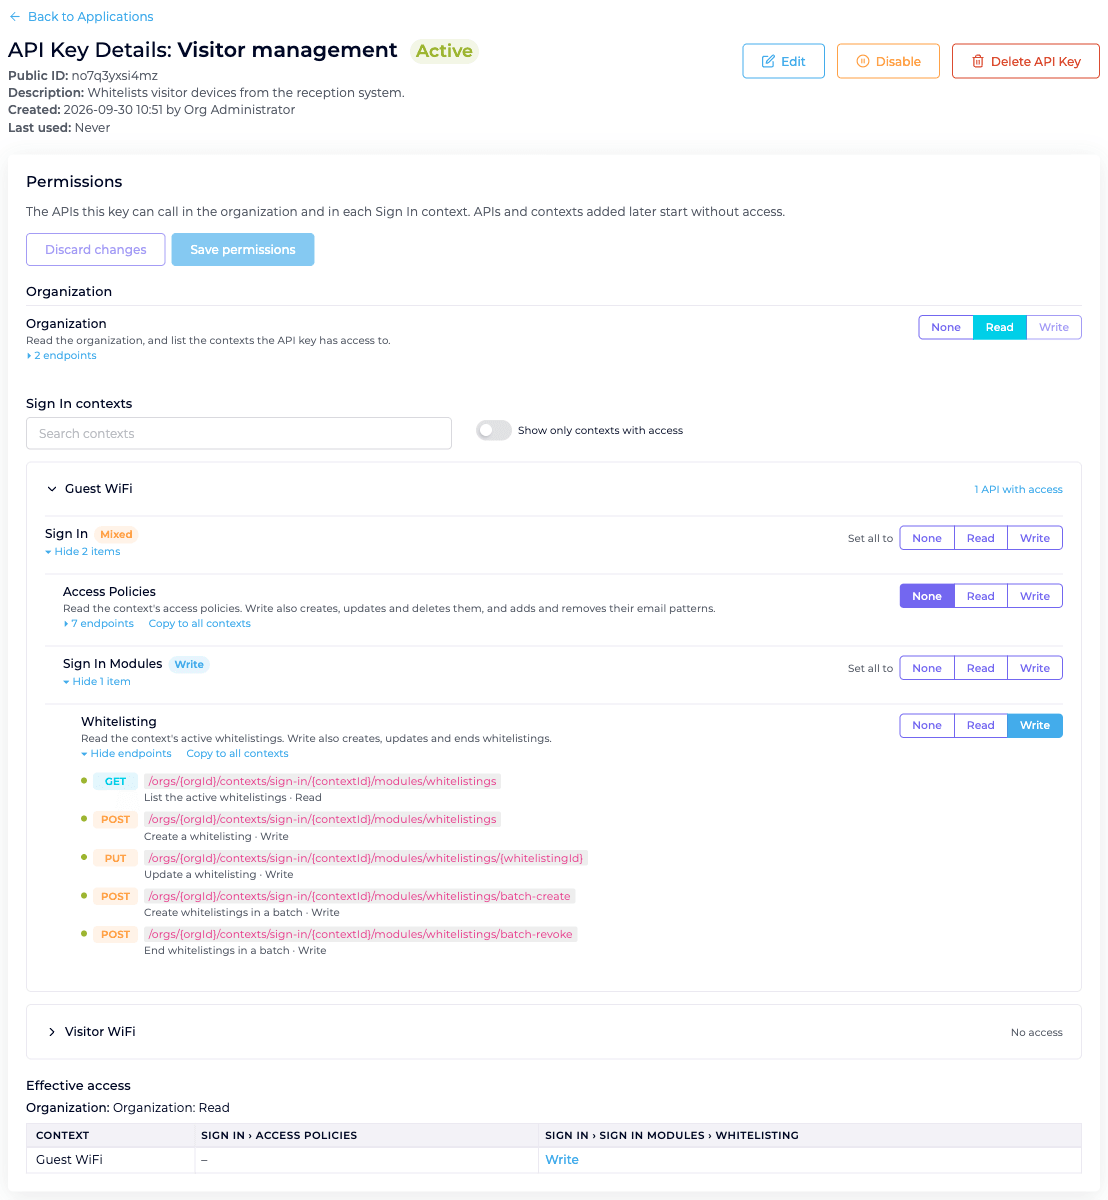
- Customize gives one context levels of its own. A customized
context has the Customized badge.
- With All Sign In contexts, the higher level applies in that context. Remove customization removes the levels of the context.
- With Selected contexts, the context uses its own levels instead of the levels in step 1. Use the levels above removes them.
- Set all to sets every API in a group to the same level.
- Effective access shows what the API key can do in each context, including unsaved changes.
- All Sign In contexts with Write and a token without expiry shows the Token without expiry warning. Choose an expiry when you rotate the token, or limit the API key to selected contexts.
- An API added later starts at None for every API key.
- A moved context gets the access of every API key with All Sign In contexts in its new Organization as soon as it arrives, and the API keys of the previous Organization lose their access to it. The move preview gives the number of API keys on each side.
- Permissions are limited by your own access. You can grant a level only if your administrator role gives you the same access, in the same context. All Sign In contexts requires that access for the whole Organization, for example through the Organization Owner role; owning every current Sign-In Context is not enough. Lowering or removing a permission is always allowed.
- Tokens are limited the same way. Rotating a token, enabling a disabled API key and changing its IP access list require that you could grant every permission the API key holds, in every context. Require IP access list is not limited this way: it applies to every API key of the Organization.
Set permissions from a Sign-In Context
Section titled “Set permissions from a Sign-In Context”The administrators of a Sign-In Context can set the permissions of an API key in that context. Open the Sign-In Context, go to Administrators and open the Applications tab.
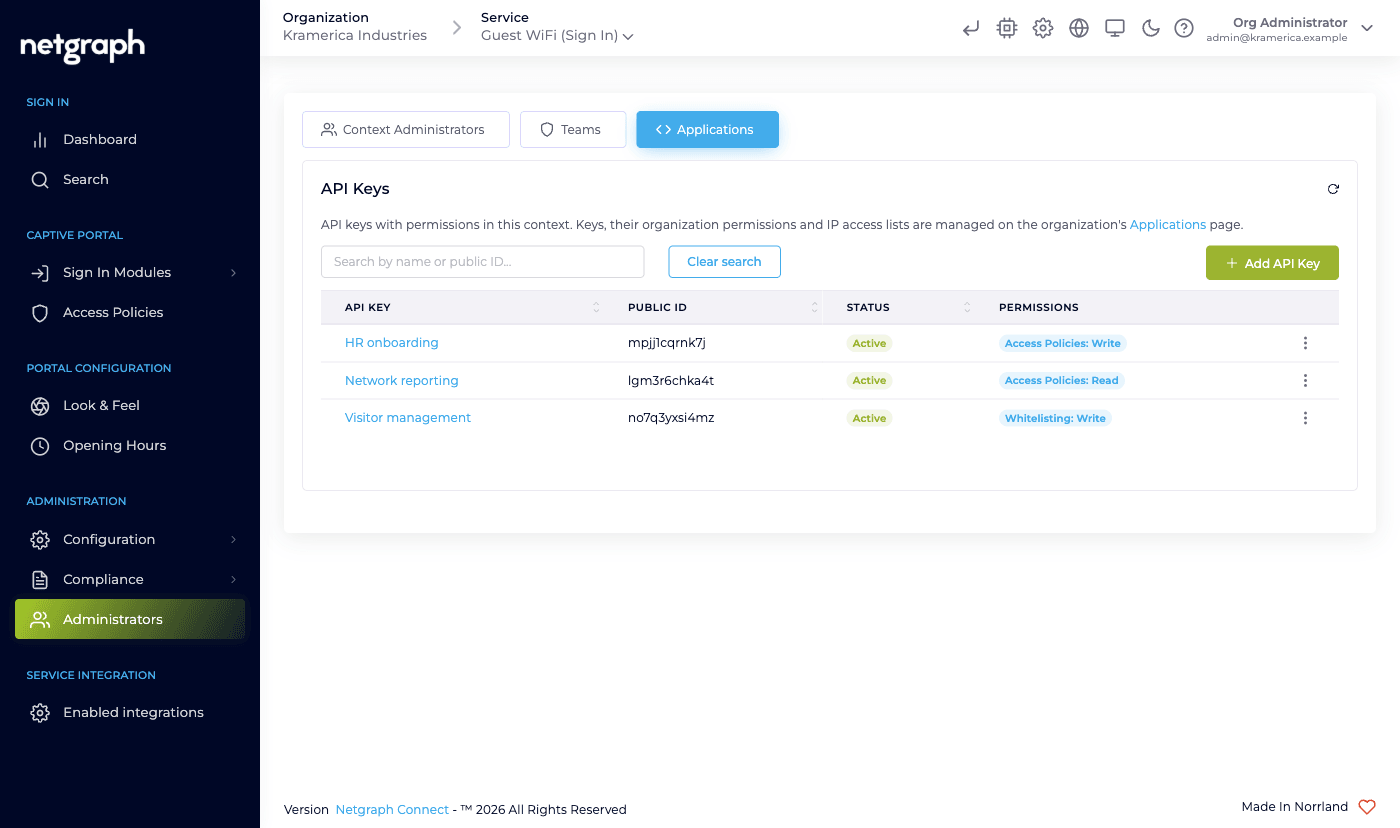
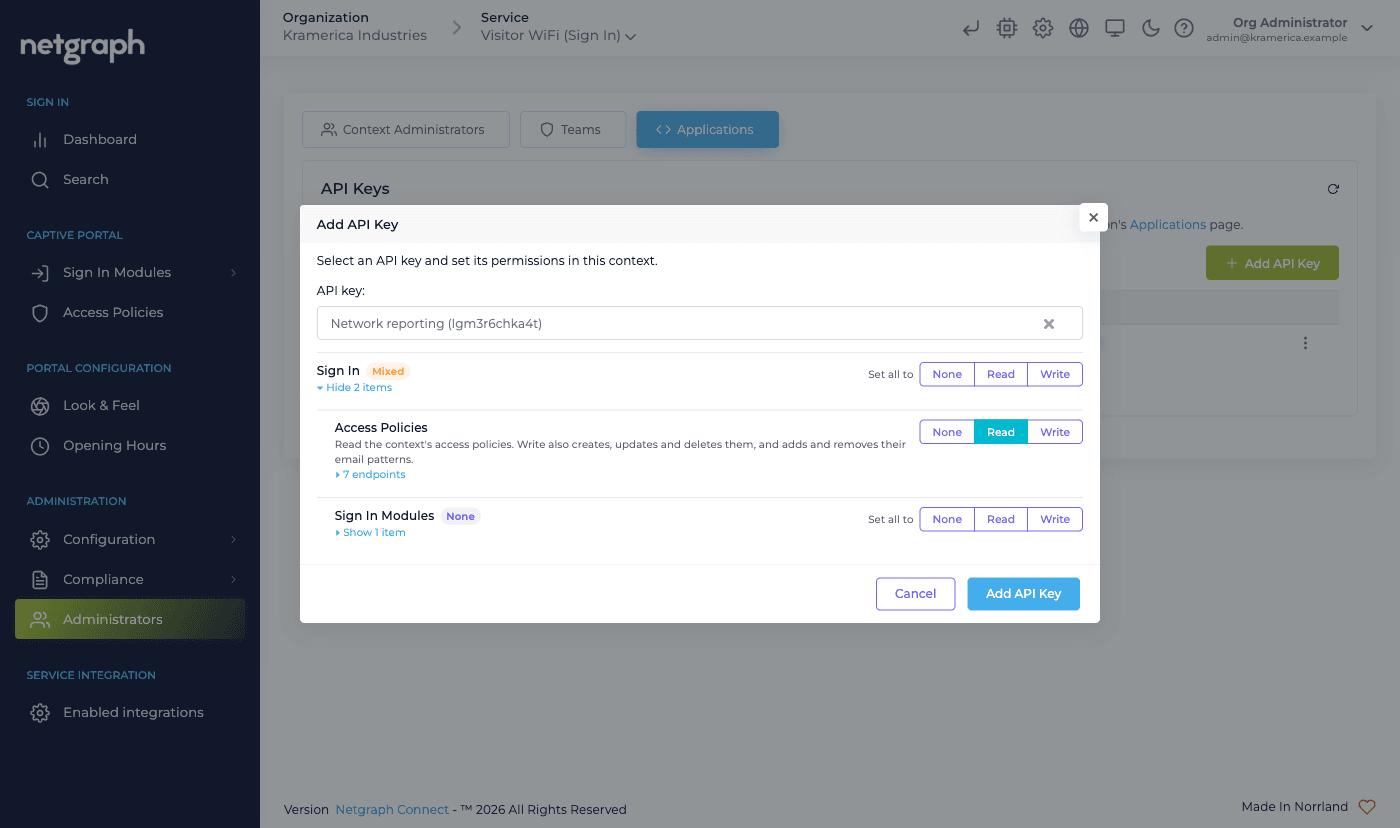
- Add API Key gives one of the API keys of the Organization access to this context. Select the API key, set its levels and click Add API Key.
- Modify, in the row menu, changes the levels of the API key in this context.
- Remove access, in the row menu, removes the levels set in this context. The API key itself is not deleted.
- A level marked All contexts is granted for every Sign-In Context on the Applications page of the Organization and is changed there only. A higher level set in this context applies instead.
API keys are created only on the Applications page of the Organization. Other Service Contexts show No APIs for this context type: API keys work only in Sign-In Contexts.
IP access list
Section titled “IP access list”The IP Access List card of API key details lists the addresses the API key accepts requests from. Add an address or a CIDR block with an optional comment, or click Remove. A change applies from the next request. Changing the list requires that you could grant every permission the API key holds; see API permissions.
Whether a request is accepted depends on the list and on Require IP access list in the API Access card:
| IP access list | Require IP access list on | Require IP access list off |
|---|---|---|
| Has entries | Only the listed addresses | Only the listed addresses |
| Empty | No requests | Any address |
- Enter the public address the requests of the integration come from, as seen from the internet.
- Private and internal ranges,
0.0.0.0/0and::/0are not accepted. - An IPv4 entry does not match a request over IPv6. If the integration uses both, add both.
- The list holds up to 50 entries.
A request from an address that is not on the list returns 403 with
the error code IP_ADDRESS_NOT_ON_ACCESS_LIST. The error names the
address the request came from.
Rotate a token
Section titled “Rotate a token”-
Click Rotate token
In the Tokens card of API key details, click Rotate token.
-
Choose the expiry and the overlap period
New token expires after offers the same choices as Token expiry at creation. Overlap period is the number of days the current token remains valid, 0 to 7. With 0 days, the current token stops working immediately.
-
Copy the new token
Click Rotate token, copy the new token and click Done. Update the integration before the overlap period ends.
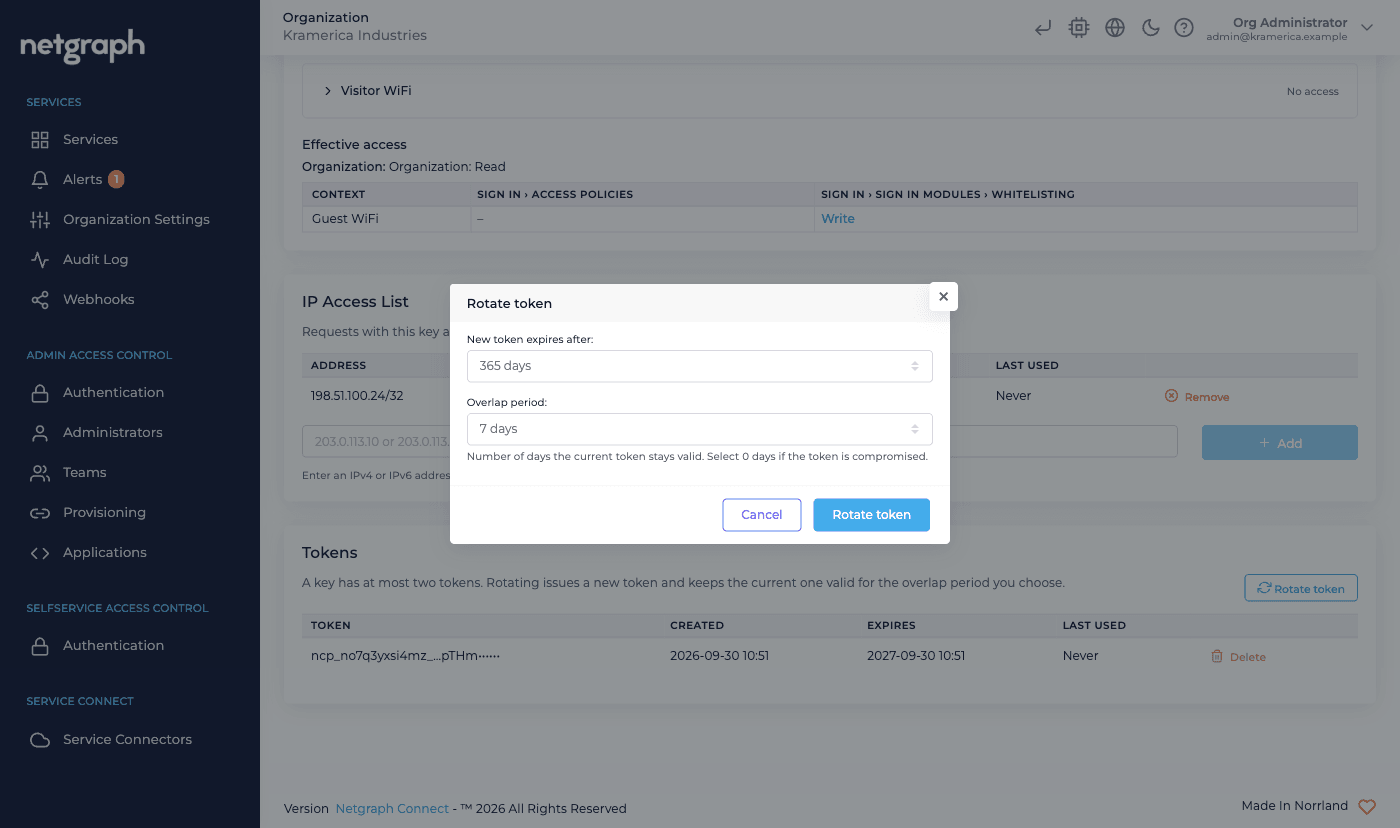
During the overlap period both tokens are valid. An API key holds at most two tokens. If it already has two, the oldest is deleted when the new one is issued, and the dialog shows a warning. The Tokens table shows each token masked, with its expiry and when it was last used. Delete deletes a token immediately. The last valid token cannot be deleted; rotate the token first. Rotating a token requires that you could grant every permission the API key holds; see API permissions.
Disable or delete an API key
Section titled “Disable or delete an API key”- Disable rejects every request with the API key until Enable is clicked. The permissions, the IP access list and the tokens are kept. Enabling the API key requires that you could grant every permission it holds; see API permissions.
- Delete API Key deletes the API key and all its permissions permanently. Requests with its tokens are rejected immediately.
Who can manage API keys
Section titled “Who can manage API keys”| Action | Roles |
|---|---|
| View API keys, their permissions, IP access lists and tokens | Organization Member, Organization Context Manager and Organization Owner |
| Create, edit, disable and delete API keys, rotate tokens, change IP access lists and Require IP access list | Organization Owner |
| Set the permissions of an API key in one context | The owner role of the context, such as Sign-In Context Owner, and Organization Context Manager and Organization Owner |
An API key belongs to the Organization, not to the administrator who created it, and keeps working when that administrator leaves.
API keys and the Legacy API key
Section titled “API keys and the Legacy API key”A Sign-In Context that uses the legacy Sign In API has a Legacy API key, under Legacy API access in its Common Settings. It works only with the legacy Sign In API. The legacy API can be turned off there, but not turned on for a context that does not use it. Other contexts show API access with a link to Applications. The API keys on the Applications page work with the Platform API.
What’s audited from this page
Section titled “What’s audited from this page”Every change to an API key is recorded in the
Audit Log: creating,
editing, disabling, enabling and deleting an API key, changing its
permissions or IP access list, rotating or deleting a token, and
changing Require IP access list. A permission change shows the
levels before and after, for example All Sign In contexts, including new ones: Sign In / Sign In Modules / Whitelisting: WRITE. Tokens
never appear in the log.
Changes made through the API are recorded as well, with the API key as
the User: apikey: followed by the public ID of the API key. Enter
apikey: in the User filter to list them.
Related pages
Section titled “Related pages”- Platform API: base URL, IDs, request format and the APIs.
- Authentication: the bearer token, API permissions and the IP access list.
- Organization API: read the Organization and list its contexts.
- Sign In API: access policies and whitelistings.
- Administrator roles: what each role grants.